 Hogwarts
IBOutlet 은 어떻게 forEach 를 돌릴 수 있을까?
IBOutlet 과 collection, 그리고 instance member 와 property initializer
1. IBOutlet 을 forEach 를 이용해 반복문을 돌려보자 🥸
High order functions을 주로 JavaScript, TypeScript 를 통해 다뤄봤던 내가 처음 생각했던 방법은 다음과 같았다.
import UIKit
class ViewController: UIViewController {
@IBOutlet weak var storyLabel: UILabel!
@IBOutlet weak var choice1Button: UIButton!
@IBOutlet weak var choice2Button: UIButton!
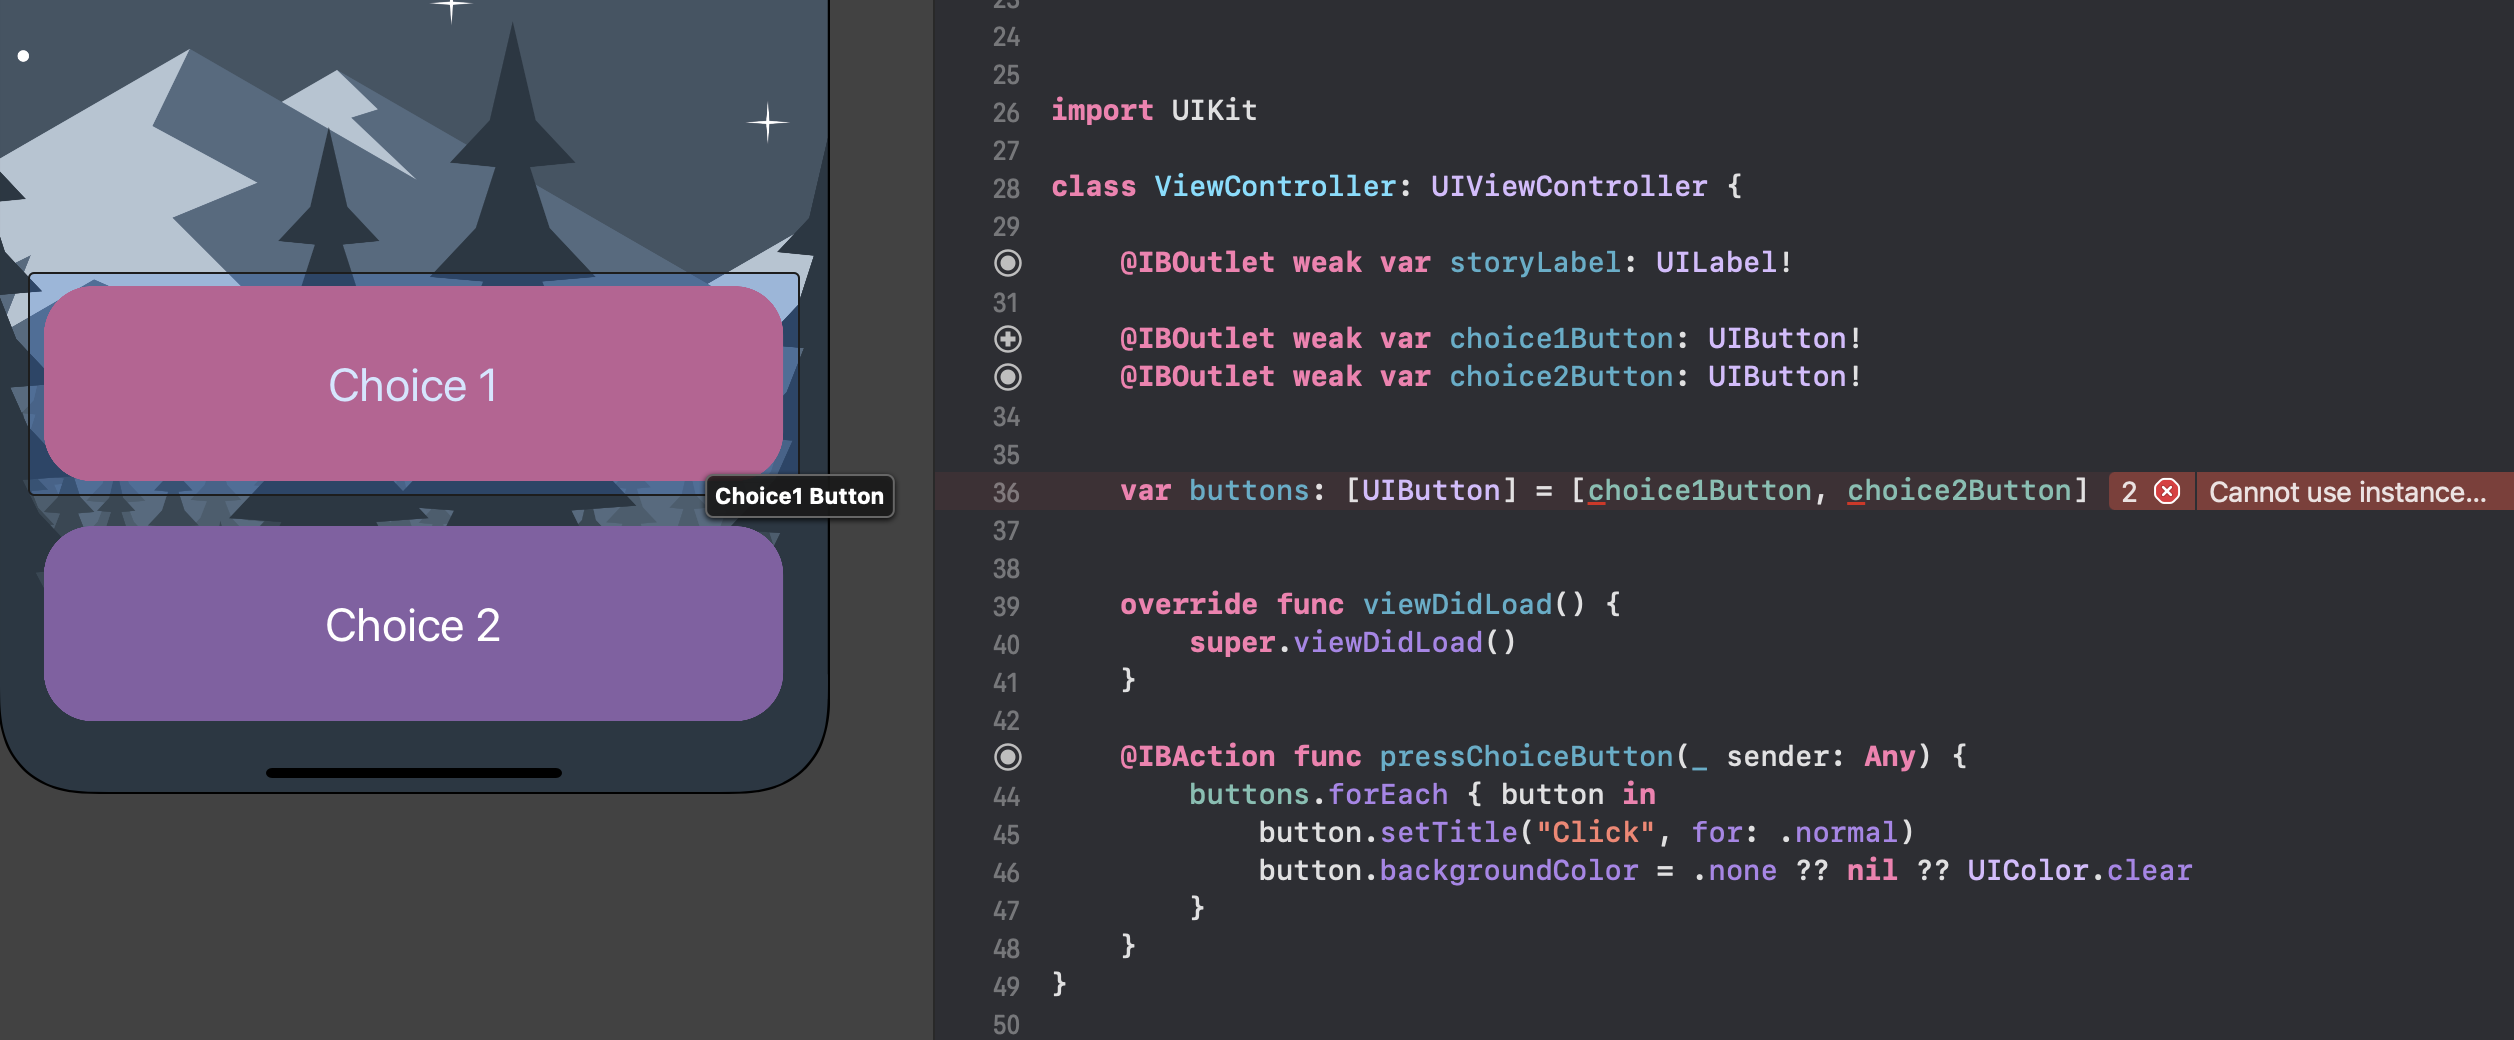
var buttons: [UIButton] = [choice1Button, choice2Button]
override func viewDidLoad() {
super.viewDidLoad()
}
@IBAction func pressChoiceButton(_ sender: Any) {
buttons.forEach { button in
button.setTitle("Click", for: .normal)
button.backgroundColor = .none ?? nil ?? UIColor.clear
}
}
}
View에서 Controller로 할당한 각각의 변수를 배열 변수에 담고, 그걸 forEach로 돌리면 되겠구나! 😎
하지만 내 첫 번째 시도는 내게 다음과 같은 에러메시지를 보여주었다. 😕
- Cannot use instance member ‘choice1Button’ within property initializer; property initializers run before ‘self’ is available
- Cannot use instance member ‘choice2Button’ within property initializer; property initializers run before ‘self’ is available
위 코드에서
@IBOutlet weak var storyLabel: UILabel!
@IBOutlet weak var choice1Button: UIButton!
@IBOutlet weak var choice2Button: UIButton!
이 부분은 instance member에 해당한다.
그리고
var buttons: [UIButton] = []
이 부분은 property에 해당하고,
var buttons: [UIButton] = [choice1Button, choice2Button]
뒤에 = [choice1Button, choice2Button] 이 부분이 바로 property 를 생성 후 할당하는 것이다.
즉, instance member는 해당 class가 인스턴스화 되며 메모리에 실제 객체가 생성될 때 생성자를 통해 주입이 된다. 그렇다면 당연히
생성자가 실행된 후에 참조가 가능한데, property 초기화가 실행되는 시점이 initializing instance member보다 빠르기 때문에
self를 통해 instance member 를 참조할 수 없게 되는 것이다.
따라서 정상적으로 코드를 작동시키기 위해서는 instance member 가 생성된 직후 할당을 해야하므로
window.onload = () => {

}
와 같은 역할을 하는
override func viewDidLoad() {
    super.viewDidLoad()
}
를 이용한 주입이 필요했다.
따라서 다음과 같이 코드를 변경했다.
import UIKit

class ViewController: UIViewController {

    @IBOutlet weak var storyLabel: UILabel!
    @IBOutlet weak var choice1Button: UIButton!
    @IBOutlet weak var choice2Button: UIButton!

    var buttons: [UIButton] = []

    override func viewDidLoad() {
        super.viewDidLoad()

        buttons = [choice1Button, choice2Button]
    }

    @IBAction func pressChoiceButton(_ sender: Any) {
        buttons.forEach { button in
            button.setTitle("Click", for: .normal)
            button.backgroundColor = .none ?? nil ?? UIColor.clear
        }
    }
}
만세~~ 🥰🥰🥰
2. 하지만 위 경우는 IBOutlet 이 2개인데, 저런 식의 변수가 10개, 20개가 된다면!?
const buttons = [...document.getElementsByClassName('btn-choice')]
와 같이 세련되게 코드를 만들고 싶었다!
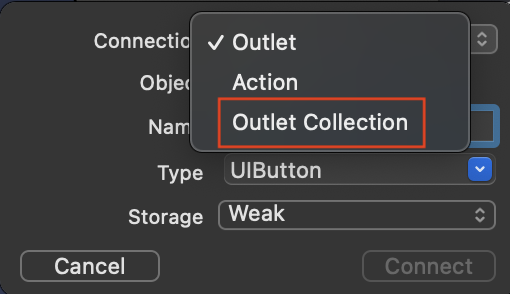
그 방법은 바로 IBOutlet 변수를 생성할 때, Type을 기본으로 설정된 Outlet이 아닌 Outlet Collection로 바꿔주는 것이다. 그러면 IBAction에서 했던 것 처럼 하나의 IBOutlet에 여러 개의 View Objects를 연결할 수 있다.
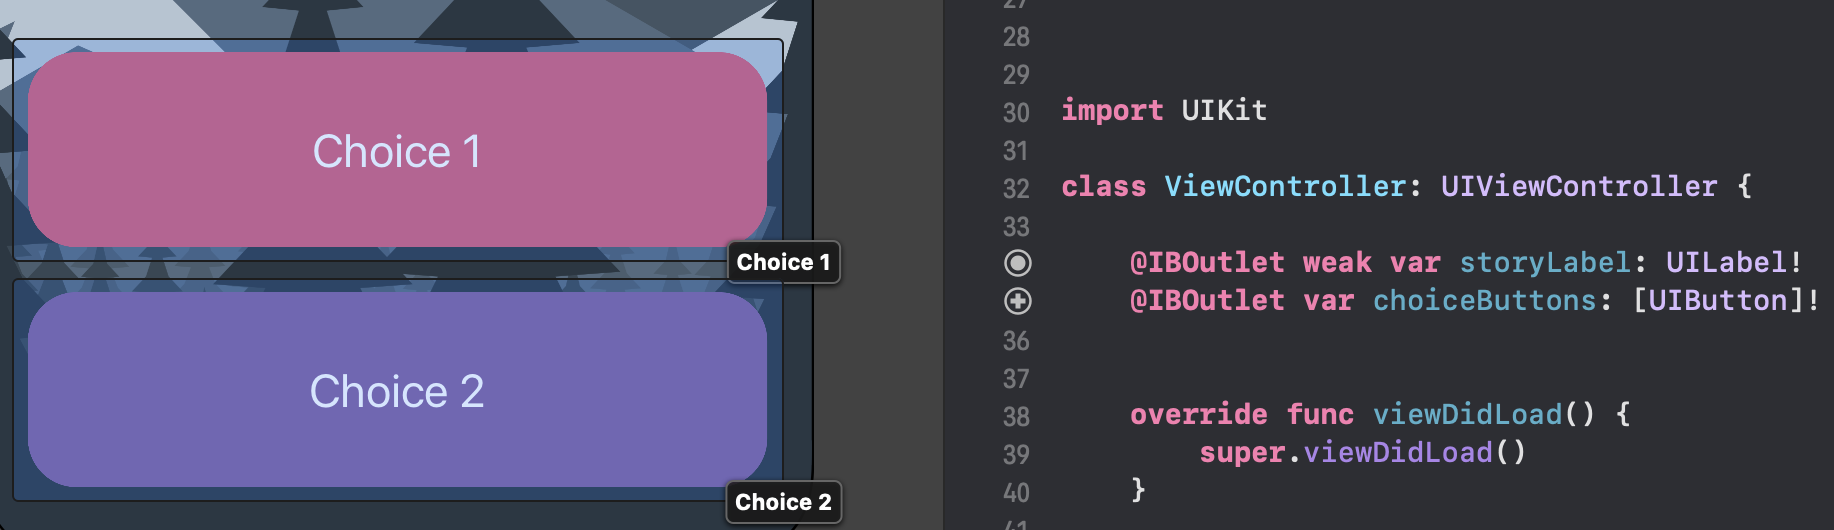
이로써 코드는 다음과 같이 더욱 간결해졌다.
import UIKit

class ViewController: UIViewController {

    @IBOutlet weak var storyLabel: UILabel!
    @IBOutlet var choiceButtons: [UIButton]!

    override func viewDidLoad() {
        super.viewDidLoad()
    }

    @IBAction func pressChoiceButton(_ sender: Any) {
        choiceButtons.forEach { button in
            button.setTitle("Click", for: .normal)
            button.backgroundColor = .none ?? nil ?? UIColor.clear
        }
    }
}
3. Index 와 Elements 를 모두 사용할 수는 없을까? 🧐
개인적으로 forEach를 사용할 때, elements 뿐 아니라 가끔 index가 필요할 때 유용하게 사용하곤 했다. 물론, 반드시 index 가
필요할 경우 for i를 이용한 반복문을 돌려도 되지만, forEach 를 사용하는 것이 코드가 더 깔끔하고, method chaining을 사용할 수
있는 등 장점이 많았기 때문이다.
Swift 에서도 가능하다!!
collectionVariable.enumerated().forEach { (offset: Int, element: Base.Element) in }
collection 변수에 .forEach를 붙이기 전에 .enumerated()를 해주고, forEach 뒤에 오는 closure 에서 parameters 에 `
(index: Int, value: ValueType)을 받아 처리할 수 있다.
import UIKit

class ViewController: UIViewController {

    @IBOutlet weak var storyLabel: UILabel!
    @IBOutlet var choiceButtons: [UIButton]!

    override func viewDidLoad() {
        super.viewDidLoad()
    }

    @IBAction func pressChoiceButton(_ sender: Any) {
        choiceButtons.enumerated().forEach { (index: Int, button: UIButton) in
            if index == 0 {
                button.setTitle("Click", for: .normal)
                button.backgroundColor = .none ?? nil ?? UIColor.clear
            }
        }
    }
}
이렇게 하면 Swift 에서도 forEach에서 index를 함께 사용할 수 있다.
4. Event 대상이 Collection 대상과 일치하는지를 확인해보자 🧐
아래와 같이 특정 Stack 안에 모아놓은 여러 개의 버튼이 있다. 각각의 색상을 설정하는 버튼 3개는 하나의 Horizontal Stack 으로 묶여있다. 그리고 이 버튼들은 모두 하나의 Action 함수에 의해 Event Listening 되고 있다.
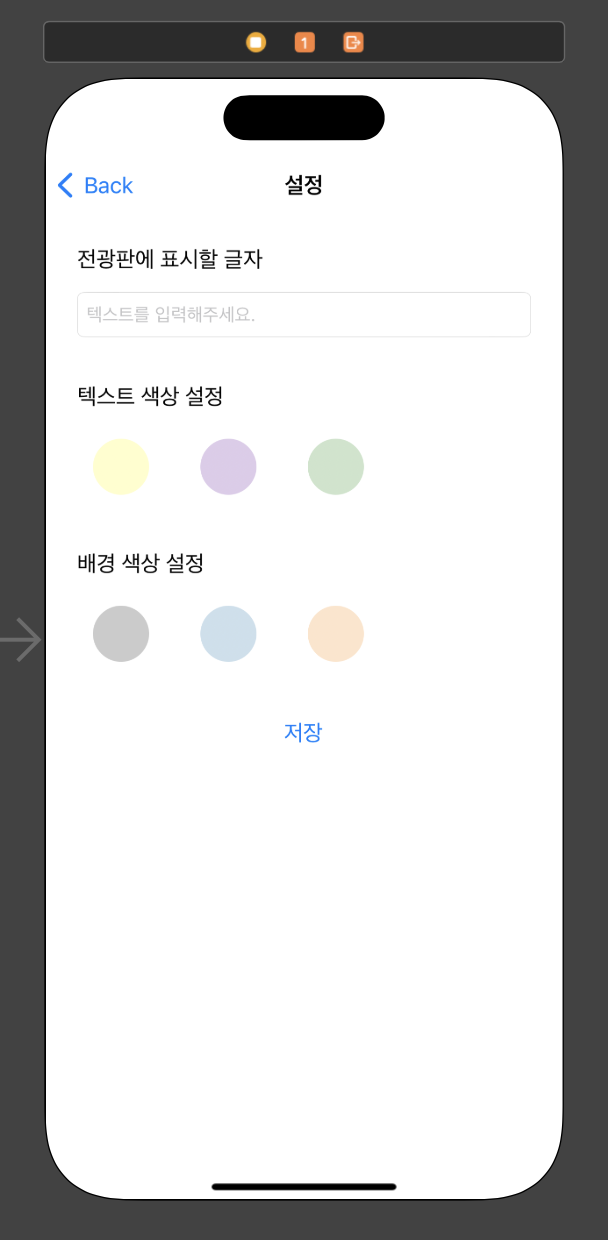
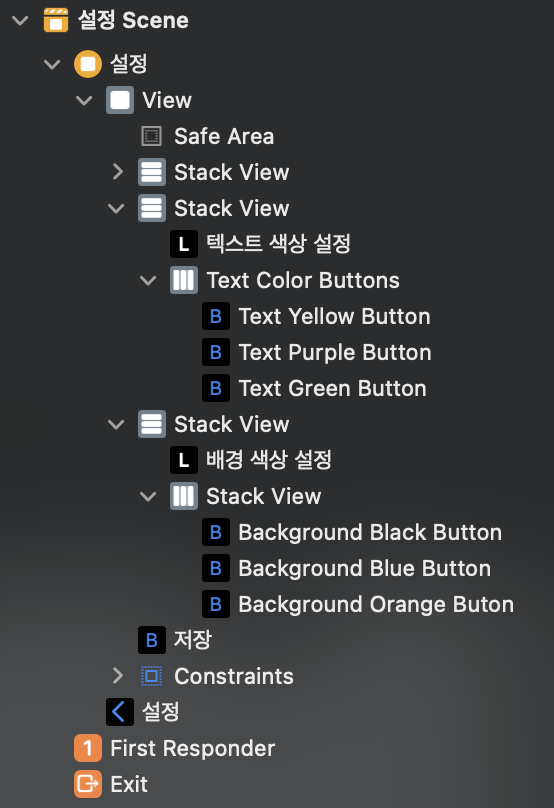
이때 선택된 버튼은 Opacity 를 1.0 으로 바꿔주고 나머지는 0.2 로 바꾸려 한다.
import UIKit

class SettingViewController: UIViewController {

    @IBOutlet weak var textField: UITextField!
    @IBOutlet weak var textColorButtons: UIStackView!
    @IBOutlet var backgroundColorButtons: [UIButton]!

    override func viewDidLoad() {
        super.viewDidLoad()
    }

    @IBAction func textColorButtonTouch(_ sender: UIButton) {
        textColorButtons.arrangedSubviews.forEach { button in
            button.layer.opacity = button.restorationIdentifier == sender.restorationIdentifier ? 1.0 : 0.2
        }
    }

    @IBAction func backgroundColorButtonTouch(_ sender: UIButton) {
        backgroundColorButtons.forEach { button in
            button.layer.opacity = button.accessibilityIdentifier == sender.accessibilityIdentifier ? 1.0 : 0.2
        }
    }
}
우선 Collection 을 정의하는 방법은 2가지를 활용할 수 있다. 첫 번째는 위와 버튼 색상을 설정할때와 같이 Stack 자체를 IBOutlet 변수로 지정해
해당 Stack 이 갖고 있는 하위 View Elements(여기서는 3개의 Button 이 해당)를 arrangedSubviews로 접근하는 것이다.
또 다른 방법으로는 위에서와 같이 아예 여러 개의 Buttons 를 하나의 IBOutlet Collection 변수에 지정하는 것이다. 이렇게 하면 위에서
Stack.arrangedSubviews을 통해 접근해 얻은 배열 객체와 동일한 객체를 미리 생성해두게 된다.
그리고 이것을 sender 즉, 버튼 터치가 일어난 대상과 비교하면 되는 것이다.
처음에는 무언가 Identifier 가 반드시 있어야 할 것 같아서 Restoration ID 나 Accessibility 의 Identifier 를 사용했다. 하지만 본래의 존재 목적과 다르게 Identifier 를 사용하는 것 같아서 단순히 동일 객체니까 객체 비교를 할 수 있지 않을까? 해서 해당 Identifier 비교를 제거하고 객체 비교를 사용했는데 정상적으로 작동한다.
import UIKit

class SettingViewController: UIViewController {

    @IBOutlet weak var textField: UITextField!
    @IBOutlet weak var textColorButtons: UIStackView!
    @IBOutlet var backgroundColorButtons: [UIButton]!

    override func viewDidLoad() {
        super.viewDidLoad()
    }

    @IBAction func textColorButtonTouch(_ sender: UIButton) {
        textColorButtons.arrangedSubviews.forEach { button in
            button.layer.opacity = button == sender ? 1.0 : 0.2
        }
    }

    @IBAction func backgroundColorButtonTouch(_ sender: UIButton) {
        backgroundColorButtons.forEach { button in
            button.layer.opacity = button == sender ? 1.0 : 0.2
        }
    }
}
가급적 Storyboard 를 사용하지 않는 것이 좋겠지만… 사용해야하는 상황에서는 이렇게 최대한 코드를 활용할 수 있다.
Reference
- “How to loop through view outlets in a UIViewController with Swift?.” stackoverflow. Mar. 20, 2015, https://stackoverflow.com/questions/29167294/how-to-loop-through-view-outlets-in-a-uiviewcontroller-with-swift.
- “forEach.” Apple Developer Documentation. accessed Jul. 6, 2022, https://developer.apple.com/documentation/swift/array/foreach(_:).