 Hogwarts
Swift Strings and Characters
Strings, Characters
Swift 의 String 타입은 Foundation의 NSString 클래스와 연결되고, 이를 확장해 String에서 NSString 메서드를 사용할 수 있게 해준다. 따라서, import Foundation을 하면 String을 캐스팅 하지 않고 NSString 메서드를 사용할 수 있다.
1. String Literals (문자열 리터럴) 👩💻
1. Multiline String Literals (여러줄 문자열 리터럴)
Swift 에서 문자열은 다음과 같이 " 사이에 원하는 텍스트를 입력하고, 코드가 필요할 경우 \() 안에 넣어 삽입하는 방식으로 사용이 가능하다.
let someString = "Some string literal value"
print("someString: \(someString)")  // someString: Some string literal value
또한 Swift 에서 Multiline 문자열이 필요한 경우 """ 3개를 연속으로 사용하고, 그 사이에 텍스트를 넣는다.
var quotation = """
The White Rabbit put on his spectacles.  "Where shall I begin,
please your Majesty?" he asked.

"Begin at the beginning," the King said gravely, "and go on
till you come to the end; then stop."
"""
print(quotation)
그러면 아래와 같이 그대로 출력되는 것을 확인할 수 있다.
The White Rabbit put on his spectacles.  "Where shall I begin,
please your Majesty?" he asked.

"Begin at the beginning," the King said gravely, "and go on
till you come to the end; then stop.
Multiline String Literals에서는 line break 또한 문자열 값으로 간주하기 때문에 개행을 위해 \n을 입력할 필요가 없다.
그렇다면, 가독성을 위해 코드상에서는 Multiline String Literals을 사용하고 싶은데, 실제로는 개행을 하고 싶지 않다면 어떻게 해야할까?
var quotation = """
The White Rabbit put on his spectacles.  "Where shall I begin, \
please your Majesty?" he asked.
"Begin at the beginning," the King said gravely, "and go on \
till you come to the end; then stop."
"""
print(quotation)
위와 같이 \를 넣어주면 개행을 하지 않도록 처리할 수 있다.
그러면 출력 결과는 아래와 같이 변경될 것이다.
The White Rabbit put on his spectacles.  "Where shall I begin, please your Majesty?" he asked.
"Begin at the beginning," the King said gravely, "and go on till you come to the end; then stop.
2. String Indent (문자열 들여쓰기)
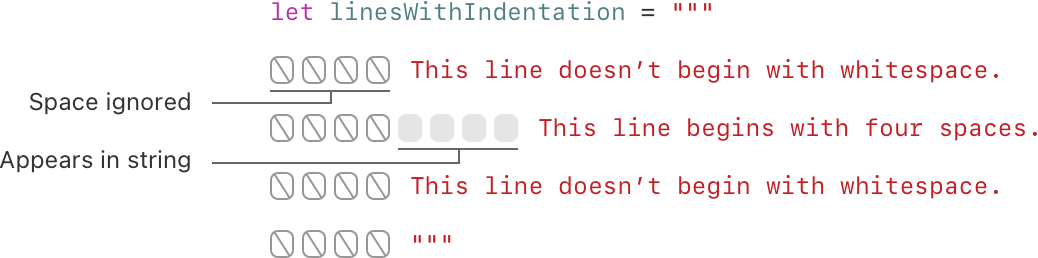
종료하는 """를 기준으로 앞의 공간은 무시되고, 해당 라인이 기준이 된다. 따라서 해당 라인 이후로 있는 공백만 정상 공백으로 인식된다.
var quotation = """
      The White Rabbit put on his spectacles.
        "Where shall I begin, please your Majesty?" he asked.
      "Begin at the beginning," the King said gravely, "and go on \
      till you come to the end; then stop."
      """
print(quotation)
출력 결과는 다음과 같다.
The White Rabbit put on his spectacles.
  "Where shall I begin, please your Majesty?" he asked.
"Begin at the beginning," the King said gravely, "and go on till you come to the end; then stop."
3. Special Characters in String Literals (문자열 리터럴의 특수 문자)
- Escaped special characters
\0(null character),\\(backslash),
\t(horizontal tab),\n(line feed),\r(carriage return),
\"(double quotation mark) and\'(single quotation mark)
그 중 가장 많이 쓰이는 \n를 예로 살펴보자.
let specialCharacters = "To me:\nLive as if you were to \"die\" tomorrow."
print(specialCharacters)
To me:
Live as if you were to "die" tomorrow.
- Unicode scalar value
다음은\u{n}형태로 표현되는 유니코드다.
let wiseWords = "\"Imagination is more important than knowledge\" - Einstein"
// "Imagination is more important than knowledge" - Einstein
let dollarSign = "\u{24}"        // $,  Unicode scalar U+0024
let blackHeart = "\u{2665}"      // ♥,  Unicode scalar U+2665
let sparklingHeart = "\u{1F496}" // 💖, Unicode scalar U+1F496
- Extended String Delimiters (확장된 문자열 구획 문자)
마지막으로 위Special Characters를 무시하도록 처리할 수 있는 특수한 형태가 존재한다.
이것은 문자열의 앞뒤에동일한 개수의 #을 입력하는 방식으로 표현한다.
#"Line 1\nLine 2"#
##"Line 1\nLine 2"##
###"Line 1\nLine 2"###
위 문자열은 모두 다음과 같은 출력 결과를 갖는다.
Line 1\nLine 2
앞뒤에 동일한 개수의 #을 입력함으로써 Escaped special characers \n가 작동을 하지 않고 그대로 출력되었다.
위에서 여러 줄 문자열 리터럴에서 개행을 일부러 하지 않기 위해 \를 넣었던 것처럼, Extended String Delimiters로 감싸진 문자열에서 일부러 작동하도록 하려면 어떻게 해야할까?
그 답은 \ 뒤에 동일한 개수의 #을 넣음으로써 가능하다.
#"Line 1\#nLine 2"#
##"Line 1\##nLine 2"##
###"Line 1\###nLine 2"###
위 문자열은 모두 다음과 같은 출력 결과를 갖는다.
Line 1
Line 2
2. Initializing an Empty String (빈 문자열 초기화) 👩💻
문자열 초기화는 다음과 같은 두 가지 방식이 있으며, 결과는 동일하다.
var emptyString = ""
var initializerSyntax = String()
String Mutability
단지 우리는 변수를 할당할 때 var, let을 구분해 할당하여 변수와 상수를 구별할 수 있다.
var로 선언한 변수는 수정이 가능하다.
var variableString = "Horse"
variableString += " and carriage"
print(variableString)   // Horse and carriage
let으로 선언한 상수는 수정이 불가능하다.
let constantString = "Highlander"
constantString += " and another Highlander" // left side of mutating operator isn't mutable:
print(constantString)
3. Strings Are Value Types (값 타입 문자열) 👩💻
Swift 에서 문자열은 Value Types(값 타입)이다.
무슨 말일까? 🤔
스위프트에서 새 문자열 값을 생성하면, 함수나 메서드에 전달되거나, 상수나 변수에 할당될 때 그 문자열 값이 복사되고, 복사본이 전달된다.
그렇다면 메모리 사용이 과도해 성능에 문제가 있지 않을까?
하지만 실제로는 코드 뒤에서 컴파일러가 실제 복사가 정말 필요한 경우에만 발생하도록 문자열 최적화를 하기 대문에 항상 높은 성능을 유지할 수 있고, 우리는 성능은 신경쓸 필요 없이 스위프트의 문자열이
Reference type이 아니라Value type이라는 것에만 집중하면 된다.
1. Working with Characters
우리는 for-in loops를 통해 문자열을 반복함으로써 String의 개별 문자 Character에 접근할 수 있다.
for character in "Dog!🐶" {
    print(character)
}
// D
// o
// g
// !
// 🐶
2. Working from Characters
String을 개별 문자 Character에 접근하는 것을 반대로 접근하면 다음과 같다.
👉 Character를 개별로 생성하고 배열을 구성해, String으로 만들 수 있다.
- 단일 Character 생성
let cCharacter: Character = "C"
print(cCharacter)   // Prints "C"
- Character 배열을 String initializers 에 arguments 로 전달해
String을 생성할 수 있다
let catCharacters: [Character] = ["C", "a", "t", "!", "🐱"]
let catString = String(catCharacters)
print(catString)    // Prints "Cat!🐱"
4. Concatenating Strings and Characters (문자열과 문자의 결합) 👩💻
1. String + String, String + Character
String+String은+연산자를 이용한다.
var string1 = "hello"
var string2 = " there"
print(string1 + string2)    // hello there
String+Character는String의append()메서드를 이용한다.
var string1 = "hello"
let exclamationMark: Character = "!"
string1.append(exclamationMark)
print("string1.append(exclamationMark) = \(string1)")   // hello!
🙃
Character+String은 불가능하다.Character는Single Character만 가질 수 있기 때문이다.
2. Concatenating of The Multiline String Literals
여러 줄의 문자열을 합칠 때는 문자열의 개행이 포함되는 때를 이해해야한다.
let badStart = """
one
two
"""

let end = """
three
"""

print(badStart + end)
one
twothree
two 다음에는 개행이 포함되지 않는다. 따라서 다음 문자열 three 가 새로운 행에서 시작하도록 하려면 다음과 같아야한다.
let goodStart = """
one
two

"""

let end = """
three
"""

print(goodStart + end)
one
two
three
5. String Interpolation (문자열 삽입) 👩💻
String Interpolation은 String Literal 안에 constants, variables, literals, 그리고 expressions 를 포함해
new String을 만드는 방법이다.
let three = 3
print("\(three) times 2.5 is \(Double(three) * 2.5)")   // 3 times 2.5 is 7.5
Multiline String에서 역시 사용할 수 있다.
let three = 3
let multilineString = """

     \(three)
x    2.5
---------
     \(Double(three) * 2.5)

"""
print(multilineString)
     3
x    2.5
---------
     7.5
String Interpolation역시Extended String Delimiters의 규칙을 우선하여 따른다.
let ignored = #"\(three) times 2.5 is \(Double(three) * 2.5)"#
print(ignored)  // \(three) times 2.5 is \(Double(three) * 2.5)

let worksWell = #"\#(three) times 2.5 is \#(Double(three) * 2.5)"#
print(worksWell) = 3 times 2.5 is 7.5
6. Unicode (유니코드) 👩💻
유니코드는 서로 다른 시스템에서 문자를 인코딩, 표현, 처리하기 위한 국제 표준이다.
Swift 의 String 과 Character 는 완벽히 유니코드와 호환된다.
1. Unicode Scalar Values (유니코드 스칼라 값)
Swift 의 기본 String 타입은 Unicode Scalar Values로부터 빌드된다.
Unicode Scalar Value는 character 또는 modifier를 표현하기 위한 unique한 21-bit 숫자다.
Syntax 는 다음과 같다. \u{Unicode Number}
// U+0061 is LATIN SMALL LETTER A("a")
print("\u{0061}")   // a
print("\u{61}")     // a

// U+1F425 is FRONT-FACING BABY CHICK("🐥")
print("\u{1F425}")  // 🐥
2. Extended Grapheme Clusters (자모 그룹의 확장)
Swift 의 모든 Character 타입 인스턴스는 single extended grapheme cluster로 표현된다. 이것은 하나 또는 그 이상의
Unicode Scalar Values로 구성되며 여러 개의 Unicode Scalar Values 로 구성되는 경우 결합되어 사람이 읽을 수 있는 단일 문자로
표현된다.
- 이 클러스터는 하나의
scalar로 구성되었다.
// U+00E9 is e acute
print("\u{E9}")         // é
- 위 클러스터는 다음과 같이 두 개의
scalar결합으로 구성될 수 있다.
// U+0065 is "e"
print("\u{65}")         // e

// U+0301 is " ́"
print("\u{301}")        //  ́

// Combine U+0065 with U+0301 is e acute
print("\u{65}\u{301}")  // é
다음 예제를 더 살펴보자
print("\u{D55C}")                   // 한
print("\u{1112}\u{1161}\u{11AB}")   // 한 = ㅎ + ㅏ + ㄴ
// U+1F1FA is REGIONAL INDICATOR SYMBOL LETTER U("🇺")
print("\u{1F1FA}")              // 🇺

// U+1F1F8 is REGIONAL INDICATOR SYMBOL LETTER S("🇸")
print("\u{1F1F8}")              // 🇸

// Combine U+1F1FA with U+1F1F8 is 🇺🇸
print("\u{1F1FA}\u{1F1F8}")     // 🇺🇸
7. Counting Characters (문자 세기) 👩💻
String 타입은 다양한 기본 메서드를 포함하고있다. 그 중 count메서드를 이용해 String의 길이를 구할 수 있다.
let unusualMenagerie = "Koala 🐨, Snail 🐌, Penguin 🐧, Dromedary 🐪"
print(unusualMenagerie.count)   // 40
Counting Characters in Extended Grapheme Clusters
var word = "cafe"
print("\(word), \(word.count)") // cafe, 4

// Combine with U+0301(" ́")
word += "\u{301}"
print("\(word), \(word.count)") // café, 4
Extended Grapheme Clusters는 여러Unicode Scalars로 구성될 수 있다. 즉, 동일 문자를 여러 다른 방법으로 표현할 수 있고, 이는 저장하는데 필요한 메모리 공간의 크기 역시 달라짐을 의미한다.따라서 긴 String 의 길이를 계산(count)하는 경우, Extended Grapheme Clusters 의 경계를 구하기 위해 전체 String 의
Unicode Scalars를 반복해야한다.또한 Extended Grapheme Clusters 로 인해 동일한 문자를 표현하더라도
String 이 반환하는count의 값과NSString이 반환하는count의 값은 다를 수 있다.NSString은UTF-16의16-bit` 코드 단위를 이용하기 때문이다.
8. Accessing and Modifying a String (문자열 접근과 수정) 👩💻
String 의 접근과 수정은 String 의 메서드를 이용하거나 Subscript Syntax를 이용한다.
1. String Indices
let greeting = "Guten Tag!"

print(greeting.startIndex)                          // Index(_rawBits: 1),      G
print(greeting.index(after: greeting.startIndex))   // Index(_rawBits: 65793),  u
print(greeting.index(before: greeting.endIndex))    // Index(_rawBits: 590081), !
print(greeting.endIndex)                            // Index(_rawBits: 655367), Fatal error: String index is out of bounds
startIndex는 시작 문자를 가리킨다endIndex는 마지막 유효 문자 다음을 가리킨다
따라서 실제로 subscript argument 에 첫 문자와 마지막 문자를 찾으려면 다음과 같이 접근해야한다.
- 첫 문자: greeting[
greeting.startIndex] - 마지막 문자: greeting[
greeting.index(before: greeting.endIndex)]
또 다른 접근 방법으로는 offsetBy를 이용하는 것이다.
let greeting = "Guten Tag!"

greeting.index(greeting.startIndex, offsetBy: 0)    // Index of "G",  Index(_rawBits: 1)
greeting.index(greeting.startIndex, offsetBy: 1)    // Index of "u",  Index(_rawBits: 65793)
greeting.index(greeting.startIndex, offsetBy: 2)    // Index of "t",  Index(_rawBits: 131329)
greeting.index(greeting.startIndex, offsetBy: 3)    // Index of "e",  Index(_rawBits: 196865)
greeting.index(greeting.startIndex, offsetBy: 4)    // Index of "n",  Index(_rawBits: 262401)
greeting.index(greeting.startIndex, offsetBy: 5)    // Index of " ",  Index(_rawBits: 327937)
greeting.index(greeting.startIndex, offsetBy: 6)    // Index of "T",  Index(_rawBits: 393473)
greeting.index(greeting.startIndex, offsetBy: 7)    // Index of "a",  Index(_rawBits: 459009)
greeting.index(greeting.startIndex, offsetBy: 8)    // Index of "g",  Index(_rawBits: 524545)
greeting.index(greeting.startIndex, offsetBy: 9)    // Index of "!",  Index(_rawBits: 590081)
greeting.index(greeting.startIndex, offsetBy: 10)   // Out of bounds, Index(_rawBits: 655361)
2. Iterating Over for-in loops with indices method
또 다른 접근 방법으로는 String 전체를 접근해야 하는 경우 for-in 반복문을 사용할 수 있다.
let greeting = "Guten Tag!"

for index in greeting.indices {
    print("\(greeting[index]) ", terminator: "")    // G u t e n   T a g !
}
indices를 이용한 for-in 반복문은 유효한 범위만 순환하기 때문에 위에서 endIndex 또는 index(greeting.startIndex, offsetBy: 10)에 해당하는 Out of bounds가 발생하지 않는 안전한 방법이다.
3. Closed Range / Half-Open Range / One-Sided Ranges
또 다른 방법으로는 Closed Range, Half-Open Range, One-Sided Ranges를 이용해 Subscript Syntax로 접근하는 것이다.
let greeting = "Guten Tag!"

let characterG = greeting.startIndex
let characterN = greeting.index(greeting.startIndex, offsetBy: 4)

print(greeting[characterG...characterN])    // Guten
let greeting = "Guten Tag!"
print(greeting[..<greeting.endIndex])       // Guten Tag!
4. Inserting and Removing (문자열 삽입과 삭제)
- insert
다음과 같은 방법으로 단일 문자 또는 여러 개의 문자열을 삽입할 수 있다.
var welcome = "hello"

// insert a single character
welcome.insert("!", at: welcome.endIndex)
print(welcome)  // hello

// insert the contents of another string
welcome.insert(contentsOf: " there", at: welcome.index(before: welcome.endIndex))
print(welcome)  // hello there!
- remove / removeSubrange
문자열 삭제의 경우 단일 문자 삭제와 여러 개의 문자열 삭제가 조금 다른 방법으로 이루어진다. 예제를 살펴보자.
var welcome = "hello there!"

// remove a single character
welcome.remove(at: welcome.index(before: welcome.endIndex))
print(welcome)  // hello there

// remove a substring at a specified range
let characterWhiteSpace = welcome.index(welcome.endIndex, offsetBy: -6)
let characterLastE = welcome.endIndex
welcome.removeSubrange(characterWhiteSpace..<characterLastE)

print(welcome)  // hello
9. Substrings (부분 문자열) 👩💻
1. String 과 Substring 의 관계
- String
let greeting = "Hello, world!"

print(type(of: greeting))   // String
- Substring
let greeting = "Hello, world!"
var index = greeting.firstIndex(of: ",") ?? greeting.endIndex
let beginning = greeting[..<index]

print(beginning)            // Hello
print(type(of: beginning))  // Substring
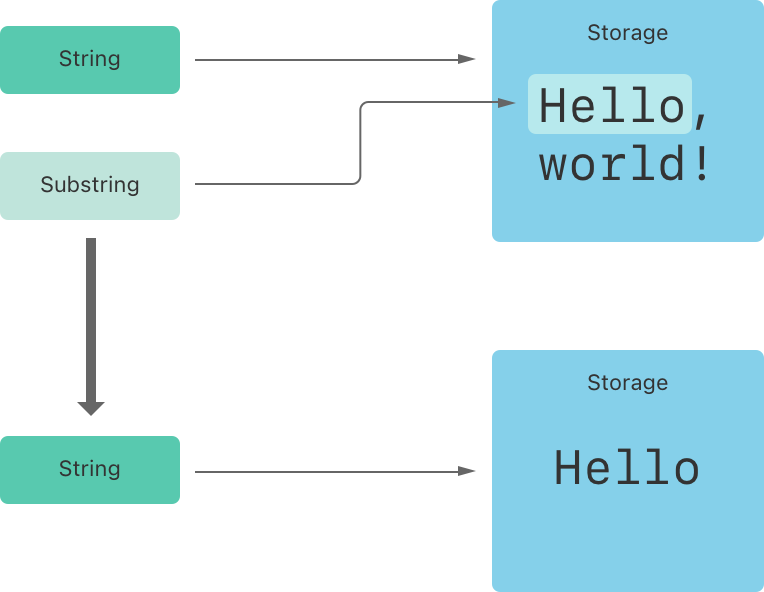
위 코드에서 greeting은 String 인스턴스고, beginning은 greeting 의 Substring 인스턴스다.
Advantage of Substring - Optimization
Substring 은 자기 자신의 메모리 공간을 갖지 않고 원본 String 의 메모리 공간을 재사용하기 때문에, String 또는 Substring 을
수정하기 전까지 아무리 많은 Substring 을 만들어도 performance cost of copying memory을 소비하지 않는다.
Disadvantage of Substring - Paradox of advantage
위 이점으로 인해 Substring 이 사용되는동안 원본 String 은 전체 데이터를 메모리에 저장해야한다. 따라서 Substring 의 장기 저장시
오히려 메모리 낭비가 되는 상황이 생기게 된다. 그러므로 장기 저장시 String instance 로 변경해야한다.
// The 'Substring' has to be converted to an instance of 'String' for long time storing.
let newString = String(beginning)
정리하면 다음과 같다.
String과Substring은StringProtocol을 따른다. 따라서 유사하게 메서드 사용이 가능하다.- String instance 는 자기 자신이 저장하는
character 들의 실제 메모리 공간을 갖는다.- Substring instance 는 자기 자신이 저장하는 character 들의 실제 메모리 공간을 갖지 않는다. 대신
원본 String 의 character 들의 공간을 재사용한다.- Substring 은 장기 저장에 적합하지 않다.
장기 저장되어야 하는 경우 수정이 끝난 Substring 은String instance 로 변환되어야한다.
2. Substring Handling
- Beginning of a string
Substring literals를 사용하거나 String 의 prefix(upTo:) 또는 prefix(_ maxLength:) 메서드를 사용해 만들 수 있다.
let str = "Hello, playground"
let index = str.index(str.startIndex, offsetBy: 5)  // Index of the "o"

print(str[..<index])            // Hello
print(str.prefix(upTo: index))  // Hello
print(str.prefix(5))            // Hello
- End of a string
Substring literals를 사용하거나 String의 prefix(from:) 또는 prefix(_ maxLength:) 메서드를 사용해 만들 수 있다.
let str = "Hello, playground"
let index = str.index(str.endIndex, offsetBy: -10)  // Negative Index of the "p"

print(str[index...])            // playground
print(str.suffix(from: index))  // playground
print(str.suffix(10))           // playground
- Range in a string
Substring literals를 사용해 만들 수 있다.
let str = "Hello, playground"
let start = str.index(str.startIndex, offsetBy: 7)  // Index of the "p"
let end = str.index(str.endIndex, offsetBy: -6)     // Negative Index of the "y"

print(str[start..<end])     // play
- Converting
SubstringtoString
Substring을 장기 저장할 때 String으로 변환해야함을 잊지 말아야한다.
let str = "Hello, playground"
let start = str.index(str.startIndex, offsetBy: 7)  // Index of the "p"
let end = str.index(str.endIndex, offsetBy: -6)     // Negative Index of the "y"

let mySubstring = str[start..<end]  // play, A Substring instance of the String instance 'str'.
let myString = String(mySubstring)  // play, A String instance.
10. Comparing Strings (문자열 비교) 👩💻
Swift 는 다음 3가지 문자열 비교를 제공한다.
- String and Character equality
- Prefix equality
- Suffix equality
1. String and Character equality
Swift 에서 문자열의 완전 동등 비교는 == != 연산자를 사용한다.
let quotation = "We're a lot alike, you and I."
let sameQuotation = "We're a lot alike, you and I."

if quotation == sameQuotation {
    print("These two strings are considered equal")
}
These two strings are considered equal
그리고 이 동등 비교에서 주의해야할 것이 있다.
Extended Grapheme Clusters에 의해 동일하다면동등 관계이다
let eAcuteQuestion = "Caf\u{E9}"                // LATIN SMALL LETTER E WITH ACUTE (U+00E9)
let combinedEAcuteQuestion = "Caf\u{65}\u{301}" // LATIN SMALL LETTER E (U+0065) followed by COMBINING ACUTE ACCENT (U+0301)

print("\neAcuteQuestion: \(eAcuteQuestion), combinedEAcuteQuestion: \(combinedEAcuteQuestion)")
if eAcuteQuestion == combinedEAcuteQuestion {
    print("These two strings are considered equal")
}
eAcuteQuestion: Café, combinedEAcuteQuestion: Café
These two strings are considered euqal
- 반면, 시각적으로 같지만 라틴 대문자
A와 러시아 키릴 대문자A는다르다
let latinCapitalLetterA: Character = "\u{41}"       // LATIN CAPITAL LETTER A (U+0041, or "A"), as used in English.
let cyrillicCapitalLetterA: Character = "\u{0410}"  // CYRILLIC CAPITAL LETTER A (U+0410, or "А"), as used in Russian.

print("\nlatinCapitalLetterA: \(latinCapitalLetterA), cyrillicCapitalLetterA: \(cyrillicCapitalLetterA)")
if latinCapitalLetterA != cyrillicCapitalLetterA {
    print("These two characters aren't equivalent")
}
latinCapitalLetterA: A, cyrillicCapitalLetterA: А
These two characters aren't equivalent
String과Substring간의 동등 비교는 성립된다
let stringA: String = "A"
let substringA: Substring = stringA.prefix(1)
if stringA == substringA {
    print("String and Substring are considered equal")
}
String and Substring are considered equal
Character와String,Character와Substring은 비교할 수 없다
print(characterA == stringA)
// Binary operator '==' cannot be applied to operands of type 'Character' and 'String'

print(characterA == substringA)
// Binary operator '==' cannot be applied to operands of type 'Character' and 'Substring'
2. Prefix equality
문자열을 비교하는 다른 방법으로는 부분 문자열을 비교하는 Prefix와 Subffix가 있다.
hasPrefix(_:) 메서드를 이용해 문자열의 시작이 동일한지 부분 일치 여부를 검사할 수 있다.
let romeoAndJuliet = [
    "Act 1 Scene 1: Verona, A public place",
    "Act 1 Scene 2: Capulet's mansion",
    "Act 1 Scene 3: A room in Capulet's mansion",
    "Act 1 Scene 4: A street outside Capulet's mansion",
    "Act 1 Scene 5: The Great Hall in Capulet's mansion",
    "Act 2 Scene 1: Outside Capulet's mansion",
    "Act 2 Scene 2: Capulet's orchard",
    "Act 2 Scene 3: Outside Friar Lawrence's cell",
    "Act 2 Scene 4: A street in Verona",
    "Act 2 Scene 5: Capulet's mansion",
    "Act 2 Scene 6: Friar Lawrence's cell"
]

var act1SceneCount = 0
for scene in romeoAndJuliet {
    if scene.hasPrefix("Act 1") {
        act1SceneCount += 1
    }
}
print("There are \(act1SceneCount) scenes in Act 1")
There are 5 scenes in Act 1
3. Suffix equality
hasSuffix(_:) 메서드를 이용해 문자열의 끝이 동일한지 부분 일치 여부를 검사할 수 있다.
let romeoAndJuliet = [
    "Act 1 Scene 1: Verona, A public place",
    "Act 1 Scene 2: Capulet's mansion",
    "Act 1 Scene 3: A room in Capulet's mansion",
    "Act 1 Scene 4: A street outside Capulet's mansion",
    "Act 1 Scene 5: The Great Hall in Capulet's mansion",
    "Act 2 Scene 1: Outside Capulet's mansion",
    "Act 2 Scene 2: Capulet's orchard",
    "Act 2 Scene 3: Outside Friar Lawrence's cell",
    "Act 2 Scene 4: A street in Verona",
    "Act 2 Scene 5: Capulet's mansion",
    "Act 2 Scene 6: Friar Lawrence's cell"
]

var mansionCount = 0
var cellCount = 0

var romeoAndJulietIterator = romeoAndJuliet.makeIterator()
while let scene = romeoAndJulietIterator.next() {
    switch true {
    case scene.hasSuffix("Capulet's mansion"): mansionCount += 1
    case scene.hasSuffix("Friar Lawrence's cell"): cellCount += 1
    default: continue
    }
}

print("\(mansionCount) mansion scenes; \(cellCount) cell scenes")
6 mansion scenes; 2 cell scenes
11. Unicode Representations of Strings (문자열의 유니코드 표현) 👩💻
Swift 는 다음 3가지 유니코드 표현으로 String에 접근할 수 있다.
UTF-8코드 유닛UTF-16코드 유닛- 문자열의 UTF-32 인코딩 형식에 해당하는
21-bit Unicode Scalar Values(UnicodeScalars)
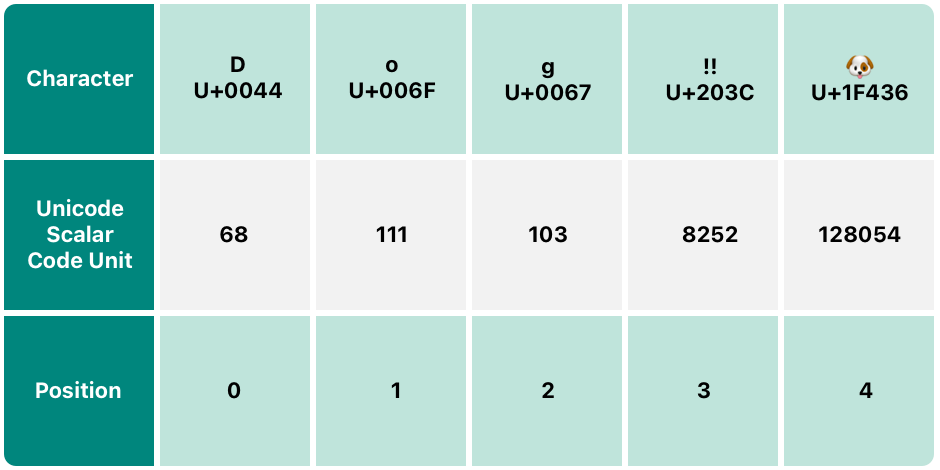
let dogString = "Dog‼🐶"
위 문자열의 16진수와 10진수의 값은 다음과 같다.
(hexadecimal) | (decimal) | (etc)
D:  U+0044    |     68    | 4*16^1 + 4 = 68
o:  U+006F    |    111    | 6*16^1 + 15 = 111
g:  U+0067    |    103    | 6*16^1 + 7 = 103
‼:  U+203C    |   8252    | 2*16^3 + 3*16^1 + 12 = 8252
🐶: U+1F436   | 128054    | 1*16^4 + 15*16^3 + 4*16^2 + 3*16 + 6 = 128054
1. UTF-8 Representation
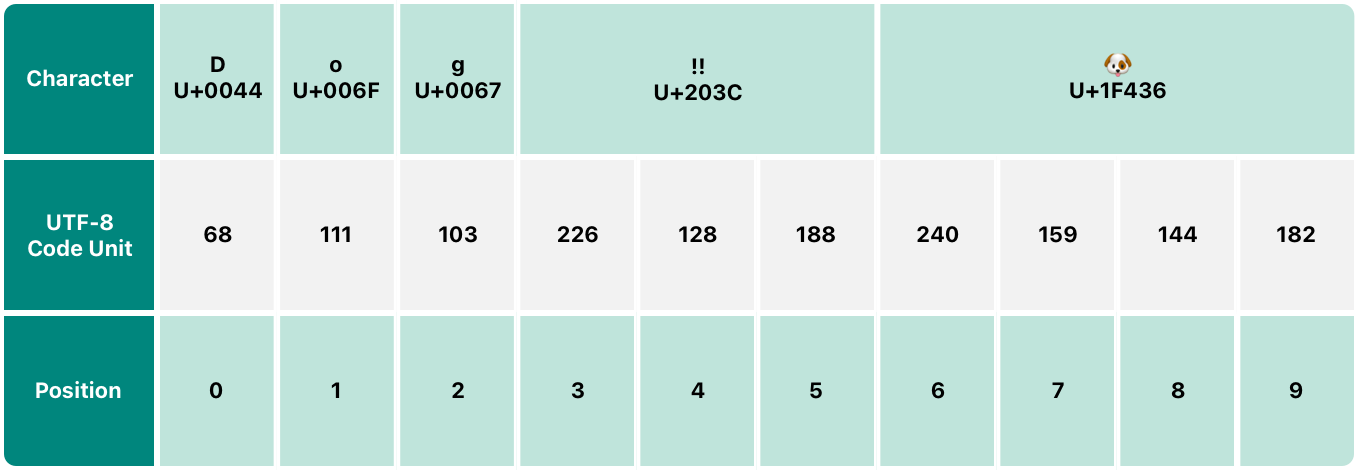
2를 공비로 하는 등비수열의 8-bit 최댓값은 2^8 - 1 = 255이다.
for codeUnit in dogString.utf8 {
  print(codeUnit, terminator: " ")
}
68 111 103 226 128 188 240 159 144 182
D, o, g : 8-bit로 표현할 수 있는 단일 문자 범위의 값이다.
‼ : 8-bit로 표현할 수 있는 단일 문자 범위의 값을 넘어선다. 따라서 (266, 128, 188) 3-byte UTF-8 표현으로 나타낸다.
🐶 : 역시 위와 동일한 이유로 (240, 159, 144, 182) 3-byte UTF-8 표현으로 나타낸다.
2. UTF-16 Representation
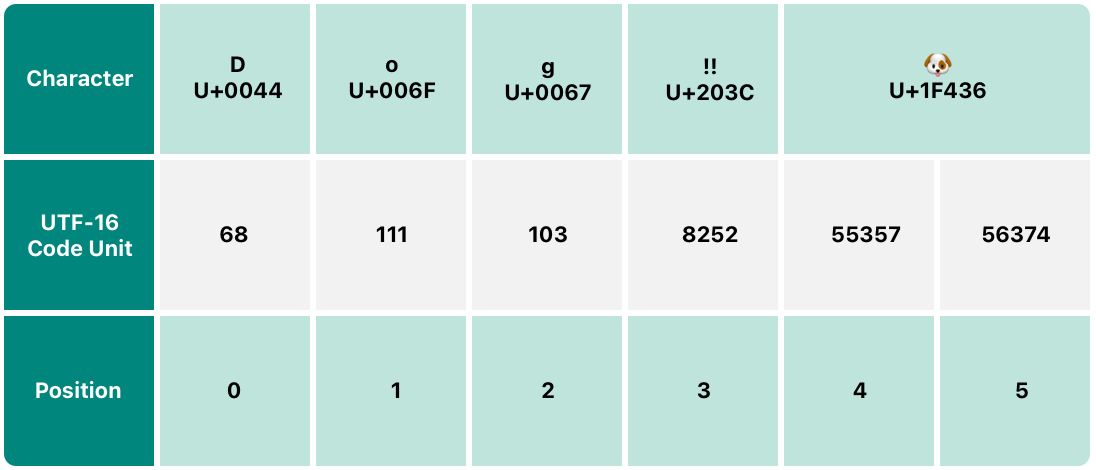
2를 공비로 하는 등비수열의 8-bit 최댓값은 2^16 - 1 = 65535이다.
for codeUnit in dogString.utf16 {
  print(codeUnit, terminator: " ")
}
68 111 103 8252 55357 56374
D, o, g : 16-bit는 utf-8의 범위는 기본으로 포함한다.
‼ : utf-8에서는 한 번에 표현하지 못했던 값이지만 16-bit에서는 한 번에 표현이 가능하다.
🐶 : 16-bit로 표현할 수 있는 단일 문자 범위의 값을 넘어선다. 따라서 (55357, 56374) UTF-16 표현으로 나타낸다.
3. Unicode Scalar Representation
마지막으로 Unicode Scalar는 모든 값을 21-bit로 unique하게 표현하므로 모든 표현을 Extended Grapheme Clusters 없이 나타낸다.
for scalar in dogString.unicodeScalars {
  print("\(scalar) :  \(scalar.value)")
}
D :  68
o :  111
g :  103
‼ :  8252
🐶 :  128054
Reference
- “Strings and Characters.” The Swift Programming Language Swift 5.7. accessed Sep. 17, 2022, Swift Docs Chapter 2 - Strings and Characters.
- “endIndex.” Apple Developer Documentation. accessed Sep. 17, 2022, Apple Developer Documentation - Swift/String/endIndex.
- “How does String.Index work in Swift.” stackoverflow. Apr. 28 2021, Stackoverflow Question and Answer.
- “How does String substring work in Swift.” stackoverflow. May. 11 2022, How to make the Substring.