 Hogwarts
Swift Initialization
Initialization - Initializers, Default Property Values, Default Initializers, Failable Initializers, Required Initializers
What is Initialization?
Initialization은 Classes, Structures, Enumerations 를 사용하기 위해 Instance 를 준비하는 과정을 말한다.
이것은 Stored Properties 를 위한 초기값을 설정하거나 new Instance 가 생성되기 전에 수행해야 하는 것들을 정리한다.
Initializers를 구현해야하며, Objective-C 와 달리 Swift 의 Initializers 는 값을 반환하지 않는다.
초기화의 주요 역할은 사용하기 전에 Instance가 올바르게 초기화되는 것을 보장하는 것이다.
그리고 세 Types 중 Classes는 Instance가 해제되기 전에 수행해야할 일을 구현할 수 있으며,
이를 Deinitialization이라 한다.
1. Setting Initial Values for Stored Properties 👩💻
1. All Stored Properties Must be Set
- Classes 와 Structures 의
Stored Properties는 Instance 가 생성되기 전 반드시모든 값을 저장해야한다. - Stored Properties 에 초기값을 설정할 때 사용되는
Initializers나Default Property Values는Property Observers 의 호출 없이이루어진다.
2. Initializers
init 키워드를 사용한다.
Syntax
init() {
   // perform some initialization here
}
struct Celsius {
    var temperature: Double
    init() {
        temperature = 16.0
    }
}

var c = Celsius()
print("The default temperature is \(c.temperature)° Celsius")
// The default temperature is 16.0° Celsius
3. Default Property Values
Properties 가 항상 동일한 초기값을 갖는다면 Default Property Values를 사용하는 것이 값을 선언에 더 가깝게 연결하고,
더 짧고 명확한 코드로 작성이 가능하며, 타입 추론을 허용한다.
또한, Default Property Values 를 사용하면, 이후 상속할 때 Initial Values 설정하는 것을 더욱 쉽게 만든다.
struct Celsius {
    var temperature = 16.0
}

var c = Celsius()
print("The default temperature is \(c.temperature)° Celsius")
// The default temperature is 16.0° Celsius
4. Setting a Default Property Value with a Closure or Function
1 ) IIFE
상수나 변수에 값을 저장할 때 사용자 정의 로직이나 설정이 필요한 경우가 있을 수 있다.
Swift 에서는 이를 위해 Closure나 Global Function를 사용할 수 있는데, 정의함과 동시에 실행시키고 그 값을 반환하도록 해,
이 return value를 상수 또는 변수에 저장하는 것이다.
좀 더 쉽고 간결한 예를 위해 TypeScript 의 로직을 본 후 Swift 와 비교해보자.
TypeScript 는 이러한 로직을 IIFE(Immediately Invoked Function Expression)라 한다.
let someNumber: number = 13
const isEven: string = (() => someNumber % 2 === 0 ? "This is an even number" : "This is an odd number")()
console.log(isEven) // This is an odd number
그리고 Swift 로 구현한 예를 보자.
var someNumber: Int = 13
let isEven: String = { someNumber % 2 == 0 ? "This is an even number" : "This is an odd number" }()
print(isEven)       // This is an odd number
어디서 많이 본 것 같지 않은가? Lazy Stored Properties 에서 lazy modifier 만 빠진 것과 같다는 것을 알 수 있다.
즉, 위와 같은 기법을 이용해 Stored Properties 의 Initial Values 를 설정할 때 사용자 정의 로직을 정의하는 것이 가능하다.
2 ) Compare Lazy Stored Properties
Syntax
class SomeClass {
    let someProperty: SomeType = {
        // create a default value for someProperty inside this closure
        // someValue must be of the same type as SomeType
        return someValue
    }()

    lazy var someLazyStoredProperty: SomeType = {
        // property definition goes here
        return someValue
    }()
}
단, 이 방법을 사용할 때 주의해야할 것은 해당 Closures 가 정의되고 실행되는 시점은 'Instance가 생성되기 전'이라는 것이다.
즉, 어떠한 Instance Properties나 Instance Methods에도 접근할 수 없다는 것을 의미한다.
IIFE 처럼 작동하는 이 방법과 Lazy Stored Properties 의 차이점은
lazymodifier 를 붙였는가이다.
즉,lazymodifier 로 인해Stored Properties 를 저장하는 방법이 변경되는 것이다.
lazy modifier 를 붙이지 않으면 IIFE 와 같이 작동한다. 따라서 Instance 가 생성되기 전에 값이 반드시 저장되어야하므로let,var키워드를 모두 사용할 수 있다. 단, Instance 생성 시점보다 먼저 실행이되므로, 어떠한 Instance Properties 나 Instance Methods 에도 접근할 수 없다.lazy modifier 를 붙이면 이것은 Lazy Stored Properties 로 작동하므로, Instance 가 생성된 후 최초로 사용할 때 저장된다. 즉, 다른 Instance Properties 나 Instance Methods 에 접근할 수 있다.
3 ) Default Property Value with a Closure Examples

8x8 체스판이 있다. 체스판을 Structures 를 이용해 구현하자.
사각형이 검정색인지 여부를 true, false 로 표현하도록 하고, 좌측 상단(1, 1)에서 우측 하단(8, 8)으로
표현된다고 가정하면 Chessboard Structure 는 Array of [8][8] Bool values를 이용해 다음과 같이 정의될 수 있다.
struct Chessboard {
    let boardColors: [[Bool]] = {
        var temporaryBoard: [[Bool]] = []
        var isBlack = false
        for i in 1...8 {
            var aLine: [Bool] = []
            for j in 1...8 {
                aLine.append(isBlack)
                isBlack = !isBlack
            }
            temporaryBoard.append(aLine)
            isBlack = !isBlack
        }
        return temporaryBoard
    }()
    func squareIsBlackAt(row: Int, column: Int) -> Bool {
        boardColors[row - 1][column - 1]
    }
}
let board = Chessboard()
printColor(1, 1)    // (1, 1) is white square
printColor(1, 2)    // (1, 2) is black square
printColor(1, 8)    // (1, 8) is black square
printColor(2, 1)    // (2, 1) is black square
printColor(8, 8)    // (8, 8) is white square


func printColor(_ row: Int, _ column: Int) {
    print("(\(row), \(column)) is \(board.squareIsBlackAt(row: row, column: column) ? "black" : "white") square")
}
2. Customizing Initialization 👩💻
1. Initialization Parameters
다른 프로그래밍 언어는 일반적으로 initializer의 overload를 처리하는 방법은 다음과 같다.
- Parameters 의 개수로 구분
- Parameters 의 개수와 Parameter Types 를 함께 구분
즉, Types 를 함께 구분하더라도 동일한 Parameters 개수와 Types 는 overload 를 할 수 없다는 말이 된다.
하지만 Swift 는
Argument Labels를 생략하지 않는다면 다음과 같이 더 세분화해overload를 처리한다.
Parameters의 개수와Parameter Types에 추가로Argument Labels까지 구분해 overload 를 처리한다.따라서 Swift 는 아래 예제와 같이 동일한 Parameters 의 개수와 Parameter Types 를 갖더라도 Argument Labels 를 다르게 해 화씨를 섭씨로 바꾸는 initializer 와 켈빈을 섭씨로 바꾸는 initializer 를
overload할 수 있다.
struct Celsius {
    var temperatureInCelsius: Double

    init(fromFahrenheit fahrenheit: Double) {
        temperatureInCelsius = (fahrenheit - 32.0) / 1.8
    }
    init(fromKelvin kelvin: Double) {
        temperatureInCelsius = kelvin - 273.15
    }
}
let boilingPointOfWater = Celsius(fromFahrenheit: 212.0)
// boilingPointOfWater.temperatureInCelsius is 100.0

let freezingPointOfWater = Celsius(fromKelvin: 273.15)
// freezingPointOfWater.temperatureInCelsius is 0.0
2. Parameter Names and Argument Labels
앞의 예에서 이미 본 것처럼 initializer는 함수나 메서드와 마찬가지로 Parameter Names와 Argument Labels를 모두
가질 수 있다.
struct Color {
    let red, green, blue: Double

    init(red: Double, green: Double, blue: Double) {
        self.red   = red
        self.green = green
        self.blue  = blue
    }
    init(white: Double) {
        red   = white
        green = white
        blue  = white
    }
}
let magenta = Color(red: 1.0, green: 0.0, blue: 1.0)
let halfGray = Color(white: 0.5)
3. Initializer Parameters Without Argument Labels
initializer 도 함수나 메서드와 마찬가지로 기본적으로 Argument Labels 는 생략이 불가능하다. 생략을 위해서는
Argument Labels 에 _를 사용해 override 함으로써 생략할 수 있다.
struct Celsius {
    var temperatureInCelsius: Double
    init(fromFahrenheit fahrenheit: Double) {
        temperatureInCelsius = (fahrenheit - 32.0) / 1.8
    }
    init(fromKelvin kelvin: Double) {
        temperatureInCelsius = kelvin - 273.15
    }
    init(_ celsius: Double) {
        temperatureInCelsius = celsius
    }
}
let bodyTemperature = Celsius(37.0)
// bodyTemperature.temperatureInCelsius is 37.0
4. Optional Property Types
다음과 같은 이유로 인해 Properties 가 Optional Types가 되어야하는 경우가 있을 수 있다.
- Initialization 하는 동안 값을 설정할 수 없어
nil을 허용해야하는 경우 - 논리적으로
nil을 허용해야하는 경우
nil을 허용하기 위해 반드시 Optional Types로 정의되어야하며, Properties 는 자동으로 nil로 초기화된다.
class SurveyQuestion {
    var text: String
    var response: String?
    init(text: String) {
        self.text = text
    }
    func ask() {
        print(text)
    }
}
질문에 대한 응답을 얻기 전까지 response 값은 nil을 허용해야하므로 Optional Property Types 로 정의되어야한다.
let cheeseQuestion = SurveyQuestion(text: "Do you like cheese?")
print(cheeseQuestion.response as Any)   // nil

cheeseQuestion.ask()    // Do you like cheese?
cheeseQuestion.response = "Yes, I do like cheese"
print(cheeseQuestion.response as Any)   // Optional("Yes, I do like cheese")
5. Assigning Constant Properties During Initialization
Stored Properties 는 Instance가 생성되기 전, 그러니까 Initialization 이 종료되기 전에 반드시 값을 가져야한다.
cf. All Stored Properties Must be Set
Initialization 이 종료되기 전까지 어느 시점에서든 let 키워드로 선언한 Constant Properties에 값을 할당할 수 있다.
class SurveyQuestion {
    let text: String
    var response: String?
    init(text: String) {
        self.text = text
    }
    func ask() {
        print(text)
    }
}
let beetsQuestion = SurveyQuestion(text: "How about beets?")
beetsQuestion.ask()     // How about beets?
beetsQuestion.response = "I also like beets. (But not with cheese.)"
print(beetsQuestion.response as Any)    // Optional("I also like beets. (But not with cheese.)")
let 키워드로 바꾼 text property 가 Initializer 에 의해 할당돼 “How about beets?” 를 잘 출력하는 것을 볼 수 있다.
주의해야 할 것은 이것이 Initialization 이 종료되기 전까지 여러 번 할당해 수정할 수 있다는 뜻은 아니다.
Initialization 이 종료되기 전 이라도 한 번 할당된 값은
immutable속성을 갖기 때문에 수정할 수 없다.
또한 Class Instances 에서 Initialization 을 진행하는 동안 Constant Properties 를 수정하는 것은 해당 Properties 를 도입한 Class 에서만 가능하다. Subclass 에서 수정하는 것은 불가능하다.
class SurveyQuestion {
   let text: String
   var response: String?
   init(text: String) {
      self.text = "Do you like cheese?"
      self.text = text  // Immutable value 'self.text' may only be initialized once
   }
   func ask() {
      print(text)
   }
}
3. Default Initializers 👩💻
1. Default Initializers for Structures and Classes
Structures 또는 Classes 에 Default Initializers가 자동 생성되는 조건은 다음과 같다.
- 모든 Properties 가
default value를 가지고 있다 - 존재하는
Initializers 가 하나도 없다
참고로 Classes 의
Default Initializers는 항상Designated Initializers가 된다.
- default value 를 모두 가지고 있으나 Initializer 가 존재하는 경우
class ShoppingListItem {
    var name: String?
    var quantity = 1
    var purchased = false

    init(name: String) {
        self.name = name
    }
}
var item = ShoppingListItem(name: "Bread")
모든 Properties 가 default value 를 가지고 있지만 Initializers 가 존재하기 때문에 Default Initializers 는 생성되지 않는다.
Optional Types는 자동으로nil을default value로 갖는다
- default value 를 모두 가지고 있지 않은 경우
class ShoppingListItem {
    var name: String
    var quantity = 1
    var purchased = false

    init(name: String) {
        self.name = name
    }
}
var item = ShoppingListItem(name: "Bread")
default value 를 가지고 있지 않은 Properties 가 존재할 경우 반드시 해당 Properties 에 값을 설정할 Initializers 가
필요하므로 Swift 는 Compile error 를 발생시켜 Initializers 를 반드시 구현하도록 한다.
따라서 Default Initializers 는 생성되지 않는다.
- default value 를 모두 가지고 있으며 Initializer 가 존재하지 않는 경우
class ShoppingListItem {
    var name: String?
    var quantity = 1
    var purchased = false
}
var item = ShoppingListItem()
Swift 가 자동으로 Default Initializers를 생성한다.
2. Memberwise Initializers for Structure Types
Structures 는 Classes 와 달리 Mmeberwise Initializers를 추가로 가질 수 있으며 자동 생성되는 조건은 다음과 같다.
- 존재하는
Initializers 가 하나도 없다
Default Initializers 와 달리 default value 를 가지고 있어야 할 필요가 없다.
단지 이 default value 의 존재 유무에 따라 모든 Member Properties 를 설정하기 위해
자동 생성되는 'Initializers' 의 경우의 수만 달라질 뿐이다.
Custom Initializers가 존재하는 경우, 더 이상Default Initializers나Memberwise Initializers에 접근할 수 없다.
- Memberwise Initializers
struct Size {
    var width: Double, height:Double
}
var square = Size(width: 2.0, height: 2.0)
struct Size {
    var width: Double = 5.0, height:Double
}
var square = Size(height: 5.0)
var rectangle = Size(width: 7.0, height: 3.0)
- Default Initializers & Memberwise Initializers
struct Size {
    var width: Double = 5.0, height:Double = 5.0
}
var square = Size()
var rectangle = Size(width: 7.0)
var anotherRectangle = Size(height: 12.0)
var hugeSquare = Size(width: 100.0, height: 100.0)
4. Initializer Delegation for Value Types 👩💻
Initializers 는 Instance 를 생성할 때 코드가 중복되는 것을 방지하기 위해 다른 Initializers 를 호출할 수 있는데,
이것을 Initializer Delegation이라 한다.
Initializer Delegation 이 작동하는 방식과 Delegation 을 허용하는 범위는 Value Types 와 Class Types 가 다르다.
- Value Types: 상속을 허용하지 않으므로
자신의 context 내 다른 Initializers에만 Delegation 이 허용된다. - Class Types: 상속을 허용하므로, Classes 는
상속한 모든 Stored Properties 에 정확한 값이 설정되도록 하기 위한 책임이 필요함을 의미한다.
struct Size {
    var width = 0.0, height = 0.0
}
struct Point {
    var x = 0.0, y = 0.0
}

struct Rect {
    var origin = Point()
    var size = Size()
    init() {}
    init(origin: Point, size: Size) {
        self.origin = origin
        self.size = size
    }
    init(center: Point, size: Size) {
        let originX = center.x - (size.width / 2)
        let originY = center.y - (size.height / 2)
        self.init(origin: Point(x: originX, y: originY), size: size)
    }
}
let basicRect = Rect()
let originRect = Rect(origin: Point(x: 2.0, y: 2.0), size: Size(width: 5.0, height: 5.0))
let centerRect = Rect(center: Point(x: 4.0, y: 4.0), size: Size(width: 3.0, height: 3.0))

printRect(basicRect)    // The origin is (0.0, 0.0) and its size is (0.0, 0.0)
printRect(originRect)   // The origin is (2.0, 2.0) and its size is (5.0, 5.0)
printRect(centerRect)   // The origin is (2.5, 2.5) and its size is (3.0, 3.0)


func printRect(_ rect: Rect) {
    print("The origin is (\(rect.origin.x), \(rect.origin.y)) and its size is (\(rect.size.width), \(rect.size.height))")
}
5. Class Inheritance and Initialization 👩💻
Swift 는 Classes 의 모든 Stored Properties 가 Initialization 가 진행되는 동안 초기값을 가질 수 있도록
Designated Initializers와 Convenience Initializers라는 두 가지 종류의 Initializers 를 제공한다.
1. Designated Initializers and Convenience Initializers
Designated Initializers는 Class 의 Primary Initializers로, Class 의 모든 Properties 를 초기화하고,
Superclass 로 올라가며 적절한 Initializers 를 찾아 Initialization Chaining을 한다.
모든 Classes 는 최소한 하나의 Designated Initializers 를 가져야하며, 경우에 따라 Superclass 로부터 하나 또는
그 이상의 Designated Initializers 를 상속받는 것으로 충족된다.
Convenience Initializers는 Optional로 필요에 따라 작성하면 된다.
2. Syntax for Designated and Convenience Initializers
Syntax
- Designated Initializers
init(parameters) {
    statements
}
- Convenience Initializers
init 앞에 convenience modifier 를 붙인다
convenience init(parameters) {
    statements
}
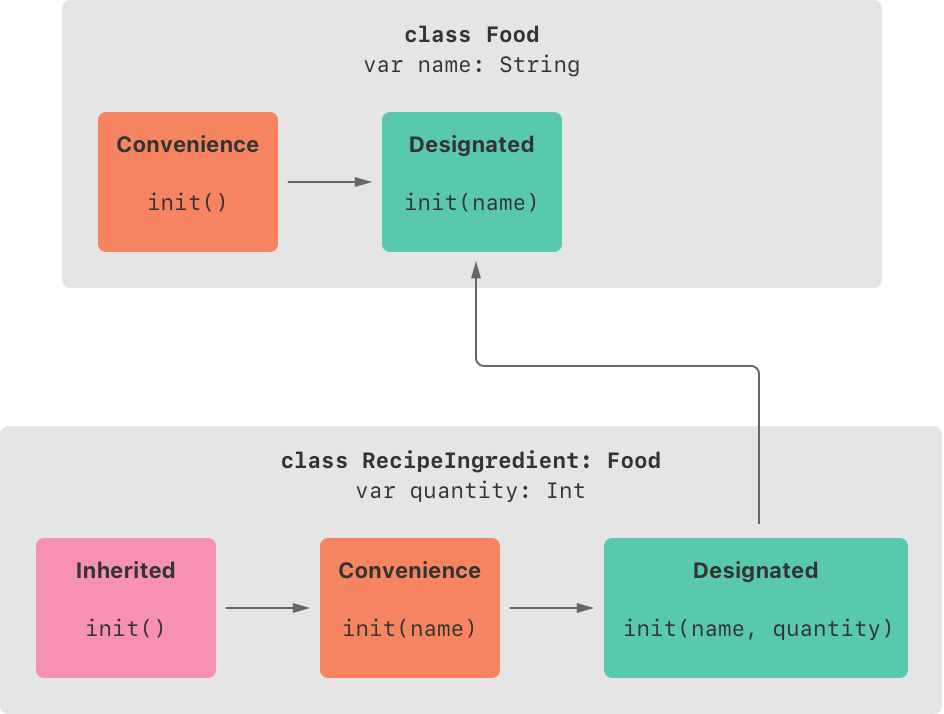
3. Initializer Delegation for Class Types
Designated Initializers 와 Convenience Initializers 의 관게를 단순화하기 위해 Initializer Delegation 에 3가지 규칙을 적용한다.
- 규칙 1.
Designated Initializers는Superclass 의 Designated Initializers 를 호출해야한다. - 규칙 2.
Convenience Initializers는context 내 다른 Initializers 를 호출해야한다. - 규칙 3.
Convenience Initializers는궁극적으로 Designated Initializers 를 호출해야한다.
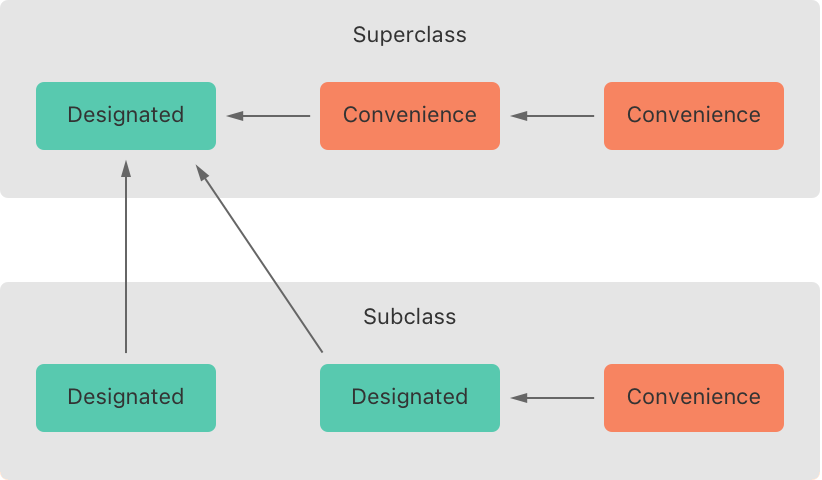
위 그림에서
Superclass는 규칙 2와 규칙3을 만족한다.Base Class이므로 규칙 1은 적용되지 않는다.Subclass는 규칙 2와 규칙3을 만족하고, 규칙 1 역시 만족한다.
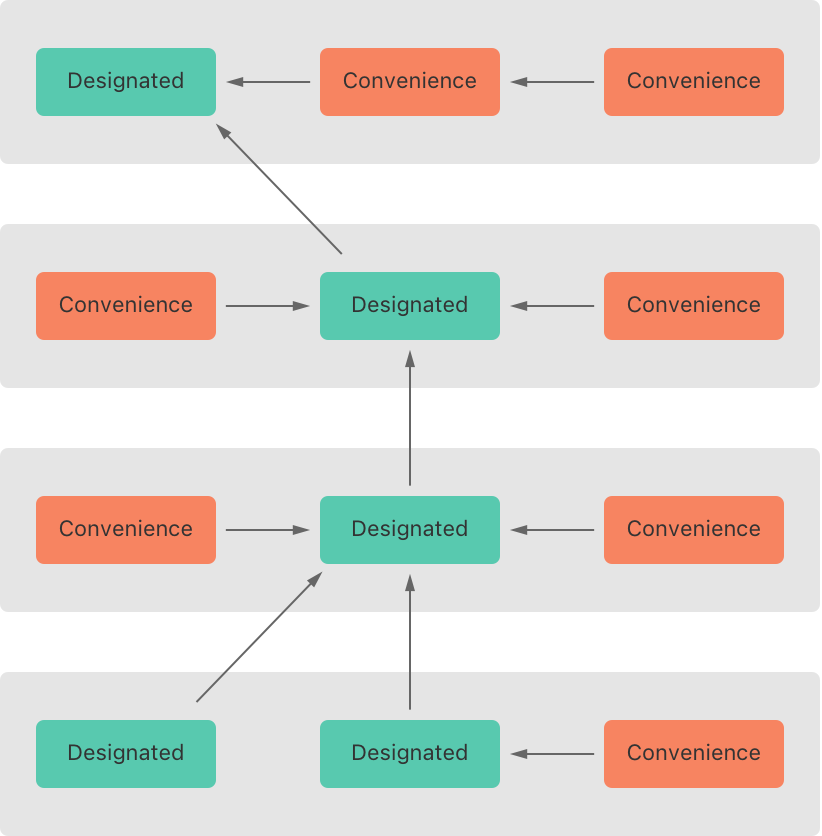
다음 그림은 좀 더 복잡한 hierarchy 구조에서 Initializer Delegation이 이루어질 때 Designated Initializers가
어떻게 funnel point 역할을 하는지를 보여준다.
4. Two-Phase Initialization
1 ) Two-Phase Initialization
Swift 에서 Class Initialization 은 2단계 프로세스를 갖는다.
- Phase 1. 각
Stored Properties가 그것을 정의한 Class 에 의해초기값이 할당된다. - Phase 2.
Instance 를 생성하기 전Stored Properties 를 추가로Customizing 할 기회가 주어진다.
Swift 의
Two-Phase Initialization프로세스는 Objective-C 의Initialization과 유사하다.
하지만 Objective-C 는 Phase 1에서 모든 Properties 에0또는nil을 할당하는 반면, Swift 는Custom Initial Values를 설정할 수 있고,0또는nil이 유효한 기본값이 아닌 경우에 대처할 수 있는 유연성을 갖는다.
2 ) Safety Check
Swift 는 에러 없이 Initialization 이 완료되었는지 보장하기 위해 4가지 Safety Check를 수행한다.
- Safety Check 1. Designated Initializers 는 Superclass Initializer 에
delegates up하기 전context 내 모든 Properties 가 초기화 되었음을 확인한다. - Safety Check 2.
Designated Initializers 는 상속된 Properties 에 값을 할당하기 전반드시 Superclass Initializer 에delegates up해야한다(반대 순서가 될 경우 Superclass Initializer 가 값을 덮어쓴다). - Safety Check 3. Check 2와 마찬가지로
Convenience Initializers 는 Properties 에 값을 할당하기 전반드시 다른 Initializers 에delegates해야한다. - Safety Check 4. Initializers 는
Phase 1 Initialization 이 종료되기 전어떠한 Instance Methods 나 Instance Properties 에접근하거나 'self' 참조를 할 수 없다.
3 ) Two-Phase Initialization Process
위 Safety Check 를 기반으로 Two-Phase Initialization 이 수행되는 방식은 다음과 같다.
Phase 1: 0, nil, Custom Initial Values 등의 값을 할당해Instance 의 메모리르 완전히 초기화한다

- Designated Initializers 또는 Convenience Initializers 가 Class 에서 호출된다.
new Instance 를 위한 메모리가 할당된다(초기화는 하기 전).- Designated Initializers 가 context 내 모든 Stored Properties 가 값을 가지고 있는지 확인한다 (이때
Stored Properties 에 대한 메모리가 초기화된다).- Designated Initializers 는 Superclass 의 Initializers 가 자신의 Stored Properties 에 동일한 일을 수행하도록 내버려둔다.
- 위 과정은
Base Class(최상위 Class)에 도달할 때까지Chaining된다.delegates up 이 Base Class 에 도달하고,Final Class(최하위 Class)가 모든 값을 저장했다고 확인하면, Instance 의 메모리는 완벽히 초기화 되었다고 간주하고,Phase 1이 완료된다.
Phase 2:Customizing할 기회를 처리한다
- Phase 1이 Final Class 에서 Base Class 까지 delegates up 을 하며 Chaining 을 했다면 이번에는 반대로 Base Class 에서 Final Class 까지
working back down을 하며 내려간다.Phase 2는 Phase1 이 Instance 의 메모리를 초기화 했기 때문에 Instance Methods 나 Instance Properties 에접근하거나 'self' 참조를 할 수 있다.- Superclass 의 Designated Initializers 에게 주어진 Customizing 할 기회를 모두 처리하면 Subclass 의 Designated Initializers 에게 Customizing 할 기회가 주어진다.
- 위 과정은
Phase 1의 Chaining 의 역순으로 일어나며마지막으로 원래 호출되었던 Convenience Initializers 에 도달한다.- 이 과정을 모두 완료하면 Initialization 이 종료되고, 의도한 Instance 를 얻게 된다.
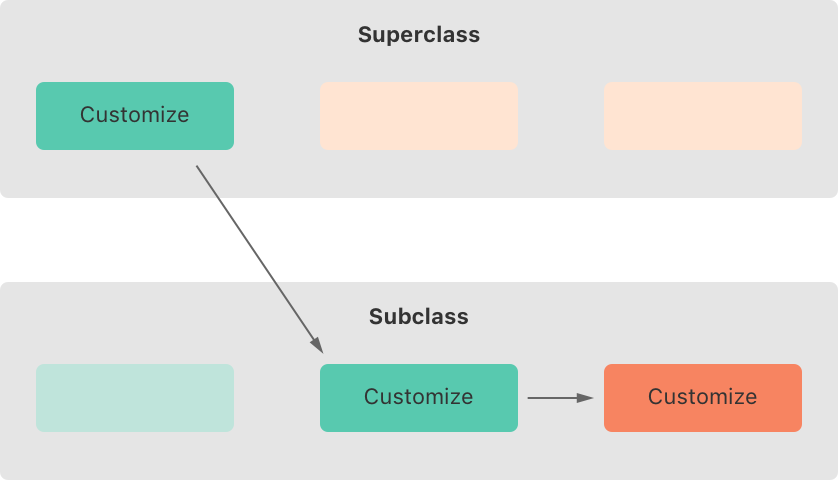
그림을 보면 알 수 있듯이, Convenience Initializers 의 Customizing 이 사용되는 것은, 처음 호출을 시작한
Convenience Initializers 의 Chaining 경로에 있는 경우 뿐이다.
Superclass 가 가지고 있는 Convenience Initializers 는 Subclass 에서 직접 호출되거나
Overriding 되는 것이 불가능하기 때문이다.
하지만 Superclass 의 Convenience Initializers 가 항상 무시되는 것은 아니다. 특정 조건이 일치될 경우 Superclass 의
Convenience Initializers 는 Subclass 에 자동으로 상속된다. 이것은 아래
Automatic Initializer Inheritance에서 설명한다.
5. Initializer Inheritance and Overriding
1 ) Difference between Objective-C and Swift
- Objective-C : Subclass 는
Superclass 의 Initializers 를 기본으로 상속한다 - Swift : Subclass 는
Superclass 의 Initializers 를 기본으로 상속하지 않는다
이로써 Swift 는 Superclass 로부터 상속된 Initializers 가 완전히 초기화되지 않거나 잘못 초기화된 채로
Subclass 의 new Instance를 생성하기 위해 사용되는 상황을 방지한다.
2 ) Inherit Superclass’s Initializers by Overriding
Superclass 의 Designated Initializers 의 구문과 일치하는 형태의 Initializers 를 Subclass 에서 구현할 때는
Properties, Methods 와 마찬가지로 반드시 override modifier 를 사용해야한다.
- Subclass 에서 구현하는 Initializers 가 Designated Initializers 든, Convenience Initializers 든 상관 없이
Superclass 의 Designated Initializers 를 재정의 하는 경우라면 반드시override modifier 를 사용해야한다.- 반면, Subclass 에서 구현하는 Initializers 가
Superclass 의 Convenience Initializers 와 일치하는 경우는override modifier 를 사용하지 않는다.
Initializer Delegation for Class Types 에서 설명한 규칙에 따라Superclass 의 Convenience Initializers는Subclass 에 의해 직접 호출되거나 Overriding 되는 것이 불가능하기 때문에 새롭게 구현하는 것이므로override modifier 를 사용하지 않는다.
3 ) Initializer Inheritance Examples
- Base Class: Vehicle
class Vehicle {
    var numberOfWheels = 0
    var description: String {
        "\(numberOfWheels) wheels(s)"
    }
}
Vehicle 은 하나의 Stored Property 와 하나의 Computed Property 를 갖는다.
그리고 Stored Property 는 Default Value 를 제공한다.
대신 Custom Initializers 를 제공하지 않는다. 그 결과 자동으로 Default Initializers 를 생성하고,
이것은 Designated Initializers 가 된다.
var vehicle = Vehicle()
print("Vehicle: \(vehicle.description)")    // Vehicle: 0 wheels(s)
- Subclass: Bicycle
class Bicycle: Vehicle {
    var hasBasket = false
    override init() {
        super.init()
        numberOfWheels = 2
    }
}
Vehicle 의 Subclass 인 Bicycle 은 init()이라는 Custom Initializers를 생성했고, 이것은 Superclass 에 존재하는
것과 일치하므로, Overriding 을 해야만한다.
- Bicycle 의
init()이 호출되면 new Instance 를 위한 메모리를 할당하고, 자신의 context 내에 정의된 hasBasket 이라는 Stored Property 의 메모리를 초기화 한 후Superclass 의 Designated Initializers 인 super.init() 을 호출한다. - 이제 Vehicle 이 자신의 Stored Property 인 numberOfWheels 의 메모리를 초기화한다.
- Vehicle 은 Base Class 이고, Final Class 인 Bicycle 이 모든 Properties 를 저장했다고 확인하므로써
new Instance를 초기화하며 Phase 1이 완료된다. - 이제 Chain 을
working back down하며 수정할 기회를 얻은 Bicycle 의 Initializers 가numberOfWheels 를 수정한다. - 모든 과정이 종료되면 Initialization 이 종료되며 Instance 가 생성된다.
좀 더 자세히 설명하면, 아래와 같은 코드는 잘못되었음을 의미한다.
class Bicycle: Vehicle {
    var hasBasket: Bool
    override init() {
        super.init()
        hasBasket = false
        numberOfWheels = 2
    }
}
Superclass 의 Designated Initializers 를 호출하기 전 자신의 context 내에 정의된 Stored Property 의 메모리를 초기화 하지 않았다.
따라서 다음과 같은 코드가 올바른 코드임을 의미한다.
class Bicycle: Vehicle {
    var hasBasket: Bool
    override init() {
        hasBasket = false
        super.init()
        numberOfWheels = 2
    }
}
4 ) Another Examples having no ‘Phase 2’
Vehicle 의 또 다른 Subclass 인 Hoverboard 를 보자.
class Hoverboard: Vehicle {
    var color: String
    init(color: String) {
        self.color = color
        super.init()
    }
    override var description: String {
        "\(super.description) in a beautiful \(color)"
    }
}
Bicycle 의 Initializers 와 Hoverboard 의 Initializers 를 비교해보자.
- Subclass: Bicycle
override init() {
    /* Phase 1 */
    hasBasket = false   // initiate self properties
    super.init()        // delegates up

    /* Phase 2 */
    numberOfWheels = 2  // opportunity to customize
}
- Subclass: Hoverboard
init(color: String) {
    /* Phase 1 */
    self.color = color  // initiate self properties
    super.init()        // delegates up

    /* Phase 2 */
    // do anything customize
}
Bicycle 은 Phase 2가 존재하지만, Hoverboard 는 Phase 2가 존재하지 않는다. 따라서 이 경우 super.init()은
Initializers 의 마지막에 암시적으로 호출될 수 있기 때문에 생략이 가능하다.
class Hoverboard: Vehicle {
    var color: String
    init(color: String) {
        self.color = color
//        super.init() implicitly called here
    }
    override var description: String {
        "\(super.description) in a beautiful \(color)"
    }
}
let hoverboard = Hoverboard(color: "silver")
print("Hoverboard: \(hoverboard.description)")  // Hoverboard: 0 wheels(s) in a beautiful silver
Subclass 의 Designated Initializers 가
Superclass 의 Designated Initializers 호출을 생략할 수 있는 조건은 다음과 같다.
Subclass의 Initializers 가Phase 2의 수정할 기회를 사용하지 않는다.Superclass의 Initializers 가Synchronous다.
(Asynchronous일 경우 반드시await키워드를 붙여await super.init()과 같이 명시적으로 작성해야 하기 때문에 생략할 수 없다)
6. Automatic Initializer Inheritance
Initializer Inheritance and Overriding 에서 설명했던 것처럼
Swift 의 Subclass 는 Superclass 의 Initializers 를 기본으로 상속하지 않는다. 하지만 자동으로 상속하는 조건은 존재한다.
그 조건은 다음과 같다.
- Designated Initializers 의 자동 상속 :
Subclass 가 아무런 Designated Initializers 를 정의하지 않았다면, 자동으로Superclass 의 모든 Designated Initializers 를 상속한다.- Convenience Initializers 의 자동 상속 : Subclass 가 위 “Designated Initializers 의 자동 상속” 규칙에 따라 생성 하든, 직접 구현을 해 생성 하든,
Superclass 와 매칭되는 모든 Designated Initializers 를 제공하면, 자동으로Superclass 의 모든 Convenience Initializers 를 상속한다.
- Case 1
class Vehicle {
    var numberOfWheels = 0
    var description: String {
        "\(numberOfWheels) wheels(s)"
    }
}
class Hoverboard: Vehicle {
    var color = "Gray"
    override var description: String {
        "\(super.description) in a beautiful \(color)"
    }
}
let hoverboard = Hoverboard()
print("Hoverboard: \(hoverboard.description)")  // Hoverboard: 0 wheels(s) in a beautiful silver
Hoverboard 는 Vehicle 의 init()을 상속했다.
- Case 2
class Vehicle {
    var numberOfWheels: Int
    var description: String {
        "\(numberOfWheels) wheels(s)"
    }

    init(numberOfWheels: Int) {
        self.numberOfWheels = numberOfWheels
    }
}
class Bicycle: Vehicle {
    var hasBasket = false
}
let bicycle = Bicycle(numberOfWheels: 2)
print(bicycle.description)  // 2 wheels(s)
Bicycle 은 Vehicle 의 init(numberOfWheels:)를 상속했다.
- Case 3
class Vehicle {
    var numberOfWheels = 1
    var description: String {
        "\(numberOfWheels) wheels(s)"
    }

    init() {}
    init(numberOfWheels: Int) {
        self.numberOfWheels = numberOfWheels
    }
}
class Bicycle: Vehicle {
    var hasBasket = false
}
let unicycle = Bicycle()
print(unicycle.description) // 1 wheels(s)

let bicycle = Bicycle(numberOfWheels: 2)
print(bicycle.description)  // 2 wheels(2)
Bicycle 은 Vehicle 의 init()과 init(numberOfWheels:)를 상속했다.
7. Designated and Convenience Initializers in Action
Food, RecipeIngredient, ShoppingListItem 라는 3개의 Class 계층을 통해 위에서 설명한 내용을 설명한다.
1 ) Base Class: Food
class Food {
    var name: String

    init(name: String) {
        self.name = name
    }
    convenience init() {
        self.init(name: "[Unnamed]")
    }
}
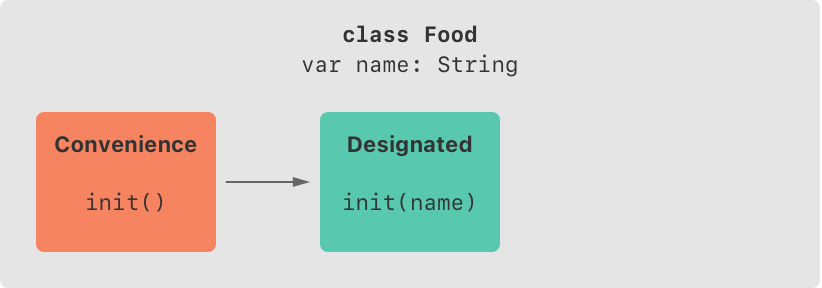
Classes 는
Memberwise Initializers 를 가지고 있지 않기 때문에Food 는 name 을 arguments 로 갖는 Designated Initializers 를 구현했다.그리고 Food 는 arguments 를 갖지 않는
init()을Convenience Initializers로 구현했다. 이 Convenience Initializers 은 context 내 다른 Initializers 를 호출하며,궁극적으로 Designated Initializers 를 호출하고있다.
let namedMeat = Food(name: "Bacon")
print(namedMeat.name)   // Bacon

let mysteryMeat = Food()
print(mysteryMeat.name) // [Unnamed]
2 ) Subclass: RecipeIngredient
class RecipeIngredient: Food {
    var quantity: Int
    init(name: String, quantity: Int) {
        self.quantity = quantity
        super.init(name: name)
    }
}
Custom Initializers 가 존재하지만 Superclass 의 모든 Designated Initializers 를 제공하지 않기 때문에
Automatic Initializer Inheritance 는 발생하지 않는다. 따라서 현재 사용 가능한 Initializers 는
- Designated Initializers:
RecipeIngredient(name:quantity:)
하나 뿐이다.
이것을 Superclass의 Designated Initializers를 모두 제공해, Superclass 의 Convenience Initializers 가 자동으로 상속되게 만들어보자.
- Case 1
class RecipeIngredient: Food {
    var quantity: Int
    init(name: String, quantity: Int) {
        self.quantity = quantity
        super.init(name: name)
    }
    override init(name: String) {
        quantity = 1
        super.init(name: name)
    }
}
Superclass 의 Designated Initializers 를 모두 제공하므로써 Superclass 의 Convenience Initializers 가 자동으로 상속되어 사용 가능한 Initializers 는 3개가 된다.
- Designated Initializers:
RecipeIngredient(name:quantity:) - Designated Initializers:
RecipeIngredient(name:)(Overriding Superclass’s init(name:)) - Convenience Initializers:
RecipeIngredient()
- Case 2
class RecipeIngredient: Food {
    var quantity: Int
    init(name: String, quantity: Int) {
        self.quantity = quantity
        super.init(name: name)
    }
    override convenience init(name: String) {
        self.init(name: name, quantity: 1)
    }
}
이 방법 역시 Superclass 의 Designated Initializers 를 모두 제공해, 사용 가능한 Initializers 는 3개가 된다.
- Designated Initializers:
RecipeIngredient(name:quantity:) - Convenience Initializers:
RecipeIngredient(name:)(Overriding Superclass’s init(name:)) - Convenience Initializers:
RecipeIngredient()
위 Case 1과 Case 2모두 Superclass 의
Designated Initializersinit(name:)을 Overriding 하므로써 Initializers 가 3개가 되고, 모두 동일한 Instance 결과물을 얻는다는 것은 동일하지만 다음과 같은 차이를 갖는다.
- Case 1은 서로 다른 2개의 Designated Initializers(Custom Initializers 와 Overriding Initializers)가
Superclass 의 Designated Initialziers 에 독립적으로 delegates up한다.- Case 2는 Overriding Initializers 를 Convenience Initializers 로 만들어,
context 내 존재하는
Designated Initializers(Custom Initializers)로 delegates
하고, 이Designated Initializers 가 다시 Superclass 의 Designated Initializers 에 delegates up하도록 한다.- Case 2에서 상속할 때
override convenience를 붙였다고 Superclass 의 convenience Initializers 를 override 한 것이 아니니 혼동하지 말고 arguments 를 자세히 보자. Superclass 가 가지고 있는 Convenience Initializers 는 Subclass 에서 직접 호출되거나 Overriding 되는 것이 불가능함을 다시 상기하도록 하자.
let oneMysteryItem = RecipeIngredient()
let oneBacon = RecipeIngredient(name: "Bacon")
let sixEggs = RecipeIngredient(name: "Eggs", quantity: 6)

print("\(oneMysteryItem.name) : \(oneMysteryItem.quantity) ea")
print("\(oneBacon.name) : \(oneBacon.quantity) ea")
print("\(sixEggs.name) : \(sixEggs.quantity) ea")
[Unnamed] : 1 e
Bacon : 1 ea
Eggs : 6 ea
3 ) Subclass: ShoppingListItem
class ShoppingListItem: RecipeIngredient {
    var purchased = false
    var description: String {
        var output = "\(quantity) x \(name)"
        output += purchased ? " ✔" : " ✘"
        return output
    }
}
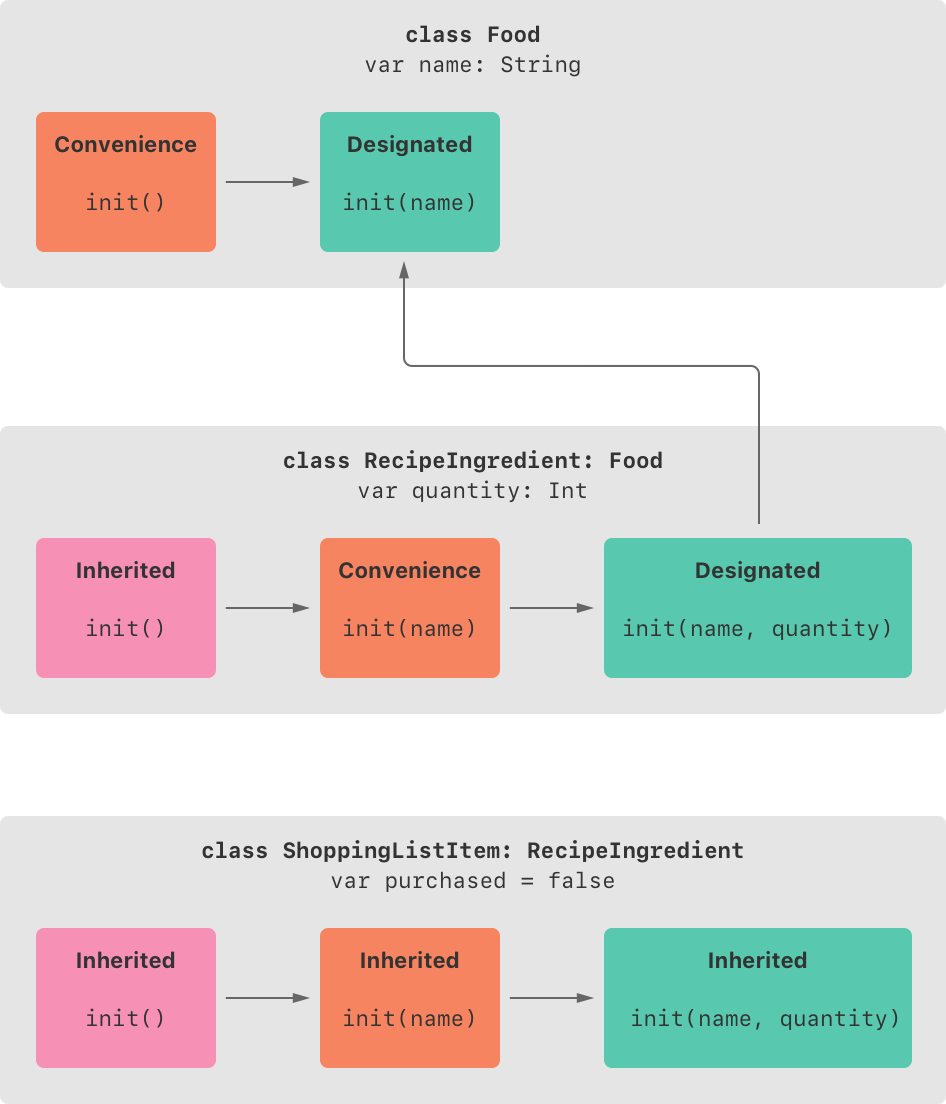
즉, 사용 가능한 Initializers는 3개가 된다.
- Designated Initializers:
ShoppingListItem() - Convenience Initializers:
ShoppingListItem(name:) - Convenience Initializers:
ShoppingListItem(name:quantity:)
RecipeIngredient 의 Subclass ShoppingListItem 은 자신의 Stored Property 에 default value 를 정의했고, Instance 는 해당 값을 항상 false 로 시작하므로 Initial Values 를 위한 Initializers 가 필요하지 않다.
따라서 ShoppingListItem 은 아무런 Designated Initializers 도 정의하지 않았기 때문에
Automatic Initializer Inheritance 가
발생해 Superclass 의 모든 Designated Initializers 를 상속
하고, 이로서 **Superclass 의 모든 Designated Initializers 를 모두 제공해Superclass 의 Convenience Initializers 도 자동으로 상속한다.
var breakfastList = [
    ShoppingListItem(),
    ShoppingListItem(name: "Bacon"),
    ShoppingListItem(name: "Eggs", quantity: 6)
]

breakfastList[0].name = "Orange juice"
breakfastList[0].purchased = true

breakfastList.forEach { print($0.description) }
1 x Orange juice ✔
1 x Bacon ✘
6 x Eggs ✘
6. Failable Initializers 👩💻
1. Failable Initializer Syntax
Classes, Structures, Enumerations의 Initialization 이 실패할 수 있는 경우 이에 대한 정의를 해주는 것이 유용할 수 있다. Initialization 이 실패할 수 있는 경우는 다음과 같다.
- 유효하지 않은 초기화 파라미터 값
- 필수 외부 리소스의 부재
- 초기화 성공을 방해하는 기타 다른 조건
Failable Initializers는 init? 키워드를 사용해 만들며, Parameters 의 개수와 Parameter Types, Argument Labels 가
모두 동일한 경우 Nonfailable Initializers 와 Failable Initializers 는 공존할 수 없다.
Failable Initializers 는 return nil을 이용해 Initialization 실패를 트리거 할 수 있고, 해당 Types 의 Optional 을 생성한다.
즉, Int Type 의 Nonfailable Initializers 가 Int 를 생성한다면, Failable Initializers 는 Int?를 생성한다.
엄밀히 말하면 Objective-C 와 달리
Swift 의 Initializers 는 값을 반환하지 않는다. Swift 에서 Initializers 의 역할은self 가 완전하고 정확히 초기화되도록 하는 것으로,return nil 은 오직 Failable Initializers 를 트리거 하기 위한 것으로, Initialization 이 성공인 경우return키워드를 사용하지 않는다.
Syntax
struct SomStructure {
    var someProperty: SomeType
    init?(someProperty: SomeType) {
        if someProperty.isEmpty { return nil }
        self.someProperty = someProperty
    }
}
- Failable Initializer of Int Types
let wholeNumber: Double = 12345.0
let pi = 3.14159

if let valueMaintained = Int(exactly: wholeNumber) {
    print("\(wholeNumber) conversion to Int maintains value of \(valueMaintained)")
}
// 12345.0 conversion to Int maintains value of 12345

let valueChanged = Int(exactly: pi)
if valueChanged == nil {
    print("\(pi) conversion to Int doesn't maintain value")
}
// 3.14159 conversion to Int doesn't maintain value

print(type(of: valueChanged))   // Optional<Int>
Int Types의 Nonfailable Initializers는 Int를 생성하고, Failable Initializers는 Int?를 생성한다.
- Nonfailable Initializer of Custom Types
Animal Types 구현을 통해 Nonfailable Initializers 와 Failable Initializers 의 차이를 알아보자.
struct Animal {
    let species: String
}
let someCreature = Animal(species: "Giraffe")
print("An animal was initialized with a species of \(someCreature.species)")
// An animal was initialized with a species of Giraffe
print(type(of: someCreature))       // Animal

let anonymousCreature = Animal(species: "")
print("An animal was initialized with a species of \(anonymousCreature.species)")
// An animal was initialized with a species of
print(type(of: anonymousCreature))  // Animal
Parameter Types 가 불일치하는 경우는 호출을 할 수 없기 때문에 init(species:)에 nil을 넘기는 것은 불가능하지만,
""은 논리적으로 문제가 있으나 코드상으론 올바른 형태이기 때문에 위와 anonymousCreature Instance 가 성공적으로 생성되었다.
- Failable Initializer of Custom Types
Failable Initializers 를 이용해 이 문제를 해결해보자.
struct Animal {
    let species: String
    init?(species: String) {
        if species.isEmpty { return nil }
        self.species = species
    }
}
let someCreature = Animal(species: "Giraffe")
if let giraffe = someCreature {
    print("An animal was initialized with a species of \(giraffe.species)")
}
// An animal was initialized with a species of Giraffe
print(type(of: someCreature))       // Optional<Animal>

let anonymousCreature = Animal(species: "")
if anonymousCreature == nil {
    print("The anonymous creature couldn't be initialized")
}
// The anonymous creature couldn't be initialized
print(type(of: anonymousCreature))  // Optional<Animal>
Failable Initializers 이므로 Animal?를 생성한다.
따라서 Animal?을 unwrapping하면 유효한 Parameters 를 갖는 someCreature 는
Animal Types 의 new Instance를 반환하고, anonymousCreature 는 nil을 반환한다.
2. Failable Initializers for Enumerations
enum TemperatureUnit {
    case kelvin, celsius, fahrenheit
    init?(symbol: Character) {
        switch symbol {
        case "K": self = .kelvin
        case "C": self = .celsius
        case "F": self = .fahrenheit
        default: return nil
        }
    }
}
let fahrenheitUnit = TemperatureUnit(symbol: "F")
if fahrenheitUnit != nil {
    print("This is a defined temperature unit, so initialization succeeded.")
}
// This is a defined temperature unit, so initialization succeeded.

let unknownUnit = TemperatureUnit(symbol: "X")
if unknownUnit == nil {
    print("This isn't a defined temperature unit, so initialization failed.")
}
// This isn't a defined temperature unit, so initialization failed.
3. Failable Initializers for Enumerations with Raw Values
Initializing from a Raw Value 를 다시 한 번 떠올려보자.
enum CompassPoint: String {
    case east, west, south, north
}
print("\(CompassPoint.east) is type of \(type(of: CompassPoint.east))")
print("\(CompassPoint.east.rawValue) is type of \(type(of: CompassPoint.east.rawValue))")

let east = CompassPoint(rawValue: "east")
print("Constant 'east' is type of \(type(of: east))")
east is type of CompassPoint
east is type of String
Constant 'east' is type of Optional<CompassPoint>
RawValues 를 갖는 Enumerations 는 자동으로 Failable Initializers
init?(rawValue:)를 생성한다.
따라서, 위 TemperatureUnit Enumerations 는 Raw Values 가 자동 생성하는 init?(rawValue:)를 이용해
다음과 같이 바꿀 수 있다.
enum TemperatureUnit: Character {
    case kelvin = "K", celsius = "C", fahrenheit = "F"
}
let fahrenheitUnit = TemperatureUnit(rawValue: "F")
if fahrenheitUnit != nil {
    print("This is a defined temperature unit, so initialization succeeded.")
}
// This is a defined temperature unit, so initialization succeeded.

let unknownUnit = TemperatureUnit(rawValue: "X")
if unknownUnit == nil {
    print("This isn't a defined temperature unit, so initialization failed.")
}
// This isn't a defined temperature unit, so initialization failed.
4. Propagation of Initialization Failure
1 ) Failable Initializers 를 Failable Initializers 에 delegates 하는 경우
- Classes, Structures, Enumerations 의 Failable Initializers 는 context 내 다른
Failable Initializer에
delegates될 수 있다. - Subclass 의 Failable Initializers 는 Superclass 의 Failable Initializers 에
delegates up될 수 있다.
이 프로세스는
즉시 Initialization 실패를 유발하고,전체 Initialization 프로세스를 중단시킨다.
class Product {
    let name: String
    init?(name: String) {
        if name.isEmpty { return nil }
        self.name = name
    }
}

class CartItem: Product {
    let quantity: Int
    init?(name: String, quantity: Int) {
        if quantity < 1 { return nil }
        self.quantity = quantity
        super.init(name: name)
    }
}
if let twoSocks = CartItem(name: "sock", quantity: 2) {
    print("Item: \(twoSocks.name), quantity: \(String(describing: twoSocks.quantity))")
}

if let zeroShirts = CartItem(name: "shirt", quantity: 0) {
    print("Item: \(zeroShirts.name), quantity: \(String(describing: zeroShirts.quantity))")
} else {
    print("Unable to initialize zero shirts")
}

if let oneUnnamed = CartItem(name: "", quantity: 1) {
    print("Item: \(oneUnnamed.name), quantity: \(oneUnnamed.quantity)")
} else {
    print("Unable to initialize one unnamed product")
}
Item: sock, quantity: 2
Unable to initialize zero shirts
Unable to initialize one unnamed product
zeroShirts는 Instance 생성에 실패했다.
oneUnnamed는 Instance 생성에 실패했다.
2 ) Failable Initializers 를 Nonfailable Initializers 에 delegates 하는 경우
- 달리
실패하지 않는 기존의 Initialization 프로세스에 잠재적인 실패 상태를 추가해야하는 경우Failable Initializers 를 Nonfailable Initializers 에 delegates하는 접근법을 사용한다. - 이 프로세스는 Initialization 프로세스에
failure state를 추가할 뿐,Initialization 은 성공한다
정확히는
Failable Initializers의 실패 처리를 하지 않고failur state를 추가한다. 즉, 결과물만 보면 에러처리 후Nonfailable Initializers를Nonfailable Initializers로delegates하는 것과 같다.
이것은 아래 Overriding a Failable Initializer 의 Case 3 와 연결된다.
class CartItem: Product {
    let quantity: Int
    init?(name: String, quantity: Int) {
        if quantity < 1 {
            self.quantity = -1
        } else {
            self.quantity = quantity
        }
        super.init(name: name)
    }
}
if let twoSocks = CartItem(name: "sock", quantity: 2) {
    print("Item: \(twoSocks.name), quantity: \(String(describing: twoSocks.quantity))")
}

if let zeroShirts = CartItem(name: "shirt", quantity: 0) {
    print("Item: \(zeroShirts.name), quantity: \(String(describing: zeroShirts.quantity))")
} else {
    print("Unable to initialize zero shirts")
}
Item: sock, quantity: 2
Item: shirt, quantity: -1
위 예제에서 확인할 수 있듯이 결론적으로 Failable Initializers 는 실패 처리를 하지 않았고, delegates 를
위임 받은 Initializers 는 Nonfailable Initializers 이기 때문에 모두 Instnace 생성에 성공했다.
단, 실패했어야 하는 케이스인 zeroShirt 는 실패 상태를 논리적으로 나타내기 위해 -1 이라는 failur state를
Custom Values 로 저장했다.
5. Overriding a Failable Initializer
Initializers Overriding 에 Failable Initializers 를 추가해 정리하면 다음과 같다.
| Superclass | Subclass | Allowed | |
|---|---|---|---|
| Case 1 | Nonfailable Initializer(init) | Nonfailable Initializer(init) | O |
| Case 2 | Failable Initializer(init?) | Failable Initializer(init?) | O |
| Case 3 | Failable Initializer(init?) | Nonfailable Initializer(init) | △ |
| Nonfailable Initializer(init) | Failable Initializer(init?) | X |
Failable Initializers 를 Failable Initializers 로 Overriding 하는 것은 기존에 Nonfailable Initializers 를 Nonfailable Initializers 로 Overriding 하는 것과 같다.
주의 깊게 봐야할 것은 위 표에서 Case 3과 Case 4다.
- Case 3 : Failable Initializers 를 Nonfailable Initializers 로 Overriding 하는 방법은
Superclass 의 Failable Initializers 결과를 Subclass 에서 Forced Unwrapping 하는 것이다.
(Superclass 의 Initializers 가 Optional Types 를 생성하는 반면, Subclass 의 Initializers 는 Normal Types 를 생성해야하기 때문이다. 위 Failable Initializers 를 Nonfailable Initializers 에 delegates 하는 경우 와 연관되므로 함께 보도록 한다.) - Case 4 :
Nonfailable Initializers 를 Failable Initializers 로 Overriding 하는 것은 허용되지 않는다.
(Phase 1에서 이미 Superclass 에서 초기화를 했는데, Subclass 가 Phase 2에서 수정 기회에 초기화를 실패하는 케이스가 발생할 수 있기 때문이다.)
아래 예제의 결과를 확인하기 위해 미리 다음 Closures 를 정의하고 시작한다.
let printTitle = { (variable: String, document: Document?) in
    guard let document = document else {
        print("\"\(variable)\" initialization failed")
        return
    }
    if document.name == nil {
        print("\"\(variable)\" initialization success, name is nil")
    } else {contacts
        print("\"\(variable)\" initialization success, name is \"\(document.name!)\"")
    }
}
Document 는 name 에 Non-empty String 과 nil 은 허용하지만 Empty String 은 허용하지 않는다.
class Document {
    var name: String?
    // this initializer creates a document with a nil name value
    init() {}
    // this initializer creates a document with a nonempty name value
    init?(name: String) {
        if name.isEmpty { return nil }
        self.name = name
    }
}
let unnamed = Document()
let contacts = Document(name: "Contacts")
let emptyName = Document(name: "")

printTitle("unnamed", unnamed)
printTitle("contacts", contacts)
printTitle("emptyName", emptyName)
"unnamed" initialization success, name is nil
"contacts" initialization success, name is "Contacts"
"emptyName" initialization failed
Non-empty String 과 nil은 Initialization 에 성공했지만, Empty String은 실패했다.
1 ) Case 3의 첫 번째 방법 - without Forced Unwrapping
Overriding 하려는 Superclass 의 Initializers 가 Failable Initializers일 때, Superclass 에
존재하는 다른 Nonfailable Initializers를 찾아 delegates up한다.
이름이 없거나(init -> nil), Empty String(init? -> ““)인 케이스가 초기화를 실패하지 않도록
Superclass 의 Nonfailable Initializers 쪽으로 우회시킨 후, Superclass 의 Failable Initializers 가
했어야 하는 일까지 모두 Subclass 가 Phase 2 에서 처리한다.
즉, 이 방법을 사용하기 위해서는 두 가지 조건이 반드시 필요하다.
- Superclass 에
Nonfailable Initializers가 존재할 것.- Superclass 의 Failable Initializers 가 Stored Properties 에 값을 저장하는 경우, Phase 2 에서 Customizing 할 기회를 이용해 처리할 수 있도록
Superclass 의 Properties가Variable일 것.
class AutomaticallyNamedDocument: Document {
    override init() {
        super.init()
        self.name = "[Untitled]"
    }
    override init(name: String) {
        super.init()
        if name.isEmpty {
            self.name = "[Untitled]"
        } else {
            self.name = name
        }
    }
}
let unnamed = AutomaticallyNamedDocument()
let contacts = AutomaticallyNamedDocument(name: "Contacts")
let emptyName = AutomaticallyNamedDocument(name: "")

printTitle("unnamed", unnamed)
printTitle("contacts", contacts)
printTitle("emptyName", emptyName)
"unnamed" initialization success, name is "[Untitled]"
"contacts" initialization success, name is "Contacts"
"emptyName" initialization success, name is "[Untitled]"
이 방법은
Forced Unwrapping없이 처리할 수 있다는 장점이 있지만 우회하기 위한 조건을 갖고 있어야하며, 우회한 결과가 논리적으로 동일한 결과를 도출할 수 있는지에 대한 책임이 개발자에게 주어진다.
2 ) Case 3의 두 번째 방법 - with Forced Unwrapping
Superclass 의 Failable Initializers 가 실패하지 않도록 예외 처리를 한 후, 생성된 Optional Instance 를
Subclass 에서 Forced Unwrapping한다.
class AutomaticallyNamedDocument: Document {
    override init() {
        super.init(name: "[Untitled]")!
    }
    override init(name: String) {
        if name.isEmpty {
            super.init(name: "[Untitled]")!
        } else {
            super.init(name: name)!
        }
    }
}
let unnamed = AutomaticallyNamedDocument()
let contacts = AutomaticallyNamedDocument(name: "Contacts")
let emptyName = AutomaticallyNamedDocument(name: "")

printTitle("unnamed", unnamed)
printTitle("contacts", contacts)
printTitle("emptyName", emptyName)
"unnamed" initialization success, name is "[Untitled]"
"contacts" initialization success, name is "Contacts"
"emptyName" initialization success, name is "[Untitled]"
이 방법의 장점은 우회를 하지 않기 때문에 우회했을 때 필요한
논리적 검증을 개발자가 할 필요가 없다는 것이다. 또한 우회를 하지 않으므로 Superclass 에Nonfailable Initializers 가 존재할 필요가 없으며, 코드가 더 직관적이게된다.그리고 마지막으로, 위 우회하는 케이스의 경우는 Subclass 에서 Phase 2에서 수정할 기회를 사용하기 때문에 Superclass 의 Stored Properties가 반드시
Variable이어야 했지만, 이 경우는Constant여도 문제 없이 Initialization 을 처리할 수 있다. 아래 예를 보면 Document 의 name 이let으로 선언되어 있지만 정상적으로 작동함을 확인할 수 있다.
class Document {
    let name: String?
    init?(name: String) {
        if name.isEmpty { return nil }
        self.name = name
    }
}

class AutomaticallyNamedDocument: Document {
    override init(name: String) {
        if name.isEmpty {
            super.init(name: "[Untitled]")!
        } else {
            super.init(name: name)!
        }
    }
}

let contacts = AutomaticallyNamedDocument(name: "Contacts")
print("\"contacts\" initialization success, name is \(contacts.name!)")
// "contacts" initialization success, name is Contacts
6. The init! Failable Initializer
일반적으로 Failable Initializers 는 ?를 붙여 만들지만, !를 붙여 암시적으로 unwrapping 된
Optional Instance 를 생성하는 Failable Initializer 를 정의할 수도 있다.
init!은 init?과 거의 동일하며 차이점은 다음과 같다.
| Nonfailable Initializers | Failable Initializers | ||
|---|---|---|---|
| Keyword | init | init? | init! |
| Created Instance | 'self' Type | 'self?' Type | 'self' Type |
init?은 Optional Types 를 반환하기 때문에delegates 를 위임한 Initializers 가 Unwrapping해야한다.init!은delegates 를 위임 받은 Initializers 가 Unwrapping후 결과를 반환한다.
따라서 바로 위 Case 3의 두 번째 방법을 init?에서 init!으로 바꾸면 다음과 같다.
class Document {
    var name: String?
    // this initializer creates a document with a nil name value
    init() {}
    // this initializer creates a document with a nonempty name value
    init!(name: String) {
        if name.isEmpty { return nil }
        self.name = name
    }
}

class AutomaticallyNamedDocument: Document {
    override init() {
        super.init(name: "[Untitled]")
    }
    override init(name: String) {
        if name.isEmpty {
            super.init(name: "[Untitled]")
        } else {
            super.init(name: name)
        }
    }
}
let unnamed = AutomaticallyNamedDocument()
let contacts = AutomaticallyNamedDocument(name: "Contacts")
let emptyName = AutomaticallyNamedDocument(name: "")

printTitle("unnamed", unnamed)
printTitle("contacts", contacts)
printTitle("emptyName", emptyName)
"unnamed" initialization success, name is "[Untitled]"
"contacts" initialization success, name is "Contacts"
"emptyName" initialization success, name is "[Untitled]"
예외 처리를 하지 않았을 경우, init?은 delegate 를 위임한 Class 에서 결과를 받아 Unwrapping 하기 때문에
에러가 발생할 경우 위임한 Class 에서 에러가 발생하고, init!은 Unwrapping 을 해서 반환하기 때문에 위임을 받은 Class
에서 에러가 발생한다.
즉, 위 경우 예외 처리를 제대로 하지 않았을 경우 init?은 Subclass 에서 에러가 발생하고,
init!은 Superclass 에서 에러가 발생한다.
7. Summary
| Nonfailable Initializers | Failable Initializers | ||
|---|---|---|---|
| Keyword | init | init? | init! |
| Created Instance | 'self' Type | 'self?' Type | 'self' Type |
| Case | delegates | Overriding | |||
|---|---|---|---|---|---|
| when overriding | Superclass | Subclass | Allowed | ||
| init? ↔ init? | O | init? | init? | O | |
| init! ↔ init! | O | init! | init! | O | |
| init? ↔ init! | O | init? or init! | init? or init! | O | |
| init ← init? | O | init | init? | X ✶ | |
| init ← init! | O | init | init! | X ✶ | |
| init? ← init | △ ✶✶ | init? | init | △ ✶✶ | |
| init! ← init | △ ✶✶ | init! | init | △ ✶✶ | |
✶ Overriding - Case 4 :
Nonfailable Initializers를 Failable Initializers로 Overriding하는 것은 허용되지 않는다.
✶✶ Overriding - Case 3 :
Failable Initializers를 Nonfailable Initializers로 Overriding하는 방법은 Superclass 의 Failable
Initializers 가 실패하지 않도록 예외 처리를 한 후, 생성된 Optional Instance 를 Subclass 에서 Forced Unwrapping하는 것이다.
7. Required Initializers 👩💻
1. Required Initializer Syntax
Classes, Structures, Enumerations 에 Protocols를 채택(adopt)해 특정 구현을 강요할 수 있듯이
Classes 의 경우 Superclass 의 특정 Initializers 를 Subclass 에서 구현하도록 required modifier 를 사용해
강요할 수 있다.
Required Initializers는 Overriding 할 때overridemodifier 는 생략하고requiredmodifier 만 작성한다.- Protocols 와 달리 상속된 Initializers 로 조건이 충족된다면, Overriding 을 명시적으로 구현하지 않아도 충족된다.
Syntax
class SomeClass {
    required init() {
        // initializer implementation goes here
    }
}
class SomeSubclass: SomeClass {
    required init() {
        // subclass implementation of the required initializer goes here
    }
}
2. Required Initializer Examples
아래 예제의 결과를 확인하기 위해 미리 다음 Closures 를 정의하고 시작한다.
let printCar = { (car: Car) in
    print("Car name is \"\(car.name)\" and have \(car.cylinder) cylinders")
}
class Vehicle {
    var name: String

    required init(name: String) {
        self.name = name
    }
}
Vehicle 클래스는 init(name:)을 강제하도록 requried modifier 를 사용한다.
class Car: Vehicle {
    var cylinder = 1
//    required init(name: String) {
//        super.init(name: name)
//    }
    convenience init(name: String, cylinder: Int) {
        self.init(name: name)
        self.cylinder = cylinder
    }
}
Car 는 Vehicle 의 Required Initializers 를 상속하는 것으로 충족된다(주석 처리한 부분).
class Truck: Car {
    required init(name: String) {
        super.init(name: name)
        self.cylinder = 8
    }
}
Truck 은 기본 실린더를 8로 저장하기 위해 Required Initializers init(name:)을 재정의하였다.
let bmw3 = Car(name: "BMW3")
let bmw5 = Car(name: "BMW5", cylinder: 5)
let someTruck = Truck(name: "BMW Truck")

printCar(bmw3)      // Car name is "BMW3" and have 1 cylinders
printCar(bmw5)      // Car name is "BMW5" and have 5 cylinders
printCar(someTruck) // Car name is "BMW Truck" and have 8 cylinders
Reference
- “Initialization.” The Swift Programming Language Swift 5.7. accessed Dec. 1, 2022, Swift Docs Chapter 13 - Initialization.