 Hogwarts
Swift Summary
Short Book about the grammar of the Swift Language
1. String 👩💻
Type
Swift 의 String 은 Struct 기반의 Value 타입이다. Objective-C 의 NSString 은 Class 기반의 Reference 타입이다. Foundation 은 Swift 의 String 에서 캐스팅 없이 NSString 의 메서드를 사용할 수 있게 해준다.
Optimization
Value 타입이라는 말은 상수나 변수에 할당하거나 함수나 메서드에 전달될 때 값이 복사된다는 것을 의미한다.
하지만 실제로는 컴파일러가 실제 복사가 필요할 때까지는 값의 복사 자체를 지연시켜 값 타입을 유지하면서 성능을 향상시킨다.
자세한 내용은 하단 Substring 참고.
String is the set of Characters
Swift 의 String 은 Character 의 집합이다.
- for in 을 이용해 각각의 Character 꺼내기
for character in "Dog!🐶" {
    print(character)
}
- Character 배열을 String 으로 생성하기
let catCharacters: [Character] = ["C", "a", "t", "!", "🐱"]
let catString = String(catCharacters)       // Cat!🐱
String + String
var newString = "hello" + " there" // hello there
String.append(Character)
var string1: String = "hello"
let exclamationMark: Character = "!"
string1.append(exclamationMark)         // hello!
Special Characters
- Unicode Scalar Value
\u{n} 형태로 표현되는 유니코드를 말한다.
let sparklingHeart = "\u{1F496}" // 💖, Unicode scalar U+1F496
- Escaped Special Characters
문자열 내에 삽입되어 특수한 기능을 하는 \0, \n, \t 와 같은 것들을 말한다.
- Extended String Delimiters (확장된 문자열 구획 문자)
‘Escaped Special Characters’ 을 무시하도록 처리하는 특수한 문자열로 앞뒤에 동일한 개수의 #를 넣어준다.
#"안녕 \n 하세요"#

// 안녕 \n 하세요
만약 중간에 임시로 ‘Escaped Special Characters’ 가 작동하도록 하려면 \ 뒤에 동일한 개수의 #을 넣어준다.
#"안녕 \#n 하세요"#

// 안녕
// 하세요
Sting Interpolation
let name = "홍길동"
"제 이름은 \(name)입니다."         // 제 이름은 홍길동입니다.
#"제 이름은 \(name)입니다."#       // 제 이름은 \(name)입니다.
#"제 이름은 \#(name)입니다."#      // 제 이름은 홍길동입니다.
물론 Extended String Delimiters # 이 우선권을 갖는다.
Extended Grapheme Clusters
Swift 의 문자열은 자모 그룹의 확장으로 표현된다.
"\u{D55C}"                   // 한
"\u{1112}\u{1161}\u{11AB}"   // 한 = ㅎ + ㅏ + ㄴ
사람이 볼 때 같은 결과물의 문자를 저장하더라도 Extended Grapheme Clusters로 인해 저장하는데 필요한 메모리 크기는
다를 수 있다.
var word1 = "\u{D55C}"                   // 한
var word2 = "\u{1112}\u{1161}\u{11AB}"   // 한 = ㅎ + ㅏ + ㄴ

print("\(word1), \(word1.count)")        // 한, 1
print("\(word2), \(word2.count)")        // 한, 1
하지만 Swift 의 String 은 동일한 문자열 길이(count)를 반환한다.
단, Extended Grapheme Clusters로 인해 NSString 이 반환하는 count 의 값은 다를 수 있다.
Accessing and Modifying a String
- String 메서드 이용
let greeting = "Guten Tag!"

print(greeting.startIndex)                          // Index(_rawBits: 1),      G
print(greeting.index(after: greeting.startIndex))   // Index(_rawBits: 65793),  u
greeting.index(greeting.startIndex, offsetBy: 1)    // Index of "u",  Index(_rawBits: 65793)
print(greeting.index(before: greeting.endIndex))    // Index(_rawBits: 590081), !
print(greeting.endIndex)                            // Index(_rawBits: 655367), Fatal error: String index is out of bounds
- Subscript Syntax 이용
let greeting = "Guten Tag!"
print(greeting[..<greeting.endIndex])       // Guten Tag!
endIndex 가 out of bounds 임에 유의하자
Subscript
Substring 은 Swift 의 String 이 Value Type 임에도 불구하고 메모리 공간 및 복사에 대한 성능 최적화를 가능케 하는 핵심으로
Subscript 또는 prefix(upTo:), prefix(_ maxLength:)메서드를 사용해 만들 수 있다.
let greeting = "Hello, world!"
var index = greeting.firstIndex(of: ",") ?? greeting.endIndex
let beginning = greeting[..<index]

print(beginning)            // Hello
print(type(of: beginning))  // Substring
- Substring 은 String 과 마찬가지로 StringProtocol 을 따르므로 유사하게 메서드 사용이 가능하다.
- Substring 은 Characters 를 저장하기 위한 자기 자신의 메모리 공간을 갖지 않고 원본 String 의 메모리 공간을 재사용한다.
- Substring 은 수정이 종료되고 장기 저장이 필요할 경우 String Instance 로 변환되어야 한다.
Comparing String
- 전체 비교
==, != Operators 를 사용해 비교할 수 있으며, Extended Grapheme Clusters에 의해 동일하다면 동등 관계이다.
- prefix 비교
hasPrefix(_:)를 사용 cf. Prefix equality
- suffix 비교
hasSuffix(_:를 사용 cf. Suffix equality
2. Collection 👩💻
Iterator Protocol & Sequence Protocol
protocol IteratorProtcol {
    associatedtype Element
    mutating func next() -> Element?
}
Iterator Protocol 은 func next() -> Self.Element?를 구현하도록 강제하는 규칙으로 Sequence Protocol 과 밀접하게 연관된다.
Sequence 와 매우 유사하다. Element 라는 associated type 을 가지며 이것은 element 를 추가하거나 iteration 을 수행할 때
사용하는 타입을 나타낸다. 그리고 next() methods 는 next element 를 반환한다.
protocol Sequence {
    associatedtype Iterator : IteratorProtocol where Iterator.Element == Element
    func makeIterator() -> Iterator
}
Sequence 는 IteratorProtocol 을 준수하는 associated type을 갖고 있으며, makeIterator() methods 는
associated type 을 통해 선언한 Iterator 를 반환한다.
따라서 IteratorProtocol과 Sequence 두 Protocols 를 준수하도록 함으로써 다음과 같은 객체의 순환을 구현할 수 있다.
struct Countdown: Sequence, IteratorProtocol {
    var count: Int

    mutating func next() -> Int? {
        if count == 0 {
            return nil
        } else {
            defer { count -= 1 }
            return count
        }
    }
}

let threeToGo = Countdown(count: 3)
for i in threeToGo {
    print(i)
}
// Prints "3"
// Prints "2"
// Prints "1"
이들 관의 관계 및 다른 Collection 을 구현함에 있어 어떻게 활용하는지에 대해 좀 더 자세한 예는 Swift의 Sequence와 Collection에 대해 알아야 하는것들 을 참고한다.
Collection
Sequence를 준수하는 Collection이라는 Protocol 로 Swift Standard Library 에 광범위하게 사용된다. Swift 는 해당
Protocol 을 준수하는 다음 3가지 Primary Collection Types 를 제공한다.
- Array
- Set
- Dictionary
Sequence 와 Collection 의 비교
- Sequence : 무한하거나 유하한 elements 에 대해
한 번만 iterating한다. - Collection : elements 를
비파괴적으료 여러 차례 iterating할 수 있다.Subscript로 접근할 수 있도록 Sequence 를 확장한다.
Arrays
String 과 마찬가지로 Array 는 Foundation 을 통해 NSArray 와 연결되고, 별도의 캐스팅 없이 NSArray 메서드를 사용할 수 있다.
var someArray = Array<Element>()
var someArray = [Int]()            // Array Type Shorthand Syntax (배열의 축약형 문법)
var someArray: [Element] = []      // Array Type Shorthand Syntax (배열의 축약형 문법)
- 초기값과 함께 생성하기
let allA = Array(repeating: "A", count: 10)
// ["A", "A", "A", "A", "A", "A", "A", "A", "A", "A"]

let oneToTen = Array(1...10)
// [1, 2, 3, 4, 5, 6, 7, 8, 9, 10]

let even  = (1...10).map { $0 * 2 }
[2, 4, 6, 8, 10, 12, 14, 16, 18, 20]
// Arithmetic Series [ f(x) = 3n + 2 ]
let threeStep1 = Array(stride(from: 2, through: 30, by: 3))
// [2, 5, 8, 11, 14, 17, 20, 23, 26, 29]

let threeStep2 = Array(repeating: 0, count: 10)
    .lazy
    .enumerated()
    .map { (i, v) in (i * 3) + 2 }
// [2, 5, 8, 11, 14, 17, 20, 23, 26, 29]
- Swift 의 Arrays 는 Structure 이므로 단순히
+Operator 를 사용해 새 Array 를 생성할 수 있다. append(_:),insert(_:at:),remove(at:),removeLast(),removeAll()등의 메서드를 사용할 수 있다.- Subscript Syntax 를 사용해 값에 접근, 수정, 전체 삭제를 할 수 있다.
- Loops 에서 index 를 함께 사용하려면
enumerated()를 사용.
Sets
Set 는 Foundation 을 통해 NSSet 과 연결되고, 별도의 캐스팅 없이 NSSet 메서드를 사용할 수 있다.
- Set 은 순서가 없다.
- Set 은
HashableProtocol 을 준수한다(= 중복이 없다). (Hash Value 는 Int 값으로 두 Object 가 완전히 동일하면 Hash Value 역시 동일하며 a==b 가 성립된다.)
var someSet = Set<Element>()
var someSet: Set<Element> = [elements...]  // Do not use to create Empty Set.
var someSet: [Element] = []는 불가능하다(Array 와 구분이 되지 않기 때문).- Array 와 달리 Any 로 선언해도 서로 다른 Types 의 데이터는 담을 수 없다.
insert(_:),remove(_:),removeAll()등의 메서드를 사용할 수 있다.
Set 자체는 순서가 없지만 index 가 필요하다면 enumerated()를 사용해 index 와 value 모두에 접근할 수 있다.
(단, 순서가 고정되지 않기 때문에 먼저 sorted()를 해주는 것이 좋다)
let fruits: Set = [
    "Apple",
    "Pear",
    "Persimmon",
    "Tangerine",
    "Orange",
    "Mango",
    "Plum",
    "Cherry"
]

print(type(of: fruits))

for (index, value) in fruits.sorted().enumerated() {
    print("Item \(index + 1): \(value)")
}
Set Operations
Performing Set Operations 를 수행할 수 있다.
- a.intersection(b) : 교집합
- a.symmetricDifference(b) : 대칭차집합
- a.union(b) : 합집합
- a.subtracting(b) : 차집합
Set Membership and Equality
Set Membership and Equality 를 사용해 Superset, Subset 등의 관계를 표현할 수 있다.
- a == b : 상동
- a.isSuperset(of: b) : a 가 b 의 상위 집합
- a.isSubset(of: a) : a 가 b 의 하위 부분 집합
- a.isDisjoint(with: b) : a 와 b 는 서로소 집합
Dictionaries
Dictionary 는 Foundation 을 통해 NSDictionary 와 연결되고, 별도의 캐스팅 없이 NSDictionary 메서드를 사용할 수 있다.
- Key: Value
- Map 의 Key 는
HashableProtocol 을 준수한다(= Key 의 중복이 없다). - Dictionary 는 항상 Optional 을 반환한다.
var someDictionary = Dictionary<Key, Value>()
var someDictionary = [Key: Value]()         // Dictionary Type Shorthand Syntax (딕셔너리의 축약형 문법)
var someDictionary: [Key: Value] = [:]      // Dictionary Type Shorthand Syntax (딕셔너리의 축약형 문법)
updateValue(_:forKey:),removeValue(forKey:),removeAll()등의 메서드를 사용할 수 있다.- Subscript Syntax 를 사용해 값을 추가, 수정, 삭제, 전체 삭제를 할수 있다.
- Subscript 로 제거하는 것과 달리
removeValue(forKey:)로 제거하면Optional(Old Value)를 반환한다.
Key, Value 는 다음과 같이 Tuple 을 이용해 비구조화 시켜 접근할 수 있다.
let fruits = [
    "Apple": 4200,
    "Pear": 6800,
    "Persimmon": 3400
]

for (goods, price) in fruits {
    print("\(goods)'s price is \(price) won.")
}
물론 둘 중 하나만 필요하다면 다음과 같이 접근할 수 있다.
for goods in fruits.keys {
    print(goods, terminator: "  ")
}

for price in fruits.values {
    print(price, terminator: "  ")
}
sorted(by:) 를 사용해 정렬 시켜 반복할 수 있다.
for goods in fruits.keys.sorted(by: <) {
    print(goods, terminator: "  ")
}

// ascending order by keys
for (goods, price) in fruits.sorted(by: {$0.0 < $1.0}) {
    print("\(goods)'s price is \(price)won.")
}

// descending order by values
for (goods, price) in fruits.sorted(by: {$0.1 > $1.1}) {
    print("\(goods)'s price is \(price)won.")
}
3. Control Flow 👩💻
For-In & While
개발에 있어 Control Flow 는 하나의 소스 코드가 여러 비즈니스 로직을 처리할 수 있도록 제어하는 기본적인 방법이다.
개발을 하는데 있어 Control Flow 는 로직의 흐름을 만들고 제어하는 가장 기본적인 방법이다.
TypeScript 에서는 [[Enumerable]] 속성에 대해 반복이 가능한 for-in(Object 의 key, Array 의 index 에 접근)과
[Symbol.iterator] 속성에 대해 반복이 가능한 for-of(Array 의 value 에 접근)가 서로 다르게 존재한다.
하지만 Swift 에서는 Array, Set, Dictionary 모두 for-in 하나로 반복한다.
- for-in
for index in 1...5 {
    print("\(index) times 5 is \(index * 5)")
}

let names = ["Anna", "Alex", "Brian", "Jack"]
for name in names {
    print("Hello, \(name)!")
}

let numberOfLegs = ["spider": 8, "ant": 6, "cat": 4]
for (animalName, legCount) in numberOfLegs {
    print("\(animalName)s have \(legCount) legs")
}
const menu: { string: number } = { chicken: 16_000, beer: 3_500, soda: 1_000 }
for (const [name, price] of Object.entries(menu)) console.log(name, price)
마지막의
for (animalName, legCount) in numberOfLegs와 같은 destructuring 은 TypeScript 의 Object 에서도for (const [name, price] of Object.entries(menu))와 같이 사용할 수 있다. 하지만 여전히for-in,for-of두 가지를 모두 사용해야하며 하나로 통일해 사용하는 것은 불가능하다.
- while
while 은 TypeScript 와 다르지 않다.
var result = 0
var rollCount = 0

while result < 20 {
    result = rollDice() * rollDice()
    rollCount += 1
    print(result)
}
- repeat-while
Swift 에서는 repeat-while 이라는 Syntax 를 사용한다.
var result = 25
var rollCount = 0

repeat {
    result = rollDice() * rollDice()
    rollCount += 1
    print(result)
} while result < 20
Conditional Statements - If
다른 언어들과 마찬가지로 if, else if, else 로 구분한다. 단, 다른 언어들과 달리 조건식을 괄호로 묶지 않아도 된다.
let temperatureInCelsius = 3
if temperatureInCelsius > 28 {
    print("It's hot. Turn on the air conditioner.")
} else if temperatureInCelsius < 10 {
    print("It's cole. Turn on the boiler.")
} else {
    print("It's nice weather. Go out for a walk.")
}
Conditional Statements - Switch
Switch must have ‘default’
Swift 의 switch 에서 default 는 필수다. 또한 Enumeration 을 switch 에 사용할 경우 Enumeration 의 모든 cases 를
switch 에도 빠짐 없이 정의해한다.
switch someCharacter {
case "a":
    print("The first letter of the alphabet")
case "z":
    print("The last letter of the alphabet")
default:
    break
}
따라서 default 에 대한 아무런 구현도 필요하지 않을 경우 의도적으로 break를 넣어주어야한다.
No Implicit Fallthrough & Compound Cases
fallthrough 가 기본값이어서 매번 break 을 명시해야하는 다른 언어와 달리 Swift 는 break 이 기본값이다.
switch anotherCharacter {
case "a":   // 'case' label in a 'switch' must have at least one executable statement
case "A":
    print("The first letter of the alphabet")
case "z":   // 'case' label in a 'switch' must have at least one executable statement
case "Z":
    print("The last letter of the alphabet")
default:
    print("Some other character")
}
따라서 위와 같은 코드는 compile-error 가 발생하므로 의도적으로 fallthrough 시키고자 할 경우 반드시 명시해야한다.
switch anotherCharacter {
case "a": fallthrough
case "A":
    print("The first letter of the alphabet")
case "z": fallthrough
case "Z":
    print("The last letter of the alphabet")
default:
    print("Some other character")
}
하지만 위 방법은 Swift 에서 좋지 못한 방법이다. Swift 는 Compound Cases Matching을 지원하므로 다음과 같이 작성할 수 있다.
switch anotherCharacter {
case "a", "A":
    print("The first letter of the alphabet")
case "z", "Z":
    print("The last letter of the alphabet")
default:
    print("Some other character")
}
Interval Matching
일반적으로 프로그래밍 언어에서 switch 는 기본적으로 equal 매칭을 한다. 따라서 Interval 에 대해서는 매칭을 할 수가 없다.
따라서 switch-true라는 특수한 Syntax 를 사용해 다음과 같이 사용한다.
switch true {
case approximateCount == 0:
    naturalCount = "no"
case (approximateCount >= 1) && (approximateCount < 5):
    naturalCount = "a few"
case (approximateCount >= 5) && (approximateCount < 12):
    naturalCount = "several"
case (approximateCount >= 12) && (approximateCount < 100):
    naturalCount = "dozens of"
case (approximateCount >= 100) && (approximateCount < 1000):
    naturalCount = "hundreds of"
default:
    naturalCount = "many"
}
하지만 Swift 의 switch 는 Interval Matching 을 지원하므로 다음과 같이 사용할 수 있다.
switch approximateCount {
case 0:
    naturalCount = "no"
case 1..<5:
    naturalCount = "a few"
case 5..<12:
    naturalCount = "several"
case 12..<100:
    naturalCount = "dozens of"
case 100..<1000:
    naturalCount = "hundreds of"
default:
    naturalCount = "many"
}
Interval Matching 역시 Iteration 을 이용한 여러 경우의 수를 equal 매칭 하는 것이다. 따라서 < 와 같이 대소 비교가 필요한
경우 결국 switch-true를 사용해야 하지 않을까 생각할 수 있지만 Swift 에는 이러한 경우에 사용할 수 있는
Where 가 있다.
# Control Flow

개발에 있어 `Control Flow` 는 하나의 소스 코드가 여러 비즈니스 로직을 처리할 수 있도록 제어하는 기본적인 방법이다.

개발을 하는데 있어 `Control Flow` 는 로직의 흐름을 만들고 제어하는 가장 기본적인 방법이다. while, for-in, if 는 다른 언어와
동일하니 생략하고 Swift 만의 특성이 있는 것 위주로 정리했다.

### Conditional Statements - Switch

### Switch must have 'default'

Swift 의 switch 에서 `default` 는 필수다. 또한 Enumeration 을 switch 에 사용할 경우 Enumeration 의 모든 cases 를
switch 에도 빠짐 없이 정의해한다.

```swift
switch someCharacter {
case "a":
    print("The first letter of the alphabet")
case "z":
    print("The last letter of the alphabet")
default:
    break
}
따라서 default 에 대한 아무런 구현도 필요하지 않을 경우 의도적으로 break를 넣어주어야한다.
No Implicit Fallthrough & Compound Cases
fallthrough 가 기본값이어서 매번 break 을 명시해야하는 다른 언어와 달리 Swift 는 break 이 기본값으로 fallthrough 가 필요할 경우 별도 명시를 해야한다.
switch anotherCharacter {
case "a":   // 'case' label in a 'switch' must have at least one executable statement
case "A":
    print("The first letter of the alphabet")
case "z":   // 'case' label in a 'switch' must have at least one executable statement
case "Z":
    print("The last letter of the alphabet")
default:
    print("Some other character")
}
따라서 위와 같은 코드는 compile-error 가 발생하므로 의도적으로 fallthrough 시키고자 할 경우 반드시 명시해야한다.
switch anotherCharacter {
case "a": fallthrough
case "A":
    print("The first letter of the alphabet")
case "z": fallthrough
case "Z":
    print("The last letter of the alphabet")
default:
    print("Some other character")
}
하지만 위 방법은 Swift 에서 좋지 못한 방법이다. Swift 는 Compound Cases Matching을 지원하므로 다음과 같이 작성할 수 있다.
switch anotherCharacter {
case "a", "A":
    print("The first letter of the alphabet")
case "z", "Z":
    print("The last letter of the alphabet")
default:
    print("Some other character")
}
Interval Matching
일반적으로 프로그래밍 언어에서 switch 는 기본적으로 equal 매칭을 한다. 따라서 Interval 에 대해서는 매칭을 할 수가 없다.
따라서 switch-true라는 특수한 Syntax 를 사용해 다음과 같이 사용한다.
switch true {
case approximateCount == 0:
    naturalCount = "no"
case (approximateCount >= 1) && (approximateCount < 5):
    naturalCount = "a few"
case (approximateCount >= 5) && (approximateCount < 12):
    naturalCount = "several"
case (approximateCount >= 12) && (approximateCount < 100):
    naturalCount = "dozens of"
case (approximateCount >= 100) && (approximateCount < 1000):
    naturalCount = "hundreds of"
default:
    naturalCount = "many"
}
하지만 Swift 의 switch 는 Interval Matching 을 지원하므로 다음과 같이 사용할 수 있다.
switch approximateCount {
case 0:
    naturalCount = "no"
case 1..<5:
    naturalCount = "a few"
case 5..<12:
    naturalCount = "several"
case 12..<100:
    naturalCount = "dozens of"
case 100..<1000:
    naturalCount = "hundreds of"
default:
    naturalCount = "many"
}
Interval Matching 역시 Iteration 을 이용한 여러 경우의 수를 equal 매칭 하는 것이다. 따라서 < 와 같이 대소비교가 필요한
경우 결국 switch-true를 사용해야 하지 않을까 생각할 수 있지만 Swift 에는 이러한 경우에 사용할 수 있는
Where 가 있다.
Tuples
Tuples 를 매칭할 때 _ 를 wildcard 로 사용할 수 있다.
func whereIs(_ point: (Int, Int)) {
    switch point {
    case (0, 0):
        print("\(point) is at the origin")
    case (_, 0):
        print("\(point) is on the x-axis")
    case (0, _):
        print("\(point) is on the y-axis")
    case (-2...2, -2...2):
        print("\(point) is inside the box")
    default:
        print("\(point) is outside of the box")
    }
}
whereIs((0, 0))     // (0, 0) is at the origin
whereIs((3, 0))     // (3, 0) is on the x-axis
whereIs((1, 2))     // (1, 2) is inside the box
whereIs((3, 2))     // (3, 2) is outside of the box
Value Bindings
switch 의 cases 에 매칭되는 값을 Binding 해 case 내부에서 사용할 수 있다.
func anotherPoint(_ point: (Int, Int)) {
    switch point {
    case (let x, 0):
        print("on the x-axis with an x value of \(x)")
    case (0, let y):
        print("on the y-axis with a y value of \(y)")
    case let (x, y):
        print("somewhere else at (\(x), \(y))")
    }
}
Where
일반적으로 Switch 의 Equal 뿐만 아니라 대소 비교와 같은 모든 Case Matching 를 허용하며 case 내부에서 Value 를 사용하고자 할 경우 다음과 같이 함수를 이용해 구현할 수 있다.
- Local Variables 에 값을 저장.
- switch-true 를 사용해 Case Matching 을 처리.
func yetAnotherPoint(_ point: (Int, Int)) {
    let (x, y) = point
    switch true {
    case x == y:
        print("(\(x), \(y)) is on the line x == y")
    case x == -y:
        print("(\(x), \(y)) is on the line x == -y")
    default:
        print("(\(x), \(y)) is just some arbitrary point")
    }
}
하지만 Swift 에서는 이것을 별도의 함수에 담지 않아도 되며 switch-true 없이도 Value Bindings 와 Where 를 통해 구현할 수 있다.
switch point {
case let (x, y) where x == y:
    print("(\(x), \(y)) is on the line x == y")
case let (x, y) where x == -y:
    print("(\(x), \(y)) is on the line x == -y")
case let (x, y):
    print("(\(x), \(y)) is just some arbitrary point")
}
😎😎
Control Transfer Statements
Iteration
while, for-in 과 같은 loops 를 반복을 돌 때 continue, break 을 사용해 흐름을 제어할 수 있다.
Switch
switch 의 경우 break, fallthrough를 사용해 흐름을 제어하며 Swift 는 No Implicit Fallthrough가 기본값이기
때문에 break은 생략이 가능하다.
Function
function 또는 closure 의 경우 return 또는 throw를 사용해 흐름을 제어하며 function context 내부의
iteration 또는 switch 에서 발생할 경우 더 상위 context 인 function 자체가 종료되므로 함께 종료된다.
Early Exit
guard 를 사용해 함수의 실행 조건에 맞지 않는 값이 들어온 경우 바로 종료하도록 해 if 의 중첩 구조를 해결한다. 물론 다른 언어에서도
if 를 개별적으로 풀고 조건을 부정값으로 만들어 return 하도록 만들어 처리가 가능하지만 Swift 는 guard라는 키워드를 통해 더 높은
가독성을 보장한다.
4. Functions 👩💻
Syntax
func name (parameters) -> return type {
    function body
}
Function without Return Values
func greetVoid(person: String) -> Void {
    print("Hello, \(person)!")
}
Void는 명시적으로 적을 수도 생략(Implicitly returns Void)할 수도 있다. 엄밀히 말하면 Void 라틑 타입의 특수한 값을 반환하는
것이고, 이 값은 () 으로 쓰여진 Empty Tubple이다.
명시적으로 반환 값이 있는 함수를 호출할 때는 반드시 let, var 로 받아야 한다. 그렇지 않으면 compile-time error 가 발생하므로, 값이 필요 없을 경우 간단히
_로 받는다.
func printAndCount(string: String) -> Int {
    print(string)
    return string.count
}
func printWithoutCounting(string: String) {
    let _ = printAndCount(string: string)
}

print(printWithoutCounting(string: "hello, world"))
hello, world
()
Function with Multiple Return Values
Swift 는 Tuple을 이용해 하나의 Compound 로 여러 변수에 값을 할당할 수 있다.
let (alphabetA: String, alphabetB: String) = ("A", "B")
let (alphabetC, alphabetD) = ("C", "D")
따라서 함수의 return 역시 Tuple 을 이용하면 한 번에 여러 값을 return 하도록 할 수 있다.
let intArray: [Int] = [31, 6, 43, 13, 6, 1, 56, 5, 88, 24]

func minMax(array: [Int]) -> (Int, Int) {
    var currentMin = array[0]
    var currentMax = array[0]
    for value in array[1..<array.count] {
        if value < currentMin {
            currentMin = value
        } else if value > currentMax {
            currentMax = value
        }
    }
    return (currentMin, currentMax)
}
- 각각의 변수 또는 상수로 받을 수 있다.
let (minNumber, maxNumber): (Int, Int) = minMax(array: intArray)
- Tuple 타입의 단일 변수 또는 상수로 받을 수 있다.
let bounds: (min: Int, max: Int) = minMax(array: intArray)
print("min is \(bounds.min) and max is \(bounds.max)")
그리고 bounds 라는 tuple 에 각각 min, max 라는 label 을 붙여주었다.
- 함수의 return 을 정의할 때 Tuple type 에 label 을 붙일 수 있다.
func minMax(array: [Int]) -> (min: Int, max: Int) {
    var currentMin = array[0]
    var currentMax = array[0]
    for value in array[1..<array.count] {
        if value < currentMin {
            currentMin = value
        } else if value > currentMax {
            currentMax = value
        }
    }
    return (currentMin, currentMax)
}
let bounds = minMax(array: intArray)
print("min is \(bounds.min) and max is \(bounds.max)")
물론… 이런 형태가 Swift 만 되는건 아니고 TypeScript 도 된다.
const [alphabetA, alphabetB]: [string, string] = ["A", "B"];
const [alphabetC, alphabetD] = ["C", "D"];
const intArray: number[] = [31, 6, 43, 13, 6, 1, 56, 5, 88, 24];

function minMax(array: number[]): [number, number] {
  let currentMin = array[0];
  let currentMax = array[0];
  for (let i = 1; i < array.length; i++) {
    const value = array[i];
    if (value < currentMin) {
      currentMin = value;
    } else if (value > currentMax) {
      currentMax = value;
    }
  }
  return [currentMin, currentMax];
}

const result: [number, number] = minMax(intArray);
console.log(result);
Optional Tuple Return Types
(String, Int, Bool)?: Tuple 자체가 Optional 이므로 nil 일 가능성이 있다. 각각의 elements 는 자동으로 Optional Types 가 된다.(String?, Int?, Bool?): Optional String, Optional Int, Optional Bool 을 포함하하지만 Tuple 은 Optional 이 아니다.
Default Parameter Values
func add(a num1: Int, b num2: Int = 10) -> Int {
    num1 + num2
}
Swift 역시 Parameters 의 default values 를 정의할 수 있다.
print(add(a: 5, b: 20))     // 25
print(add(a: 5))            // 15
하나의 값이 고정된 default value 를 갖는다면 별도의 Overloading 없이도 2가지 호출 방식을 사용할 수 있다.
Variadic Parameters
func arithmeticMean(_ numbers: Double...) -> Double {
    var total: Double = 0
    for number in numbers {
        total += number
    }
    return total / Double(numbers.count)
}
다음과 같이 n 개의 Parameters 를 받아 내부에서 Array 로 작동시킬 수 있다.
print(arithmeticMean(2))                    // 2.0
print(arithmeticMean(1, 2, 3, 4, 5))        // 3.0
print(arithmeticMean(3, 8.25, 18.75))       // 10.0
In-Out Parameters
Swift 의 경우 Parameters 는 함수가 호출될 때 전달된 Arguments 를 복사해 constants 로 정의된다. 즉, 기본적으로 함수의 context 내부에서 임의로 Global/Static 에 접근하지 않는다면 Parameters 자체는 함수형을 위한 조건을 만족하는 상태가 된다.
여기에 inout keyword 를 사용하면 TypeScript 의 기본값과 마찬가지로 variables 로 선언되어 함수의 context 내에서 수정을 할 수
있음은 물론, inout 의 경우 함수가 종료될 때 arguments 의 Pointer 에 접근해 수정된 값으로 변경한다.
func swapTwoInts(_ a: inout Int, _ b: inout Int) {
    let temporaryA = a
    a = b
    b = temporaryA
}
var someInt = 3
var anotherInt = 107
swapTwoInts(&someInt, &anotherInt)

print("someInt is now \(someInt), and anotherInt is now \(anotherInt)")
- Parameters 의 앞에
inoutkeyword 를 사용해 정의한다.- Arguments 의 앞에
&keyword 를 사용해 호출한다.
- 함수가 호출될 때
arguments의 값이 parameters 에복사된다.- 복사된 arguments 의 값이 함수의
body에서수정된다.- 함수가 종료될 때
arguments의 Pointer 를 이용해 값을수정한다.
Function Types
First-Class Citizen 이므로 값으로 취급될 수 있음은 물론 함수의 Signature 를 Types 로 취급하는 것 역시 가능하다.
func addTwoInts(_ a: Int, _ b: Int) -> Int {
    a + b
}
func multiplyTwoInts(_ a: Int, _ b: Int) -> Int {
    a * b
}
위 두 함수는 다음과 같은 하나의 Signature 로 Types 를 정의할 수 있다.
var mathFunction: (Int, Int) -> Int
mathFunction = addTwoInts(_:_:)
(Int, Int) -> Int Types 와 일치하는 함수 addTwoInts(_:_:)를 변수 mathFunction 에 할당할 수 있다.
또한 Parameters 또는 Return Types 로써 사용되는 것이 가능하다.
- Function Types as Parameter Types
func printMathResult(mathFunction function: (Int, Int) -> Int, _ a: Int, _ b: Int) {
    print("Result: \(function(a, b))")
}

printMathResult(mathFunction: addTwoInts, 5, 7)       // Result: 12
printMathResult(mathFunction: multiplyTwoInts, 5, 7)  // Result: 35
함수 printMathResult(mathFunction)은 (Int, Int) -> Int Types 를 Parameters 로 받는다.
- Function Types as Return Types
func stepForward(_ input: Int) -> Int {
    print(#function)
    return input + 1
}
func stepBackward(_ input: Int) -> Int {
    print(#function)
    return input - 1
}

func chooseStepFunction(backward: Bool) -> (Int) -> Int {
    backward ? stepBackward(_:) : stepForward(_:)
}
함수 chooseStepFunction(backward:)는 (Int) -> Int를 Return Types 로 가지며, stepBackward(_:) 또는
stepForward(_:)를 반환한다.
Type Alias
그리고 함수의 Types 는 typealias keyword 를 사용해 정의 후 재사용이 가능하다.
func addTwoInts(_ a: Int, _ b: Int) -> Int {
    a + b
}
typealias ArithmeticCalc = (Int, Int) -> Int
let sum: arithmeticCalc = addTwoInts(_:_:)

print(addTwoInts(5, 7))         // 12
print(sum(5, 7))                // 12
Function Expressions
TypeScript 에서는 일반적으로 this 및 가독성을 이유로 Function Declarations 보다 Function Expressions 를 더 많이 사용한다.
// With Function Types
const addTwoInts: (num1: number, num2: number) => number
    = (a, b) => a + b

// Without Function Types
const multiplyTwoInts = (a: number, b: number): number => a * b
Swift 역시 같은 방식으로 Closures 를 이용해 정의가 가능하다.
// With Function Types
let addTwoInts: (Int, Int) -> Int = { (a: Int, b: Int) in
    a + b
}

// Without Function Types
let multiplyTwoInts = { (a: Int, b: Int) in
    a * b
}
게다가 Swift 의 Type Inference 를 사용하면 다음과 같이 간략히 사용하는 것도 가능하다.
typealias ArithmeticCalc = (Int, Int) -> Int

let addTwoInts = { (a: Int, b: Int) in a + b }
let multiplyTwoInts: (Int, Int) -> Int = { $0 * $1 }
let subtractTwoInts: arithmeticCalc = { $0 - $1 }


print(addTwoInts(5, 7))         // 12
print(multiplyTwoInts(5, 7))    // 35
print(subtractTwoInts(5, 7))    // -2
물론, Swift 에서는 일반적으로 함수를 이렇게 정의하지는 않는 것 같다. 하지만 위와 정의하는 경우 바로 Inline 으로 Closure 를 실행할 수 있기 때문에 함수로 인식시키고 처리하기 위한 Overhead 를 없앨 수 있다는 장점이 존재한다.
5. Closures 👩💻
Closure Expressions
Closures 는 다음 세 가지 형태 중 하나를 갖는다.
- Global Functions : 이름이 있고, 어떤 값도 캡처하지 않는 Closures
- Nested Functions : 이름이 있고, 자신이 속한
function context의 값을 캡처할 수 있는 Closures - Closure Expressions : 이름이 없고, 자신이 속한
context의 값을 캡처할 수 있는 경량화된 Closures
Syntax
{ (parameters) -> return type in
    statements
}
| Global Functions | Closures | |
|---|---|---|
| Variadic Parameters | O | O |
| In-Out Parameters | O | O |
| Tuple Type Parameters | O | O |
| Tuple Type Returns | O | O |
| Default Parameter Values | O | X |
Shorthand Syntax
Swift 의 Closures 는 Type Inference(Parameters, Return Type)와 Shorthand Argument Names, Trailing Closures 를 사용해 코드를 간략하게 바꿀 수 있다.
let names = ["Chris", "Alex", "Ewa", "Barry", "Daniella"]
메서드 sorted(by:)에 전달할 함수를 기존의 Function Syntax 를 사용하면 다음과 같이 정의할 수 있었다.
func forward(_ s1: String, _ s2: String) -> Bool {
    return s1 < s2
}

let ascendingOrder = names.sorted(by: forward(_:_:))
이 함수를 Closure Syntax 를 사용해 바꿔보자.
{ (s1: String, s2: String) -> Bool in
    return s1 < s2
}
sorted(by:)메서드에 전달할 arguments 를 inline 으로 작성해보자.
let ascendingOrder = names.sorted(by: { (s1: String, s2: String) -> Bool in return s1 < s2 })
Type Inference 를 사용해 Parameter Types 와 Return Types 를 생략하고, 함수와 마찬가지로 Body 부분이 Single-line 이므로 Return keyword 를 생략해보자.
let ascendingOrder = names.sorted(by: { s1, s2 in s1 < s2 })
Swift 는 여기에 Shorthand Argument Names 를 사용해 더욱 축약시킬 수 있다.
let ascendingOrder = names.sorted(by: { $0 < $1 })
추가로 2개의 Arguments 와 그들 사이의 Operator 만 존재하는 경우 Operator Methods만 남긴 채 모두 생략하는 것도 가능하다.
let ascendingOrder = names.sorted(by: <)
Trailing Closures
Single Trailing Closures
마지막 Closures 를 메서드의 ( ) 밖으로 분리시킬 수 있고 이를 Trailing Closures 라 한다. 위 Closures 를 모두
Trailing Closures 로 바꾸면 다음과 같이 작성할 수 있다.
let ascendingOrder = names.sorted { (s1: String, s2: String) -> Bool in return s1 < s2 }
let ascendingOrder = names.sorted { s1, s2 in s1 < s2 }
let ascendingOrder = names.sorted { $0 < $1 }
단, Operator Methods만 단독으로 남은 경우 Trailing Closures 로 분리시킬 수 없다.
let ascendingOrder = names.sorted { < } // error: unary operator cannot be separated from its operand
Multiple Trailing Closures
만약 함수가 여러 개의 Trailing Closures 를 가질 경우, 첫 번째 Trailing Closure의 argument labels는 생략될 수 있다.
그 외 나머지 Trailing Closures 는 argument labels 을 지정해야한다.
func loadPicture(from server: Server, completion: (Picture) -> Void, onFailure: () -> Void) {
    if let picture = download("photo.jpg", from: server) {
        completion(picture)
    } else {
        onFailure()
    }
}
loadPicture(from:completion:onFailure:) 함수는 completion, onFailure 라는 2개의 Closures 를 가지고 있다.
둘 다 Trailing Closures 로 분리시킬 경우, 첫 번째 Trailing Closures 는 completion
이 되므로 Argument Labels 를 생략할 수 있다. 반면, 두 번째 Trailing Closures 에 해당하는 onFailure 는 두 번째 Trailing Closures 에 해당하므로
Argument Labels 를 명시해야한다.
loadPicture(from: someServer) { picture in
    someView.currentPicture = picture
} onFailure: {
    print("Couldn't download the next picture.")
}
위 함수 예제는 결과에 따른 성공/실패라는 2개의 completion handlers 만 가지고 있으며 이를 Trailing Closures 로 호출하고있다. 만약 completion handlers 가 여러 개 중첩된다면 어떻게 될까? 이것들을 모두 Trailing Closures 로 분리시키면 오히려 코드를 읽기 어려워 질 것이다. 이런 경우 Concurrency - Asynchronous Functions 를 사용해 대체하도록 한다.
Capturing Values
Closures 는 정의될 때 context 에 값을 Capturing 할 수 있으며, 캡쳐할 때는 물론이고 더 이상 필요하지 않아 제거할 때 역시 모든 메모리 관리를 알아서 처리한다.
Reference Types
Closures 는 Functions 와 마찬가지로 Reference Types 다. 즉, Closures 를 다른 변수 또는 상수에 복사하면 Reference Types 이므로 Properties 들의 Pointer 가 복사되므로 캡쳐한 값 역시 공유하게된다.
func makeIncrementer(forIncrement amount: Int) -> () -> Int {
    var runningTotal = 0
    func incrementer() -> Int {
        runningTotal += amount
        return runningTotal
    }
    return incrementer
}

let incrementByTen = makeIncrementer(forIncrement: 10)
let anotherIncrementByTen = makeIncrementer(forIncrement: 10)
let referToIncrementByTen = incrementByTen
print(incrementByTen())         // 10
print(anotherIncrementByTen())  // 10
print(referToIncrementByTen())  // 20
anotherIncrementByTen()은incrementByTen()와 다른 instances 이므로 캡쳐한 변수runningTotal을 각자의 scope 에 저장한다.referToIncrementByTen()은 할당될 때incrementByTen()의 Pointer 를 복사하므로 캡쳐한 변수runningTotal를 공유한다.
Escaping Closures
Arguments 로 전달되는 Closures 는 Trigger 시점에 따라 두 가지로 구분할 수 있다.
- 함수가 종료되기 전 함수 context 내에서 호출.
- 함수가 종료된 후 함수 context 밖에서 호출.
Swift 는 context 내부의 무언가를 escaping 하는 것이 disable 상태이므로 이를 위해서는 @escaping keyword 를 명시해야한다.
Store in a Variable
var completionHandlers: [() -> Void] = []
func someFunctionWithEscapingClosure(completionHandler: @escaping () -> Void) {
    completionHandlers.append(completionHandler)
}
Closures 를 escaping 시키는 가장 쉬운 방법은 함수 context 외부 변수에 저장하는 것이다.
Escaping Closures in Classes
var completionHandlers: [() -> Void] = []
func someFunctionWithEscapingClosure(completionHandler: @escaping () -> Void) {
    completionHandlers.append(completionHandler)
}
func someFunctionWithNonescapingClosure(closure: () -> Void) {
    closure()
}
Non-escaping Closures 를 하나 더 추가하고 이를 이용해 Classes 를 하나 만들어보자.
class SomeClass {
    var x = 10
    func doSomething() {
        someFunctionWithEscapingClosure { self.x = 100 }
        someFunctionWithNonescapingClosure { x = 200 }
    }
}
let instance = SomeClass()
instance.doSomething()      // `someFunctionWithNonescapingClosure` is called in `doSomething` function's body
print(instance.x)   // 200

completionHandlers.first?() // `someFunctionWithEscapingClosure ` is not called in `doSomething()` function's body
print(instance.x)   // 100
Escaping Closures 가 Class Instances 의 self를 참조하는 경우 주의해야한다. self 를 캡처할 경우 너무도 쉽게
Strong Reference Cycle(강한 순환 참조)가 생기기 쉽기 때문이다. Reference Cycles에 대해 좀 더 자세한 내용은
Automatic Reference Counting을 참고한다.
따라서 Closures는 implicit(암시적) 으로 Closure 내부 변수를 이용해 외부 변수를 캡처하지만,
Escaping Closures는 self 키워드 이용해 explicit(명시적) 으로 코드를 작성
하도록한다. 이는 개발자에게 순환 참조가 없음을 확인하도록 상기시킨다.
Escaping Closures in Structures
struct SomeStruct {
    var x = 10
    mutating func doSomething() {
        someFunctionWithEscapingClosure { self.x = 100 }    // error: escaping closure captures mutating 'self' parameter
        someFunctionWithNonescapingClosure { x = 200 }      // Ok
    }
}
Structures 는 Classes 와 달리 Value Types 다. 그리고 Swift 에서 Value Types 는 immutable을 보장하기 위해 내부에서
값을 수정할 수 없다. 수정을 위해서는 mutating을 명시해야한다.
문제는 Escaping Closures 의 Trigger 가 작동되는 시점은 이미 mutating context 밖이라는 것이다.
따라서 위와 같은 코드는 compile-time error 가 발생된다.
하지만 이것이 Structures 에서 Escaping Closures 를 사용할 수 없음을 의미하는 것은 아니다.
아래와 같이 mutating 키워드가 필요한 코드를 제외하면 Escaping Closures는 Value Types에서도 사용 가능하다.
struct SomeStruct {
    func anotherDoSomething() {
        someFunctionWithEscapingClosure { print("It's OK") }
    }
}
var valueTypeInstance = SomeStruct()

valueTypeInstance.anotherDoSomething()
completionHandlers.first?()  // It's OK
Value Types 에서 Escaping Closures 는 mutating 을 일으켜서는 안 된다.
Autoclosures
Closures Evaluated when Called
- Code
var customersInLine = ["Chris", "Alex", "Ewa", "Barry", "Daniella"]

let returned = customersInLine.remove(at: 0)
print(returned)         // Chris
print(customersInLine)  // ["Alex", "Ewa", "Barry", "Daniella"]
line 내에 작성된 코드는 코드를 읽은 즉시 평가(evaluated)된다.
- Closures
var customersInLine = ["Chris", "Alex", "Ewa", "Barry", "Daniella"]
let customerProvider = { customersInLine.remove(at: 0) }

print(customersInLine)  // ["Chris", "Alex", "Ewa", "Barry", "Daniella"]

customerProvider()
print(customersInLine)  // ["Alex", "Ewa", "Barry", "Daniella"]
{ } 블럭으로 감싸 Closures 로 만들면 코드를 읽은 시점이 아니라 Closures 의 Trigger 가 작동된 시점에 평가된다.
Autoclosure Type Parameters
위에서 본 것처럼 { } 블럭으로 감싸 Closures 로 만들면 평가를 지연시킬 수 있기 때문에 Closures 를 Parameters 로 전달하는 것이
가능하다.
var customersInLine = ["Chris", "Alex", "Ewa", "Barry", "Daniella"]


func serve(customer customerProvider: () -> String) {
    print("Now serving \(customerProvider())!")
}

serve(customer: { customersInLine.remove(at: 0) })  // Now serving Chris!
함수를 정의할 때 Parameters 에 @autoclosure keyword 를 사용하면 { } 블럭으로 감싸는 Closure Wrapping 을 자동으로
처리할 수 있다.
func serve(customer customerProvider: @autoclosure () -> String) {
    print("Now serving \(customerProvider())!")
}

serve(customer: customersInLine.remove(at: 0))      // Now serving Chris!
단, Autoclosures 의 남용은 코드를 이해하기 어렵게 만든다.
Autoclosures with Escaping Closures
@autoclosure 와 @escaping을 함께 사용할 수 있다.
var customersInLine = ["Chris", "Alex", "Ewa", "Barry", "Daniella"]
var customerProviders: [() -> String] = []

func collectCustomerProviders(_ customerProvider: @autoclosure @escaping () -> String) {
    customerProviders.append(customerProvider)
}

collectCustomerProviders(customersInLine.remove(at: 0))
collectCustomerProviders(customersInLine.remove(at: 0))

print("Collected \(customerProviders.count) closures.")
print("customerProviders: \(customerProviders)")

for customerProvider in customerProviders {
    print("Now serving \(customerProvider())!")
}
Collected 2 closures.
[(Function), (Function)]
Now serving Chris!
Now serving Alex!
6. Enumerations 👩💻
Syntax
enum SomeEnumeration {
    case one
    case two
    case three
}
enum SomeEnumeration {
    case one, two, three
}
- Enumeration 은 새
Type을 만드는 것이므로 대문자로 시작한다. Singleton을 기반으로 하므로 단수형을 사용한다.
Iterating
CaseIterable protocol 을 채택하면 Collection 을 생성해 순환시킬 수 있다.
enum Beverage: CaseIterable {
    case coffee, tea, juice
}

for beverage in Beverage.allCases {
    print(beverage)
}
Associated Values
Enumerations 의 cases 가 자기 자신의 값 외에 다른 값을 가질 수 있는 방법으로 Associated Values와 Raw Values가 있다.
Syntax
Enumeration 의 cases 가 값이 아닌 Type 을 저장하도록 할 수 있다.
이렇게 하면 서로 다른 Types 의 값을 하나의 Enumeration 에 저장할 수 있다.
enum Barcode {
    case upc(Int, Int, Int, Int)
    case qrCode(String)
}
위에서는 Beverage Type 이 cases 로 coffee, tea, juice 라는 값을 가졌다.
반면 Barcode Type 은 cases 로 upc(Int, Int, Int, Int) 또는 qrCode(String) 라는 Type 을 갖는다.
따라서 Beverage 는 다음과 같이 case 자체를 값으로 정의할 수 있지만
var myBeverage: Beverage
myBeverage = .coffee
Beverage 는 다음과 같이 해당 Types 에 해당하는 값의 instance 를 생성해야한다.
var productBarcode: Barcode
productBarcode = .upc(8, 85909, 51226, 3)
productBarcode = .qrCode("ABCDEFGHIJKLMNOP")
Switch Statements with Associated Values
Associated Vales 가 정의하는 Types 의 실제 instance values 를 Switch 에서 사용하기 위해 다음과 같이 let 또는 var를
사용할 수 있다.
func printBarcode (_ productBarcode: Barcode) {
    switch productBarcode {
    case .upc(let numberSystem, let manufacturer, let product, let check):
        print("UPC: \(numberSystem), \(manufacturer), \(product), \(check).")
    case .qrCode(let productCode):
        print("QR code: \(productCode).")
    }
}
만약 모든 값이 필요할 경우 Types 앞에 let 또는 var keyword 를 작성하는 것으로 대신할 수 있다.
func printBarcode (_ productBarcode: Barcode) {
    switch productBarcode {
    case let .upc(numberSystem, manufacturer, product, check):
        print("UPC : \(numberSystem), \(manufacturer), \(product), \(check).")
    case let .qrCode(productCode):
        print("QR code: \(productCode).")
    }
}
Raw Values
Syntax
Enumerations 를 정의할 때 Primitive Types 를 채택하면 RawRepresentable에 의해 각 cases 가 다른 값을 Raw Values로
갖는다.
enum ASCIIControlCharacter: Character {
    case tab = "\t"
    case lineFeed = "\n"
    case carriageReturn = "\r"
}
enum SomeEnumeration: Int {
    case one = 1
    case two = 2
    case three = 3
}

print(SomeEnumeration.one)          // One
print(SomeEnumeration.one.rawValue) // 1
enum SomeEnumeration: String {
    case one = "하나"
    case two = "둘"
    case three = "셋"
}

print(SomeEnumeration.one)          // One
print(SomeEnumeration.one.rawValue) // 하나
- Raw Values 는
String,Character,Integer,Floating-Point NumberTypes 를 가질 수 있다. - Raw Values 는
Unique해야한다.
Associated Values 와 다른 점은 Associated Values 는 cases 가 다른 값을 가질 수 있도록 함은 물론이고, 2가지 이상의 Types 를 저장하는 것이 가능하지만 Raw Values 는 cases 가 다른 값을 가질 수 있도록 할 수는 있지만 하나의 Types 만 가질 수 있다.
Implicitly Assigned Raw Values
- Integer
enum Planet: Int {
    case mercury, venus, earth, mars, jupiter, saturn, uranus, neptune
}

print(Planet.mercury.rawValue)  // 0
print(Planet.venus.rawValue)    // 1
print(Planet.neptune.rawValue)  // 7
enum Planet: Int {
    case mercury = 10, venus = 20, earth, mars, jupiter, saturn, uranus, neptune
}

print(Planet.mercury.rawValue)  // 10
print(Planet.venus.rawValue)    // 20
print(Planet.neptune.rawValue)  // 26
- String
enum CompassPoint: String {
    case east, west, south, north
}

print(CompassPoint.east)            // east
print(CompassPoint.east.rawValue)   // east
print(type(of: CompassPoint.east))          // CompassPoint
print(type(of: CompassPoint.east.rawValue)) // String
Initializing from a Raw Value
- With specific cases
enum Planet {
    case mercury, venus, earth, mars, jupiter, saturn, uranus, neptune
}

let possiblePlanet = Planet.uranus
print(possiblePlanet)   // uranus
- With Raw Values
enum Planet: Int {
    case mercury, venus, earth, mars, jupiter, saturn, uranus, neptune
}

let possiblePlanet = Planet(rawValue: 7)
print(possiblePlanet as Any)    // Optional(__lldb_expr_18.Planet.neptune)

let impossiblePlanet = Planet(rawValue: 8)
print(impossiblePlanet as Any)  // nil
Recursive Enumerations
Enumeration 의 case 가 다시 자기 자신을 Associated Values 로 가질 때 이를 Recursive Enumerations라 하며,
반드시 indirect 키워드를 명시해야한다.
enum ArithmeticExpression {
    case number(Int)
    indirect case addition(ArithmeticExpression, ArithmeticExpression)
    indirect case multiplication(ArithmeticExpression, ArithmeticExpression)
}
indirect enum ArithmeticExpression {
    case number(Int)
    case addition(ArithmeticExpression, ArithmeticExpression)
    case multiplication(ArithmeticExpression, ArithmeticExpression)
}
위 Enumeration ArithmeticExpression.Type은 다음 3 가지의 arithmetic expressions(산술 표현식)을
저장할 수 있다.
- a plain number
- the addition of two expressions
- the multiplication of two expressions
(5 + 4) * 2를 ArithmeticExpression.Type 를 이용해 선언해보자. 데이터가 중첩(nested)되므로,
Enumeration 역시 중첩(nested)이 가능해야한다.
let five = ArithmeticExpression.number(5)
let four = ArithmeticExpression.number(4)
let sum = ArithmeticExpression.addition(five, four)
let product = ArithmeticExpression.multiplication(sum, ArithmeticExpression.number(2))
Recursive Structure를 가진 데이터를 다루는 가장 직관적인 방법은 Recursive Function을 이용하는 것이다.
func evaluate(_ expression: ArithmeticExpression) -> Int {
    switch expression {
    case let .number(value): return value
    case let .addition(left, right): return evaluate(left) + evaluate(right)
    case let .multiplication(left, right): return evaluate(left) * evaluate(right)
    }
}

print(evaluate(five))       // 5
print(evaluate(four))       // 4
print(evaluate(sum))        // 9
print(evaluate(product))    // 18
7. Structures and Classes 👩💻
Syntax
Definition
struct SomeStructure {
    // structure definition goes here
}
class SomeClass {
    // class definition goes here
}
Instances
let someStructure = SomeStructure()
let someClass = SomeClass()
Characteristic
일반적으로 프로그래밍 언어에서 Class 하나에 파일 하나가 필요하다.
하지만 Swift 는 파일 하나에 여러 개의 Classes 와 Structures 를 정의할 수 있으며, 외부 인터페이스는 다른 Class 나
Structure 가 사용할 수 있도록 자동으로 제공된다.
이는 전통적으로 프로그래밍 언어에서 Class의 instance는 Object인 반면, Swift 의 Structures와
Classes는 다른 언어와 비교해 Functionality에 가깝다.
Commons of Structures and Classes
- Define properties : 값을 저장
- Define methods : 기능을 제공
- Define subscripts :
Subscript Syntax를 이용해 값에 접근 - Define initializers : 초기 상태를 설정
- Be extended : 기본 구현 이상으로 확장
- Conform to protocols : 특정 종류의 표준 기능을 제공
Class Only Features
- inheritance : 다른 Class의 특성을 inherit (Structure 와 Protocol 은 다른 Protocol 을 adopt 하는 것만 가능하다.)
- Runtime 때 class instance 의 타입을 해석(interpret)하고, type casting 이 가능하다.
- deinitializers : class instance 에 할당된 자원을 해제
- Reference counting : class instance 에 참조를 허용 (Structure 는 Value Types 로 항상 Copy 되므로, Reference counting 을 사용하지 않는다.)
Class가 제공하는 추가 기능은 복잡성을 증가시킨다. 따라서 general guideline 에 따르면, Class 를 사용하는 것이 꼭 필요하거나 더 적합한 경우가 아니면 일반적으로 추론하기 쉬운Structure를 선호해야한다고 말한다. 이는 우리가 만드는 대부분의 Custom Data Types 는 Structure 또는 Enumeration 으로 되어야 함을 의미한다.
Choosing Between Structures and Classes
Choosing Between Structures and Classes 를 참고하도록 한다.
- 기본적으로 Structure 를 써라
- Objective-C와 상호 운용이 필요하면 Class 를 써라
- 앱 전체에서 데이터의 identity 를 제어해야한다면 Class 를 써라
(i.e. file handles, network connections, CBCenterManager 와 같은 shared hardware intermediaries) - 공유 implementation(구현체) 를 적용하기 위해 Structure 와 Protocol 을 써라
(Inheritance 없이도 Structure 와 Protocol 의 Adopt Protocol 만으로도 충분히 계층 구현이 가능하다. 만약Class 에서만 유효해야하는 상속을 구현해야할 때, Class Inheritance 대신 Class-Only Protocols 를 사용할 수 있다.)
Structures and Enumerations Are Value Types
Swift 의 모든 기본 타입들, integers, floating-point Numbers, Booleans, strings, arrays, dictionaries 는 모두
Value Types으로Structures 로 구현되어있다.
Standard Library에 의해 정의된 Array, Dictionary 그리고 String 과 같은Collections역시 Structures 로 구현되어 있으므로Value Types다.하지만 다른 Value Types 와 다르게
performance cost of copying을 줄이기 위해optimiaztion을 사용한다. 따라서, Value Types 가 즉시 copy 를 하는 것과 다르게 copies 에 수정이 발생되기 전에는Reference Types처럼original instance와copies가 메모리를 공유한다.이후 copies 중 하나에 수정이 발생하면, 수정이 되기 직전에 실제
copy가 이루어진다. 즉,copies에 수정이 발생되기 이전에는Reference Types처럼 작동하고, 수정이 발생되는 순간Value Types처럼 작동하기 때문에 코드상으로는 즉시copy가 이뤄지는 것처럼 보인다.
반면,
Foundation에 의해 정의된 NSArray, NSDictionary 그리고 NSString 과 같은Classes Bridged to Swift Standard Library Value Types는 Classes 로 구현되어 있으므로Reference Types다.
Foundation - NSArray, Classes Bridged to Swift Standard Library Value Types
Classes Are Reference Types
Identity in Value Types
// Equal to(==)
print(5 == 5)       // true
print(5 == 7)       // false

// Not equal to(!=)
print(5 != 7)       // true
Identity in Reference Types
Reference Types를 위한 Identity Operators는 ==, !=가 아닌 ===, !==를 사용한다.
let jamie = Person()
let student = jamie

// Equal to(===)
print(jamie === student)    // true
print(jamie !== student)    // false
Pointers
C, C++, Objective-C 같은 언어는 메모리 주소를 참조하기 위해 pointer를 사용한다.
이것은 Swift 에서 Reference Types의 instance를 참조하기 위한 상수 또는 변수 역시 이와 유사하다.
하지만, Swift 가 가리키는 주소값은 C 언어에서의 pointer 와 달리 메모리 주소를 가리키는direct pointer가
아니며, reference 를 만들기 위해 asterisk(*)를 필요로 하지 않는다.
Swift 에서 references는 다른 constants 또는 variables를 정의하듯 사용하면 된다.
만약, pointer를 직접적으로 다뤄야 하는 경우를 위해 Standard Library는 pointer types와 buffer types를
제공한다. Manual Memory Management
8. Properties 👩💻
Stored Properties
Syntax
Class, Structure, Enumeration의 instance 일부로써 constant values 또는 variable values를
저장한다.
FixedLengthRange instance 는 1개의 variable firstValue 와 1개의 constant length 를 가지고 있다.
struct FixedLengthRange {
    var firstValue: Int
    let length: Int
}
Stored Properties of Constant Structure Instances
만약 Structure 의 instance 를 생성해 let 키워드에 할당하면, instance 자체가 constant 가 되므로
properties가 variable 이더라도 수정이 불가능하다.
let rangeOfFourItems = FixedLengthRange(firstValue: 0, length: 4)
rangeOfFourItems.firstValue = 3 // Cannot assign to property: 'rangeOfFourItems' is a 'let' constant
그러나 이것은 Structures가 Value Types여서 발생하는 현상으로, Reference Types인 Classes는
instance 를 let 키워드를 이용해 constant 로 선언해도, properties 가 variable 이면 여전히 수정 가능하다.
class FixedVolumeRange {
    var firstValue: Int
    let volume: Int

    init(firstValue: Int, volume: Int) {
        self.firstValue = firstValue
        self.volume = volume
    }
}
let rangeOfFiveVolumes = FixedVolumeRange(firstValue: 0, volume: 5)
print("rangeOfFiveVolumes(firstValue: \(rangeOfFiveVolumes.firstValue), volume: \(rangeOfFiveVolumes.volume))")

rangeOfFiveVolumes.firstValue = 1
print("rangeOfFiveVolumes(firstValue: \(rangeOfFiveVolumes.firstValue), volume: \(rangeOfFiveVolumes.volume))")
rangeOfFiveVolumes(firstValue: 0, volume: 5)
rangeOfFiveVolumes(firstValue: 1, volume: 5)
Lazy Stored Properties
Property 선언 앞에 lazy modifier 붙여 만들며, 반드시 var 키워드와 함께 사용해야한다. constant 는
initialization 이 종료되기 전에 반드시 값을 가져야 하기 때문이다(= 선언과 동시에 값을 저장해야한다).
struct SomeStructure {
    lazy var someProperty = {
        return // property definition goes here
    }()

    lazy var anotherProperty = SomeClass()  // or SomeStructure()
}
Lazy Stored Properties 는 다음 경우 유용하다
- 초기값이 외부 요인에 의존하는 경우
- 필요할 때까지 수행하면 안 되는 경우
- 초기값을 저장하는데 비용이 많이 드는 경우
- 초기값이 필요하지 않은 경우
Stored Properties and Instance Variables
Objective-C 는 Class instance 의 Properties 로 Values 와 References 를 저장하는 두 가지
방법을 제공했다. 또한 Properties 를 Backing Store(백업 저장소)로 사용할 수 있었다.
하지만 Swift 는 Backing Store에 직접 접속할 수 없도록 하고, Properties를 저장하는 방식을 통합했다.
따라서 선언하는 방법에 따른 혼동을 피하고 명확한 문장으로 단순화되었으며, 이는 Properties의 이름, 타입,
메모리 관리 특성을 포함하는 모든 정보를 유형을 한 곳에서 정의한다.
Computed Properties
Syntax
Class, Structure, Enumeration 의 일부로써 값을 저장하는 대신 계산하며, getter와
optional setter를 제공한다. Lazy Stored Properties 와 마찬가지로 반드시 var 키워드와 함께 사용해야하며,
Lazy Stored Properties 와 다르게 반드시 데이터 타입을 명시(explicit type)해야한다.
또한, 값을 할당(저장)하는 것이 아니므로, =를 사용하지 않고, explicit type 다음 바로 getter 와 setter 를
갖는 Closure를 작성한다. 또한 setter 의 parameter 는 반드시 명시된 explicit type 과 동일한 SomeType
이어야하므로, 별도의 type을 명시할 수 없다.
struct SomeStructure {
    var someProperty: SomeType {
        get {
            return // property definition for getter goes here
        }
        set (parameterName) {
            // property definition for setter goes here
        }
    }
}
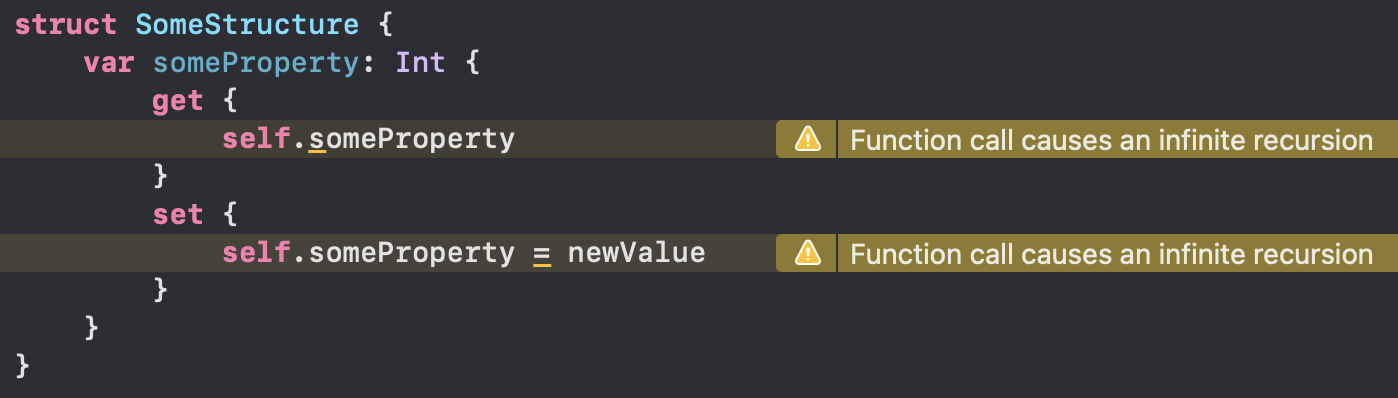
단!!
Computed Properties는 절대 자기 자신을 대상으로 해서는 안 된다.
강한 참조가 생성되기 때문이다.
Shorthand Getter/Setter Declaration
- getter : 다른 Closures 와 마찬가지로 single expression 으로 작성되면
return키워드를 생략할 수 있다. - setter : Computed Properties 의 setter 의 Parameters 를 생략하면 기본값으로
newValue와oldValue를 사용한다.
struct Rect {
    var origin = Point()
    var size = Size()
    var center: Point {
        get {
            let centerX = origin.x + (size.width / 2)
            let centerY = origin.y + (size.height / 2)
            return Point(x: centerX, y: centerY)
        }
        set (newCenter) {
            origin.x = newCenter.x - (size.width / 2)
            origin.y = newCenter.y - (size.height / 2)
        }
    }
}
따라서 위 코드는 다음과 같이 바꿀 수 있다.
struct Rect {
    var origin = Point()
    var size = Size()
    var center: Point {
        get {
            Point(x: origin.x + (size.width / 2),
                    y: origin.y + (size.height / 2))
        }
        set {
            origin.x = newValue.x - (size.width / 2)
            origin.y = newValue.y - (size.height / 2)
        }
    }
}
Read-Only Computed Properties
setter 가 필요 없고 getter 만 필요한 경우 이를 Read-Only Computed Properties라고 하며, get 키워드와
중괄호{ }를 생략할 수 있다.
struct Rect {
    var origin = Point()
    var size = Size()
    var center: Point {
        Point(x: origin.x + (size.width / 2),
                y: origin.y + (size.height / 2))
    }
}
Property Observers
Syntax
Property Observers는 Property 의 값에 set의 변화를 관찰하고 실행된다. 새 값이 기존의 값과 같더라도 set 이
발생하는 것 자체로 trigger 되기 때문에 호출된다.
Property 에 Observers를 붙일 수 있는 곳은 다음과 같다.
- Stored Properties
- 상속된 Stored Properties
- 상속된 Computed Properties
상속된 Properties 에 Property Observers 를 붙일 때는
overriding을 이용한다.
상속되지 않은 Computed Properties 는 Property Observers 를 사용할 수 없으므로, 대안으로 Computed Properties 의 setter 를 사용해 일정 부분 유사하게 구현하는 방법이 있다.
class SomeClass {
    var someProperty: Type = defaultValue {
        willSet {
            // observer definition for willSet goes here
        }
        didSet {
            // observer definition for didSet goes here
        }
    }
}
Lazy Stored Properties 또는 Computed Properties 와 마찬가지로 반드시
var키워드와 함께 사용한다. 또한 초기값을 반드시 정의해야하며, 로직은 Trailing Closures 를 이용해 정의한다.
willSet & didSet
- willSet : 값이 저장되기 직전에 호출되며, Parameters 를 생략하면 기본값으로
newValue를 사용한다. willSet 에서 주의해야 할 것은 값을 저장하기 직전의 행동을 정의할 수 있을 뿐 값을 저장하는 행위 자체를 제어하지는 못한다!! - didSet : 값이 저장된 직후에 호출되며, Parameters 를 생략하면 기본값으로
oldValue를 사용한다.
class StepCounter {
    var totalSteps: Int = 0 {
        willSet {
            if newValue > totalSteps {
                print("About to set totalSteps to \(newValue)")
            }
        }
        didSet {
            if totalSteps > oldValue  {
                print("Added \(totalSteps - oldValue) steps, totalStep is now \(totalSteps)")
            } else {
                print("Please check your step data")
                totalSteps = oldValue
            }
        }
    }
}
Initializer of subclasses
Property Observers 의 willSet, didSet 은 Initializers 에 의해 Instance 가 생성될 때는 작동하지 않는다. Initializers 에 의해 Instance 가 생성되고 난 이후에 Observers 가 작동한다.
따라서 다음과 같은 과정을 거치게 된다.
- Subclass 가 자신의 Properties 의 속성을 모두 설정한 후 Superclass 의 Initializers 를 호출한다.
- Superclass 가 자신의 Designated Initializers 를 이용해 Initialization 을 수행한다. 이때 Superclass 자신이 갖고 있는 Observers 는 작동하지 않는다. 이로써 Phase 1 이 종료된다.
- 이제
Phase 2가 진행되고 Subclass 의 Initializers 가 Superclass 의 Properties 를 수정한다. 이때 해당 Properties 에 Observers 가 붙어있다면willSet,didSet이 작동한다.
Property Wrappers
Syntax
Property Wrappers는 Properties 를 정의하는 코드와 저장되는 방법을 관리하는 코드 사이에 분리된 layer(계층)을
추가한다.
예를 들어 Thread-Safe 검사를 제공하는 Properties, 또는 기본 데이터를 Database 에 저장하는 Properties 가
있는 경우 해당 코드를 모든 Properties 에 작성해야한다. 이때 Property Wrappers를 사용하면 코드를 한 번만 작성하고
재사용 할 수 있다.
@propertyWrapper
struct SomeStructure {
    private var someProperty: SomeType
    var wrappedValue: SomeType {
        get { someProperty }
        set { someProperty = newValue }
    }
}
Class,Structure,Enumeration를 이용해 정의하며 3가지 부분으로 나뉜다@propertyWrapperAnnotation 을 선언private var변수 선언wrappedValue라는 이름을 갖는 Computed Property를 정의
@propertyWrapper
struct OneToNine {
    private var number = 1
    var wrappedValue: Int {
        get { number }
        set { number = max(min(newValue, 9), 1) }
    }
}
struct MultiplicationTable {
    @OneToNine var left: Int
    @OneToNine var right: Int
}
위 코드를 풀어서 @propertyWrppaer 없이 직접 구현하면 다음과 같이 구현할 수 있다.
struct OneToNine {
    private var number = 1
    var wrappedValue: Int {
        get { number }
        set { number = max(min(newValue, 9), 1) }
    }
}
// Explicit Wrapping
struct MultiplicationTable {
    private var _left = OneToNine()
    private var _right = OneToNine()
    var left: Int {
        get { _left.wrappedValue }
        set { _left.wrappedValue = newValue }
    }
    var right: Int {
        get { _right.wrappedValue }
        set { _right.wrappedValue = newValue }
    }
}
참고로 Observers와 Wrappers는 동시에 사용하지 못하는 것으로 보인다.
Can I implement a property observer in a property wrapper structure?
Setting Initial Values for Wrapped Properties
위와 같이 Property Wrappers 의 초기값을 하드코딩하면 유연성이 떨어진다.
Property Wrappers 는 Structure에 정의하므로 Initializer를 사용할 수 있고, 이는 Property Wrappers 를
더욱 유연하게 만든다.
@propertyWrapper
struct LengthOfSide {
    private var maximum: Int
    private var length: Int

    var wrappedValue: Int {
        get { length }
        set { length = min(newValue, maximum) }
    }

    init() {
        maximum = 10
        length = 0
    }

    init(wrappedValue: Int) {
        maximum = 10
        length = min(wrappedValue, maximum)
    }

    init(wrappedValue: Int, maximum: Int) {
        self.maximum = maximum
        length = min(wrappedValue, maximum)
    }
}
Property Wrappers 의 Initializers 를 사용하는 방법은 두 가지가 있다.
1 ) Property Wrappers 의 Initializers 를 사용해 초기화
struct NarrowRectangle {
    @LengthOfSide(wrappedValue: 15, maximum: 20) var height: Int
    @LengthOfSide(wrappedValue: 3, maximum: 5) var width: Int
}
2 ) Properties 의 Initial Values 를 사용해 초기화
struct HugeRectangle {
    @LengthOfSide(maximum: 20) var height: Int = 20
    @LengthOfSide(maximum: 20) var width: Int = 25
}
Projecting a Value From a Property Wrapper
Property Wrapper 는 Projected Value 라는 숨겨진 값을 하나 추가할 수 있다. 다음은 LengthOfSide라는
Property Wrapper 가 유효성 검사에 의해 값이 보정되었는지를 Projected Value 라는 숨겨진 값에 저장하도록 할
것이다.
@propertyWrapper
struct LengthOfSide {
    private var maximum: Int
    private var length: Int
    private(set) var projectedValue: Bool = false

    var wrappedValue: Int {
        get { length }
        set {
            if newValue > maximum {
                length = maximum
                projectedValue = true
            } else {
                length = newValue
                projectedValue = false
            }
        }
    }

    init() {
        maximum = 10
        length = 0
    }

    init(wrappedValue: Int) {
        maximum = 10
        length = min(wrappedValue, maximum)
    }

    init(wrappedValue: Int, maximum: Int) {
        self.maximum = maximum
        length = min(wrappedValue, maximum)
    }
}
이 숨겨진 값은 겉으로 노출되지 않는다. 이 값을 보려면 $ 를 붙여주면 숨겨진 값에 접근할 수 있다.
struct HugeRectangle {
    @LengthOfSide(wrappedValue: 20, maximum: 20) var height: Int
    @LengthOfSide(maximum: 20) var width: Int = 25
}

var hugeRectangle = HugeRectangle()

print(hugeRectangle.height)     // 20
print(hugeRectangle.$height)    // false

hugeRectangle.width = 30
print(hugeRectangle.width)      // 20
print(hugeRectangle.$width)     // true
Projecting은 Initializers 에서는 작동하지 않는다.
Global and Local Variables
Definition
- Global Variables: Functions, Methods, Closures, Type Context 외부에 정의된 변수를 의미
- Local Variables: Functions, Methods, Closures Context 내부에 정의되 변수를 의미
Stored Variables
Stored Variables는 Stored Properties 처럼 값을 저장하고 검색하는 것을 제공한다.
Global Constants 와 Global Variables 는 항상
lazily하게 계산된다. 이는 Lazy Stored Properties 와 유사하다. 단, Lazy Stored Properties 와 다른 점은lazymodifier 를 붙일 필요가 없다.반면에 Local Constants 와 Local Variables 는 절대
lazily하게 계산되지 않는다.
Computed Variables
Global Variables 와 Local Variables 모두 Computed를 사용할 수 있다.
Variable Observers
Global Variables 와 Local Variables 모두 Observer를 사용할 수 있다.
Variable Wrappers
Property Wrappers는 Local Stored Variables에만 적용 가능하다.
Global Variables 또는 Computed Variables 에는 적용할 수 없다.
Type Properties
Syntax
C 나 Objective-C 에서 static constants, static variables 를 정의하기 위해 Global Static Variables
를 사용했다. 하지만 Swift 는 불필요하게 전역으로 생성되는 Global Static Variables 의 전역 변수 오염 문제를 해결하기
위해 Type Properties를 제공한다.
Type Properties 는 Swift Types 가 정의되는 { } 내부 context 범위 내에 정의되며, 그 Scope 범위
내에서만 사용 가능하다. Global Static Variables 와 마찬가지로 Properties 앞에 static 키워드를 사용해
정의하며, 단, Classes 의 경우 Computed Properties 를 Subclass 에서 overriding 을 허용하려면
Superclass 에서 static keyword 대신 class keyword 를 사용한다.
Type Properties는 정의할 때 반드시Initiate Value를 함께 정의해야한다.
- Structures
struct SomeStructure {
    static var someTypeProperty = "Initiate Value"
    static var computedTypeProperty: Int {
        return 1
    }
}
- Enumerations
enum SomeEnumeration {
    static var someTypeProperty = "Initiate Value"
    static var computedTypeProperty: Int {
        return 6
    }
}
- Classes
class SomeClass {
    static var someTypeProperty = "Initiate Value"
    static var computedTypeProperty: Int {
        return 27
    }
    class var overrideableComputedTypeProperty: Int {
        return 107
    }
}
computedTypeProperties 는
statickeyword 를 사용헸지만 overrideableComputedTypeProperty 는classkeyword 를 사용해 Subclass 에서 overriding 하는 것을 허용했다.
Type Properties and Instance Properties
Type Properties 는 Instance Properties 와 달리 단 하나만 존재하므로, 언제나 전역에서 공유된다. 따라서 단 하나의 값을 앱 전역에서 공유하기 위해 사용한다.
struct AudioChannel {
    static let thresholdLevel = 10
    static var maxInputLevelForAllChannels = 0
    var currentLevel: Int = 0 {
        didSet {
            if currentLevel > AudioChannel.thresholdLevel {
                currentLevel = AudioChannel.thresholdLevel
            }
            if currentLevel > AudioChannel.maxInputLevelForAllChannels {
                AudioChannel.maxInputLevelForAllChannels = currentLevel
            }
        }
    }
}
- thresholdLevel : 오디오가 가질 수 있는 볼륨 최댓값을 정의 (상수 10)
- maxInputLevelForAllChannels : AudioChannel Instance 가 받은 최대 입력값을 추적(0에서 시작)
- currentLevel : 현재의 오디오 볼륨을 계산을 통해 정의
var leftChannel = AudioChannel()
var rightChannel = AudioChannel()
좌우 채널을 각각 Instnace 로 생성한다.
leftChannel.currentLevel = 7
print(leftChannel.currentLevel)     // 7
print(AudioChannel.maxInputLevelForAllChannels) // 7
왼쪽 볼륨을 7로 올리자 왼쪽 채널의 볼륨이 7로, Type Property maxInputLevelForAllChannels 역시 7로 저장되었다.
rightChannel.currentLevel = 11
print(rightChannel.currentLevel)    // 10
print(AudioChannel.maxInputLevelForAllChannels) // 10
이번엔 오른쪽 볼륨을 11로 올리자 최대 레벨 제한에 의해 10으로 저장되고, 이에 따라 그 다음 if statement 에서 maxInputLevelForAllChannels가 10으로 저장되었다.
9. Methods 👩💻
Compare with Objective-C
Methods는 Functions 중에서 특정 Type 과 연관된 Functions 를 말한다.
Classes, Structures, Enumerations 모두 Instance 의 작동을 위한 Instance Methods를 정의하고,
Encapsulate(캡슐화) 할 수 있다. 또한 Type을 위한 Type Methods 역시 정의할 수 있는데, 이것은 Objective-C 의
Class Methods 와 유사하다.
Objective-C 에서 Classes 는 Methods 를 정의할 수 있는 유일한 타입인 반면, Swift 는 Classes 뿐만 아니라 Structures 와 Enumerations 에서도 정의할 수 있도록 유연성을 높였다.
Instance Methods
Instance Methods 는 Classes, Structures, Enumerations 의 Instance 에 속해 있는 함수로, Instance 의 Properties 에 접근, 수정하거나 Instance 의 작동을 위한 기능을 제공한다.
Instance Methods 는 그것이 정의된 context 내의 다른 모든 Instance Methods 와 Instance Properties 에 대해
암시적인 접근 권한을 갖는다. 그리고 Instance Methods 는 Instance Properties 와 마찬가지로 Instance 없이
독립적으로 호출이 불가능하다.
The self Property
Instance 는 self라고 불리는 Instance 자기 자신과 동일한 Property를 암시적으로 갖는다(implicit self property).
Mutating of Value Types
Structures 와 Enumerations 는
Value Types다. 기본적으로 Value Type 의 Properties 는 Instance Methods 에 의해 수정될 수 없다(immutable).수정이 필요할 경우
mutating키워드를 사용해 수정을 허용하도록 명시해야하며, mutating 을 하는 방법에는 Properties 를 수정하는 방법과 new Instance 를 생성하는 방법이 있다.
1 ) Modifying Value Types from Within Instance Methods
부분적으로 수정할 때는 Mutating Methods 가 종료될 때 Properties 를 변경하는 방법을 사용한다.
struct Point {
    var x = 0.0, y = 0.0
    mutating func moveBy(x deltaX: Double, y deltaY: Double) {
        x += deltaX
        y += deltaY
    }
}
mutating키워드를 이용해 Structures 의 Properties 를 수정하는 것은 Structure Instance 를var로 선언한 경우에만 가능하다.
Stored Properties of Constant Structure Instances
2 ) Assigning to self Within a Mutating Method
전체를 수정할 때는 Mutating Methods 가 종료될 때 new Instance 를 할당해 original Instance 를 대체하는 방법을 사용한다.
struct Point {
    var x = 0.0, y = 0.0
    mutating func anotherMoveBy(x deltaX: Double, y deltaY: Double) {
        self = Point(x: x + deltaX, y: y + deltaY)
    }
}
Type Methods
Type Property Syntax 와 마찬가지로 Methods 앞에 static 키워드를 사용한다.
struct SomeStructure {
    static func someTypeMethod() {
        // type method implementation goes here
    }
}
Type Methods 에서
self는 Instance 가 아닌Type itself, 즉Type 자체를 가리킨다.그리고 Instance Methods 와 마찬가지로,
self를 암시적으로 처리하므로 Type 의 context 에 정의된 Type Properties 나 Type Methods 에 접근하기 위한self를 생략할 수 있다.차이점이 있다면 다음과 같다.
Instance Methods는context내부에 정의된Instance Properties와Instance Methods에 접근 가능하다.
또한 Type Methods 접근도 가능한데,Type 의 full name을 붙여 접근 가능하다.Type Methods는context내부에 정의된Type Properties와Type Methods에 접근 가능하다.
자세한 코드는 Type Method Examples 를 참고한다.
10. Subscripts 👩💻
Syntax
subscript(index: Int) -> Int {
    get {
        // Return an appropriate subscript value here.
    }
    set(newValue) {
        // Perform a suitable setting action here.
    }
}
Computed Properties 와 마찬가지로
getter와optional setter를 제공하며, setter 의 Parameter 를 생략하고 기본값으로newValue를 사용할 수 있다.
또한 Computed Properties 와 마찬가지로 setter 의 Parameter 는 반드시 Return Type 과 동일해야하므로 별도의Type을 명시할 수 없으며, Read-Only Computed Properties와 마찬가지로Read-Only Subscripts는get키워드와 중괄호를 생략할 수 있다.
Custom Subscripts Example
다음은 정수의 n-times-table을 표시하기 위해 TimesTable Structure를 정의한다. Subscripts 는
Read-Only Subsscripts로 구현되었다.
struct TimesTable {
    let multiplier: Int
    subscript(index: Int) -> Int {
        multiplier * index
    }
}
let threeTimesTable = TimesTable(multiplier: 3)
(0...10).forEach { print(threeTimesTable[$0], terminator: "  ") }
0 3 6 9 12 15 18 21 24 27 30
Subscripts in Dictionary
Subscripts 는 구현하려는 Classes, Structures, Enumerations 에 적합한 형태로 자유롭게 구현이 가능하다.
따라서, Subscripts 의 정확한 의미는 context에 따라 달라진다. 일반적으로 Subscripts 는 Collection,
List, Sequence의 member elements에 접근하기 위한 용도로 사용되며 Dictionary 가 그 예다.
- Subscripts 를 이용해 값을 조회하기
var numberOfLegs = ["spider": 8, "ant": 6, "cat": 4]
print("The number of legs of ant is \(numberOfLegs["ant"]!).")
// The number of legs of ant is 6.
- Subscripts 를 이용해 값을 저장하기
numberOfLegs["bird"] = 2
print(numberOfLegs)  // ["spider": 8, "ant": 6, "cat": 4, "bird": 2]
Dictionary의key-value는 모든 keys 가 values 를 갖지 않는 것을 모델로 하기 때문에Optional Return Type을 취하므로Optional Subscripts를 사용한다.
Subscripts Options
Subscripts 는 Parameters 의 타입이나 개수, Return Type 을 자유롭게 정의할 수 있다.
심지어 함수와 마찬가지로 Variadic Parameters 와 Default Parameter Values 역시 가능하다.단, In-Out Parameters 는 사용할 수 없다.
struct Matrix {
    let rows: Int, columns: Int
    var grid: [Double]
    init(rows: Int, columns: Int) {
        self.rows = rows
        self.columns = columns
        grid = Array(repeating: 0.0, count: rows * columns)
    }
    func indexIsValid(row: Int, column: Int) -> Bool {
        row >= 0 && row < rows && column >= 0 && column < columns
    }
    subscript(row: Int, column: Int) -> Double {
        get {
            assert(indexIsValid(row: row, column: column), "Index out of range")
            return grid[(row * columns) + column]
        }
        set {
            assert(indexIsValid(row: row, column: column), "Index out of range")
            grid[(row * columns) + column] = newValue
        }
    }
}
Type Subscripts
Subscripts 역시 Properties, Methods 와 마찬가지로 Instance 뿐만 아니라 Type 자체의
Subscripts를 정의할 수 있다.
enum Planet: Int {
    case mercury = 1, venus, earth, mars, jupiter, saturn, uranus, neptune
    static subscript(n: Int) -> Planet {
        Planet(rawValue: n)!
    }
}
let earth = Planet(rawValue: 3)!
print(earth)    // earth
11. Inheritance 👩💻
Base Class
다른 Classes 를 상속하지 않은 Class 를 Base Class라 한다.
class Vehicle {
    var currentSpeed = 0.0
    var description: String {
        return "traveling at \(currentSpeed) miles per hour"
    }
    func makeNoise() {
        // do nothing - an arbitrary vehicle doesn't necessarily make a noise
    }
}
Universal Base Class를 하나 만들어 모든 Classes 가 기본적으로 이것을 상속하도록 하는 일부 언어와 달리 Swift 는 명시적으로 상속을 하지 않은 Class 는build할 때 자동으로Base Class가 된다.
Subclassing
Subclassing은 존재하는 다른 Class 를 기반으로 new Class 를 생성하는 행위를 말한다.
기존의 Class 를 Superclass, 기존의 Class 를 상속해 새로 생성된 Class 를 Subclass라 하며,
Subclass 는 새로운 것을 추가하는 것은 물론이고, 기존의 것을 수정할 수 있다.
Overriding
Subclass 는 Superclass 의 Instance Methods, Type Methods, Instance Properties,
Type Properties, Subscripts 를 다시 구현할 수 있다. 이것을 Overriding이라 한다.
Overriding 을 위해서 앞에 override modifier 를 붙여준다.
이렇게 하는 것은 재정의를 명확히 하고, 실수로 재정의하는 것을 방지하기 위한 것으로, override modifier 없이 재정의하면
Swift 는 이를 확인하고 compile error를 발생시킨다.
Overriding가능한characteristics는mutable한 것으로 제한된다. 예를 들어let키워드로 선언된 경우immutable이기 때문에 Overriding 할 수 없다.
class TimesTable {
    let multiplier: Int
    subscript(index: Int) -> Int { multiplier * index }
    func printMultiplier() {
        print(multiplier)
    }
    init(multiplier: Int) {
        self.multiplier = multiplier
    }
}

class ArithmeticSequenceTable: TimesTable {
    var superMultiplier: Int { super.multiplier }
    override func printMultiplier() {
        super.printMultiplier()
    }
    override subscript(index: Int) -> Int { super[index] + 1 }
}
Overriding Property Getters and Setters
class Car: Vehicle {
    var gear = 1
    override var description: String {
        super.description + " in gear \(gear)"
    }
}
Overriding Property Observers
class AutomaticCar: Car {
    override var currentSpeed: Double {
        didSet {
            gear = Int(currentSpeed / 10.0) + 1
        }
    }
}
Overriding Stored Properties
Stored Properties 는 Overriding 하는 것이 불가능하다. 이를 Overriding 하려 하면 compile error를
발생시킨다. Subclass 에서 Stored Properties 를 수정하기 위해서는
Initialization Phase 2의 수정할 기회 를 이용한다.
class Vehicle {
    var tag = "Vehicle"
}

class Bicycle: Vehicle {
    override init() {
        super.init()
        tag = "Bicycle"
    }
}

class Tandem: Bicycle {
    convenience init(tag: String) {
        self.init()
        self.tag = tag
    }
}
var vehicle = Vehicle()
var bicycle = Bicycle()
var tandem = Tandem(tag: "Tandem")

print(vehicle.tag)  // Vehicle
print(bicycle.tag)  // Bicycle
print(tandem.tag)   // Tandem
Preventing Overrides
Overriding을 막기 위해 final modifier 를 추가할 수 있다. 만약 Subclass 에서 재정의 할 경우
Swift 는 이를 확인하고 compile error를 발생시킨다.
class AutomaticCar: Car {
    override final var currentSpeed: Double {
        didSet {
            gear = Int(currentSpeed / 10.0) + 1
        }
    }
}
class ElectricMotorCar: AutomaticCar {
    override var currentSpeed: Double { // error: Property overrides a 'final' property

    }
}
AutomaticCar 의 currentSpeed 를 Overriding 하면서 final modifier 를 붙여주었기 때문에
AutomaticCar 를 상속한 ElectricMotorCar 는 이것을 재정의 할 수 없다.
Properties, Methods, Subscripts 가 아닌 Classes 정의에
finalmodifier 를 작성할 경우, 이 Class 를Subclassing하려는 모든 시도는 compile-time error 가 발생한다.
12. Initialization 👩💻
Initialization
Initialization은 Classes, Structures, Enumerations 를 사용하기 위해 Instance 를 준비하는 과정을 말한다.
이것은 Stored Properties 를 위한 초기값을 설정하거나 new Instance 가 생성되기 전에 수행해야 하는 것들을 정리한다.
Initializers를 구현해야하며, Objective-C 와 달리 Swift 의 Initializers 는 값을 반환하지 않는다.
초기화의 주요 역할은 사용하기 전에 Instance가 올바르게 초기화되는 것을 보장하는 것이다.
그리고 세 Types 중 Classes는 Instance가 해제되기 전에 수행해야할 일을 구현할 수 있으며,
이를 Deinitialization이라 한다.
All Stored Properties Must be Set
- Classes 와 Structures 의
Stored Properties는 Instance 가 생성되기 전 반드시모든 값을 저장해야한다. - Stored Properties 에 초기값을 설정할 때 사용되는
Initializers나Default Property Values는Property Observers 의 호출 없이이루어진다.
struct Celsius {
    var temperature: Double
    init() {
        temperature = 16.0
    }
}
Default Property Values
Properties 가 항상 동일한 초기값을 갖는다면 Default Property Values를 사용하는 것이 값을 선언에 더 가깝게 연결하고,
더 짧고 명확한 코드로 작성이 가능하며, 타입 추론을 허용한다.
또한, Default Property Values 를 사용하면, 이후 상속할 때 Initial Values 설정하는 것을 더욱 쉽게 만든다.
struct Celsius {
    var temperature = 16.0
}
Default Property Values with Closure
상수나 변수에 값을 저장할 때 사용자 정의 로직이나 설정이 필요한 경우가 있을 수 있다.
Swift 에서는 이를 위해 Closure나 Global Function를 사용할 수 있는데, 정의함과 동시에 실행시키고 그 값을 반환하도록 해,
이 return value를 상수 또는 변수에 저장하는 것이다.
class SomeClass {
    let someProperty: SomeType = {
        // create a default value for someProperty inside this closure
        // someValue must be of the same type as SomeType
        return someValue
    }()
}
Initialization Parameters
Swift 는 다른 언어와 달리 Parameters 의 개수와 Types 가 같더라도 Argument Labels가 다르면 구별이 가능하기
때문에 다음과 같이 initializer 를 overload 할 수 있다.
struct Celsius {
    var temperatureInCelsius: Double

    init(fromFahrenheit fahrenheit: Double) {
        temperatureInCelsius = (fahrenheit - 32.0) / 1.8
    }
    init(fromKelvin kelvin: Double) {
        temperatureInCelsius = kelvin - 273.15
    }
}
Optional Property Types
다음과 같은 이유로 인해 Properties 가 Optional Types가 되어야하는 경우가 있을 수 있다.
- Initialization 하는 동안 값을 설정할 수 없어
nil을 허용해야하는 경우 - 논리적으로
nil을 허용해야하는 경우
nil을 허용하기 위해 반드시 Optional Types로 정의되어야하며, Properties 는 자동으로 nil로 초기화된다.
class SurveyQuestion {
    var text: String
    var response: String?
    init(text: String) {
        self.text = text
    }
    func ask() {
        print(text)
    }
}
Assigning Constant Properties During Initialization
Initialization 이 종료되기 전까지 어느 시점에서든 let 키워드로 선언한 Constant Properties에 값을 할당할 수 있다.
주의해야 할 것은 이것이 Initialization 이 종료되기 전까지 여러 번 할당해 수정할 수 있다는 뜻은 아니다.
Initialization 이 종료되기 전 이라도 한 번 할당된 값은
immutable속성을 갖기 때문에 수정할 수 없다.
또한 Class Instances 에서 Initialization 을 진행하는 동안 Constant Properties 를 수정하는 것은 해당 Properties 를 도입한 Class 에서만 가능하다. Subclass 에서 수정하는 것은 불가능하다.
class SurveyQuestion {
    let text: String
    var response: String?
    init(text: String) {
        self.text = text
    }
    func ask() {
        print(text)
    }
}
let beetsQuestion = SurveyQuestion(text: "How about beets?")
Default Initializers
Structures 또는 Classes 에 Default Initializers가 자동 생성되는 조건은 다음과 같다.
- 모든 Properties 가
default value를 가지고 있다 - 존재하는
Initializers 가 하나도 없다
- Classes 의
Default Initializers는 항상Designated Initializers가 된다.Optional Types는 자동으로nil을default value로 갖는다.
class ShoppingListItem {
    var name: String?
    var quantity = 1
    var purchased = false
}
var item = ShoppingListItem()
Swift 가 자동으로 Default Initializers를 생성한다.
Memberwise Initializers for Structure Types
Structures 는 Classes 와 달리 Mmeberwise Initializers를 추가로 가질 수 있으며 자동 생성되는 조건은 다음과 같다.
- 존재하는
Initializers 가 하나도 없다
Default Initializers 와 달리 default value 를 가지고 있어야 할 필요가 없다.
단지 이 default value 의 존재 유무에 따라 모든 Member Properties 를 설정하기 위해
자동 생성되는 'Initializers' 의 경우의 수만 달라질 뿐이다.
Custom Initializers가 존재하는 경우, 더 이상Default Initializers나Memberwise Initializers에 접근할 수 없다.
- Memberwise Initializers
struct Size {
    var width: Double, height:Double
}
var square = Size(width: 2.0, height: 2.0)
struct Size {
    var width: Double = 5.0, height:Double
}
var square = Size(height: 5.0)
var rectangle = Size(width: 7.0, height: 3.0)
- Default Initializers & Memberwise Initializers
struct Size {
    var width: Double = 5.0, height:Double = 5.0
}
var square = Size()
var rectangle = Size(width: 7.0)
var anotherRectangle = Size(height: 12.0)
var hugeSquare = Size(width: 100.0, height: 100.0)
Initializer Delegation for Value Types
Initializers 는 Instance 를 생성할 때 코드가 중복되는 것을 방지하기 위해 다른 Initializers 를 호출할 수 있는데,
이것을 Initializer Delegation이라 한다.
Initializer Delegation 이 작동하는 방식과 Delegation 을 허용하는 범위는 Value Types 와 Class Types 가 다르다.
- Value Types: 상속을 허용하지 않으므로
자신의 context 내 다른 Initializers에만 Delegation 이 허용된다. - Class Types: 상속을 허용하므로, Classes 는
상속한 모든 Stored Properties 에 정확한 값이 설정되도록 하기 위한 책임이 필요함을 의미한다.
struct Size {
    var width = 0.0, height = 0.0
}
struct Point {
    var x = 0.0, y = 0.0
}

struct Rect {
    var origin = Point()
    var size = Size()
    init() {}
    init(origin: Point, size: Size) {
        self.origin = origin
        self.size = size
    }
    init(center: Point, size: Size) {
        let originX = center.x - (size.width / 2)
        let originY = center.y - (size.height / 2)
        self.init(origin: Point(x: originX, y: originY), size: size)
    }
}
let basicRect = Rect()
let originRect = Rect(origin: Point(x: 2.0, y: 2.0), size: Size(width: 5.0, height: 5.0))
let centerRect = Rect(center: Point(x: 4.0, y: 4.0), size: Size(width: 3.0, height: 3.0))

printRect(basicRect)    // The origin is (0.0, 0.0) and its size is (0.0, 0.0)
printRect(originRect)   // The origin is (2.0, 2.0) and its size is (5.0, 5.0)
printRect(centerRect)   // The origin is (2.5, 2.5) and its size is (3.0, 3.0)


func printRect(_ rect: Rect) {
    print("The origin is (\(rect.origin.x), \(rect.origin.y)) and its size is (\(rect.size.width), \(rect.size.height))")
}
Designated Initializers and Convenience Initializers
Syntax
Designated Initializers는 Class 의 Primary Initializers로, Class 의 모든 Properties 를 초기화하고,
Superclass 로 올라가며 적절한 Initializers 를 찾아 Initialization Chaining을 한다.
모든 Classes 는 최소한 하나의 Designated Initializers 를 가져야하며, 경우에 따라 Superclass 로부터 하나 또는
그 이상의 Designated Initializers 를 상속받는 것으로 충족된다.
- Designated Initializers
init(parameters) {
    statements
}
- Convenience Initializers
init 앞에 convenience modifier 를 붙인다
convenience init(parameters) {
    statements
}
Initializer Delegation Rule
Designated Initializers 와 Convenience Initializers 의 관게를 단순화하기 위해 Initializer Delegation 에 3가지 규칙을 적용한다.
- 규칙 1.
Designated Initializers는Superclass 의 Designated Initializers 를 호출해야한다. - 규칙 2.
Convenience Initializers는context 내 다른 Initializers 를 호출해야한다. - 규칙 3.
Convenience Initializers는궁극적으로 Designated Initializers 를 호출해야한다.
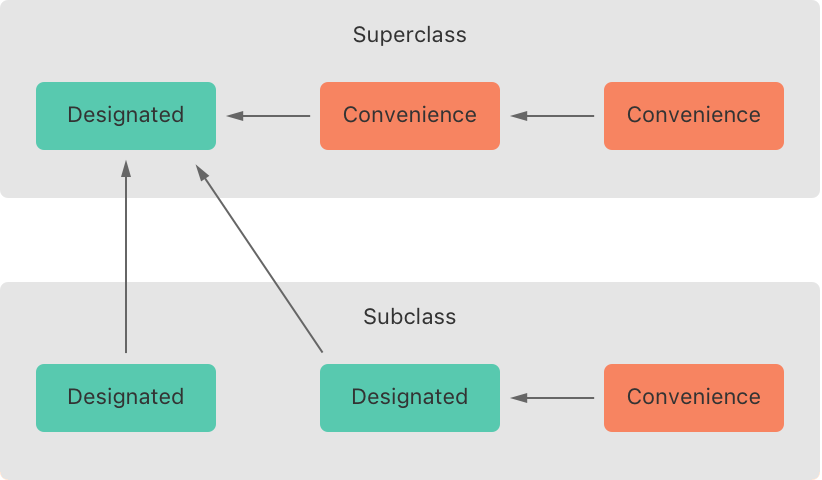
위 그림에서
Superclass는 규칙 2와 규칙3을 만족한다.Base Class이므로 규칙 1은 적용되지 않는다.Subclass는 규칙 2와 규칙3을 만족하고, 규칙 1 역시 만족한다.
다음 그림은 좀 더 복잡한 hierarchy 구조에서 Initializer Delegation이 이루어질 때 Designated Initializers가
어떻게 funnel point 역할을 하는지를 보여준다.
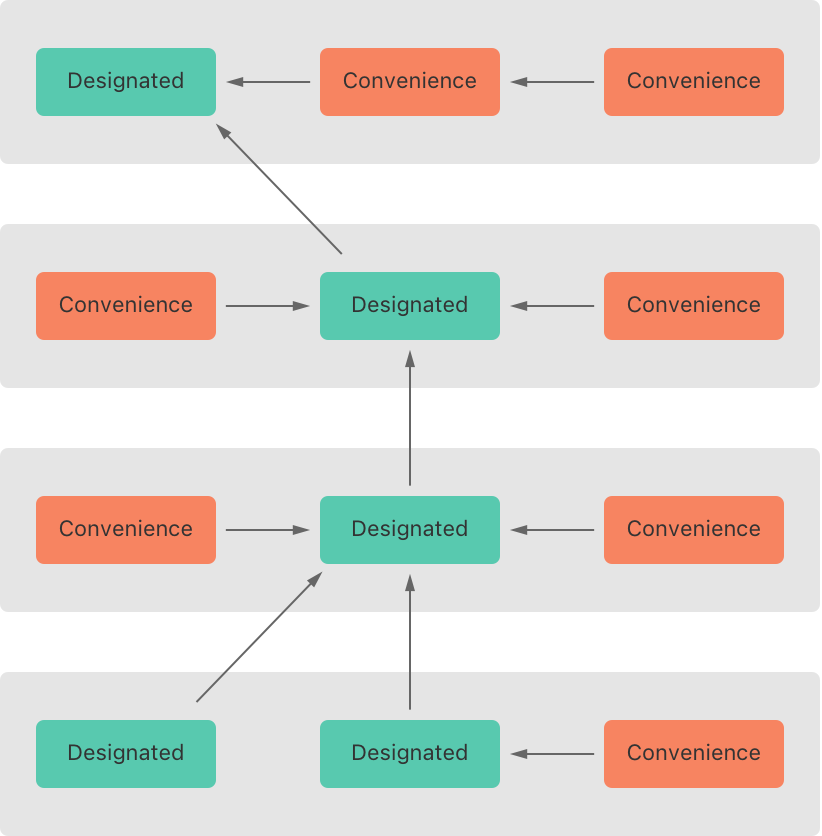
Two-Phase Initialization in Classes
Swift 에서 Class Initialization 은 2단계 프로세스를 갖는다.
- Phase 1. 각
Stored Properties가 그것을 정의한 Class 에 의해초기값이 할당된다. - Phase 2.
Instance 를 생성하기 전Stored Properties 를 추가로Customizing 할 기회가 주어진다.
Swift 의
Two-Phase Initialization프로세스는 Objective-C 의Initialization과 유사하다.
하지만 Objective-C 는 Phase 1에서 모든 Properties 에0또는nil을 할당하는 반면, Swift 는Custom Initial Values를 설정할 수 있고,0또는nil이 유효한 기본값이 아닌 경우에 대처할 수 있는 유연성을 갖는다.
Safety Check
Swift 는 에러 없이 Initialization 이 완료되었는지 보장하기 위해 4가지 Safety Check를 수행한다.
- Safety Check 1. Designated Initializers 는 Superclass Initializer 에
delegates up하기 전context 내 모든 Properties 가 초기화 되었음을 확인한다. - Safety Check 2.
Designated Initializers 는 상속된 Properties 에 값을 할당하기 전반드시 Superclass Initializer 에delegates up해야한다(반대 순서가 될 경우 Superclass Initializer 가 값을 덮어쓴다). - Safety Check 3. Check 2와 마찬가지로
Convenience Initializers 는 Properties 에 값을 할당하기 전반드시 다른 Initializers 에delegates해야한다. - Safety Check 4. Initializers 는
Phase 1 Initialization 이 종료되기 전어떠한 Instance Methods 나 Instance Properties 에접근하거나 'self' 참조를 할 수 없다.
Two-Phase Initialization Process
위 Safety Check 를 기반으로 Two-Phase Initialization 이 수행되는 방식은 다음과 같다.
1 ) Phase 1: 0, nil, Custom Initial Values 등의 값을 할당해 Instance 의 메모리르 완전히 초기화한다

- Designated Initializers 또는 Convenience Initializers 가 Class 에서 호출된다.
new Instance 를 위한 메모리가 할당된다(초기화는 하기 전).- Designated Initializers 가 context 내 모든 Stored Properties 가 값을 가지고 있는지 확인한다 (이때
Stored Properties 에 대한 메모리가 초기화된다).- Designated Initializers 는 Superclass 의 Initializers 가 자신의 Stored Properties 에 동일한 일을 수행하도록 내버려둔다.
- 위 과정은
Base Class(최상위 Class)에 도달할 때까지Chaining된다.delegates up 이 Base Class 에 도달하고,Final Class(최하위 Class)가 모든 값을 저장했다고 확인하면, Instance 의 메모리는 완벽히 초기화 되었다고 간주하고,Phase 1이 완료된다.
2 ) Phase 2: Customizing 할 기회를 처리한다
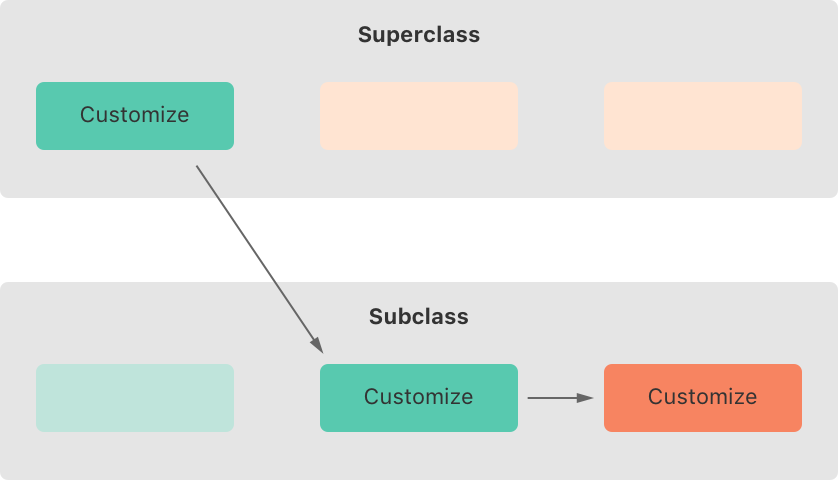
- Phase 1이 Final Class 에서 Base Class 까지 delegates up 을 하며 Chaining 을 했다면 이번에는 반대로 Base Class 에서 Final Class 까지
working back down을 하며 내려간다.Phase 2는 Phase1 이 Instance 의 메모리를 초기화 했기 때문에 Instance Methods 나 Instance Properties 에접근하거나 'self' 참조를 할 수 있다.- Superclass 의 Designated Initializers 에게 주어진 Customizing 할 기회를 모두 처리하면 Subclass 의 Designated Initializers 에게 Customizing 할 기회가 주어진다.
- 위 과정은
Phase 1의 Chaining 의 역순으로 일어나며마지막으로 원래 호출되었던 Convenience Initializers 에 도달한다.- 이 과정을 모두 완료하면 Initialization 이 종료되고, 의도한 Instance 를 얻게 된다.
그림을 보면 알 수 있듯이, Convenience Initializers 의 Customizing 이 사용되는 것은, 처음 호출을 시작한
Convenience Initializers 의 Chaining 경로에 있는 경우 뿐이다.
Superclass 가 가지고 있는 Convenience Initializers 는 Subclass 에서 직접 호출되거나
Overriding 되는 것이 불가능하기 때문이다.
하지만 Superclass 의 Convenience Initializers 가 항상 무시되는 것은 아니다. 특정 조건이 일치될 경우 Superclass 의
Convenience Initializers 는 Subclass 에 자동으로 상속된다. 이것은 아래
Automatic Initializer Inheritance 에서 설명한다.
Initializer Inheritance and Overriding
Difference between Objective-C and Swift
- Objective-C : Subclass 는
Superclass 의 Initializers 를 기본으로 상속한다 - Swift : Subclass 는
Superclass 의 Initializers 를 기본으로 상속하지 않는다
이로써 Swift 는 Superclass 로부터 상속된 Initializers 가 완전히 초기화되지 않거나 잘못 초기화된 채로
Subclass 의 new Instance를 생성하기 위해 사용되는 상황을 방지한다.
Inherit Superclass’s Initializers by Overriding
Superclass 의 Designated Initializers 의 구문과 일치하는 형태의 Initializers 를 Subclass 에서 구현할 때는
Properties, Methods 와 마찬가지로 반드시 override modifier 를 사용해야한다.
- Subclass 에서 구현하는 Initializers 가 Designated Initializers 든, Convenience Initializers 든 상관 없이
Superclass 의 Designated Initializers 를 재정의 하는 경우라면 반드시override modifier 를 사용해야한다.- 반면, Subclass 에서 구현하는 Initializers 가
Superclass 의 Convenience Initializers 와 일치하는 경우는override modifier 를 사용하지 않는다.
Initializer Delegation for Class Types 에서 설명한 규칙에 따라Superclass 의 Convenience Initializers는Subclass 에 의해 직접 호출되거나 Overriding 되는 것이 불가능하기 때문에 새롭게 구현하는 것이므로override modifier 를 사용하지 않는다.
Implicit Delegates Up
Subclass 에 Phase 2가 존재하지 않는다면 delegates up 을 하기 위한 super.init()을 생략 하는 것이 가능하다.
예제 코드는 Initializer Inheritance and Overriding Example 1, Initializer Inheritance and Overriding Example 2 를 참고한다.
Automatic Initializer Inheritance
Initializer Inheritance and Overriding 에서 설명했던 것처럼
Swift 의 Subclass 는 Superclass 의 Initializers 를 기본으로 상속하지 않는다. 하지만 자동으로 상속하는 조건은 존재한다.
그 조건은 다음과 같다.
- Designated Initializers 의 자동 상속 :
Subclass 가 아무런 Designated Initializers 를 정의하지 않았다면, 자동으로Superclass 의 모든 Designated Initializers 를 상속한다.- Convenience Initializers 의 자동 상속 : Subclass 가 위 “Designated Initializers 의 자동 상속” 규칙에 따라 생성 하든, 직접 구현을 해 생성 하든,
Superclass 와 매칭되는 모든 Designated Initializers 를 제공하면, 자동으로Superclass 의 모든 Convenience Initializers 를 상속한다.
- Case 1
class Vehicle {
    var numberOfWheels = 0
    var description: String {
        "\(numberOfWheels) wheels(s)"
    }
}
class Hoverboard: Vehicle {
    var color = "Gray"
    override var description: String {
        "\(super.description) in a beautiful \(color)"
    }
}
let hoverboard = Hoverboard()
print("Hoverboard: \(hoverboard.description)")  // Hoverboard: 0 wheels(s) in a beautiful silver
Hoverboard 는 Vehicle 의 init()을 상속했다.
- Case 2
class Vehicle {
    var numberOfWheels: Int
    var description: String {
        "\(numberOfWheels) wheels(s)"
    }

    init(numberOfWheels: Int) {
        self.numberOfWheels = numberOfWheels
    }
}
class Bicycle: Vehicle {
    var hasBasket = false
}
let bicycle = Bicycle(numberOfWheels: 2)
print(bicycle.description)  // 2 wheels(s)
Bicycle 은 Vehicle 의 init(numberOfWheels:)를 상속했다.
Designated and Convenience Initializers in Action
Food, RecipeIngredient, ShoppingListItem 라는 3개의 Class 계층을 통해 위에서 설명한 내용을 설명한다.
1 ) Base Class: Food
class Food {
    var name: String

    init(name: String) {
        self.name = name
    }
    convenience init() {
        self.init(name: "[Unnamed]")
    }
}
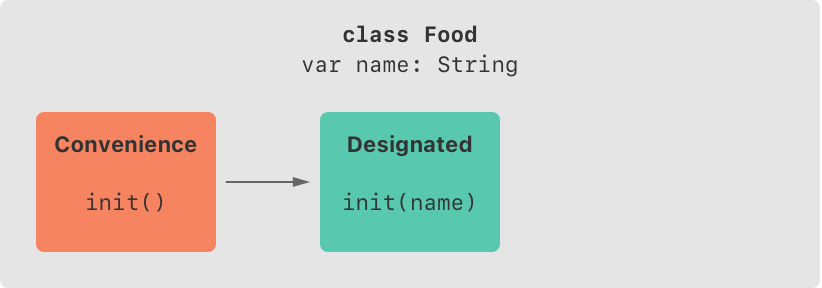
Classes 는
Memberwise Initializers 를 가지고 있지 않기 때문에Food 는 name 을 arguments 로 갖는 Designated Initializers 를 구현했다.그리고 Food 는 arguments 를 갖지 않는
init()을Convenience Initializers로 구현했다. 이 Convenience Initializers 은 context 내 다른 Initializers 를 호출하며,궁극적으로 Designated Initializers 를 호출하고있다.
let namedMeat = Food(name: "Bacon")
print(namedMeat.name)   // Bacon

let mysteryMeat = Food()
print(mysteryMeat.name) // [Unnamed]
2 ) Subclass: RecipeIngredient
class RecipeIngredient: Food {
    var quantity: Int
    init(name: String, quantity: Int) {
        self.quantity = quantity
        super.init(name: name)
    }
}
Custom Initializers 가 존재하지만 Superclass 의 모든 Designated Initializers 를 제공하지 않기 때문에
Automatic Initializer Inheritance 는 발생하지 않는다. 따라서 현재 사용 가능한 Initializers 는
- Designated Initializers:
RecipeIngredient(name:quantity:)
하나 뿐이다.
이것을 Superclass의 Designated Initializers를 모두 제공해, Superclass 의 Convenience Initializers 가 자동으로 상속되게 만들어보자.
- Case 1
class RecipeIngredient: Food {
    var quantity: Int
    init(name: String, quantity: Int) {
        self.quantity = quantity
        super.init(name: name)
    }
    override init(name: String) {
        quantity = 1
        super.init(name: name)
    }
}
Superclass 의 Designated Initializers 를 모두 제공하므로써 Superclass 의 Convenience Initializers 가 자동으로 상속되어 사용 가능한 Initializers 는 3개가 된다.
- Designated Initializers:
RecipeIngredient(name:quantity:) - Designated Initializers:
RecipeIngredient(name:)(Overriding Superclass’s init(name:)) - Convenience Initializers:
RecipeIngredient()
- Case 2
class RecipeIngredient: Food {
    var quantity: Int
    init(name: String, quantity: Int) {
        self.quantity = quantity
        super.init(name: name)
    }
    override convenience init(name: String) {
        self.init(name: name, quantity: 1)
    }
}
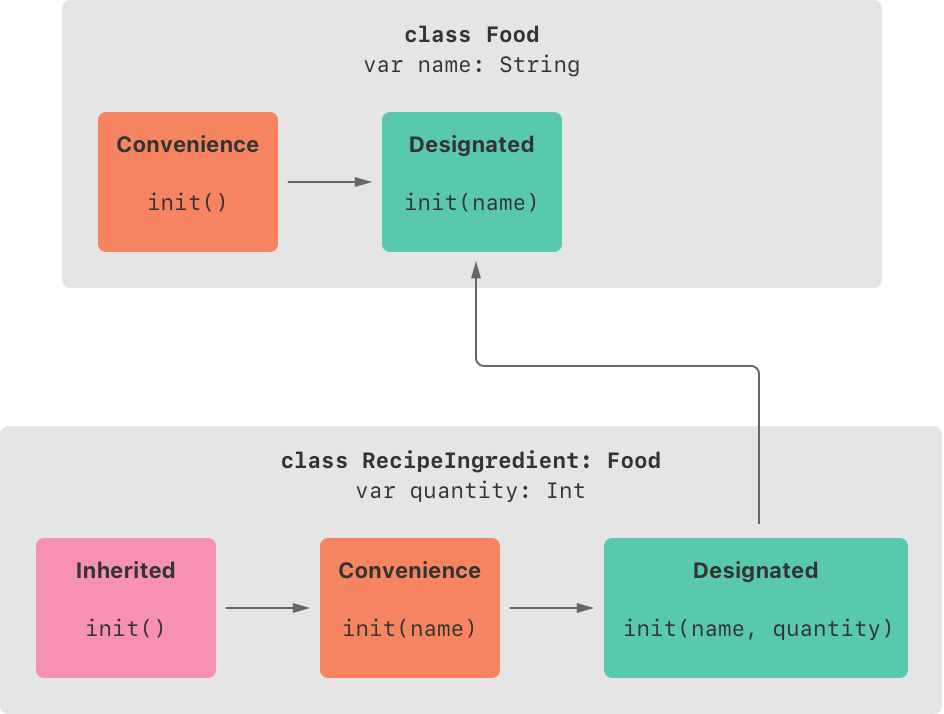
이 방법 역시 Superclass 의 Designated Initializers 를 모두 제공해, 사용 가능한 Initializers 는 3개가 된다.
- Designated Initializers:
RecipeIngredient(name:quantity:) - Convenience Initializers:
RecipeIngredient(name:)(Overriding Superclass’s init(name:)) - Convenience Initializers:
RecipeIngredient()
위 Case 1과 Case 2모두 Superclass 의
Designated Initializersinit(name:)을 Overriding 하므로써 Initializers 가 3개가 되고, 모두 동일한 Instance 결과물을 얻는다는 것은 동일하지만 다음과 같은 차이를 갖는다.
- Case 1은 서로 다른 2개의 Designated Initializers(Custom Initializers 와 Overriding Initializers)가
Superclass 의 Designated Initialziers 에 독립적으로 delegates up한다.- Case 2는 Overriding Initializers 를 Convenience Initializers 로 만들어,
context 내 존재하는
  Designated Initializers(Custom Initializers)로 delegates
하고, 이Designated Initializers 가 다시 Superclass 의 Designated Initializers 에 delegates up하도록 한다.- Case 2에서 상속할 때
override convenience를 붙였다고 Superclass 의 convenience Initializers 를 override 한 것이 아니니 혼동하지 말고 arguments 를 자세히 보자. Superclass 가 가지고 있는 Convenience Initializers 는 Subclass 에서 직접 호출되거나 Overriding 되는 것이 불가능함을 다시 상기하도록 하자.
let oneMysteryItem = RecipeIngredient()
let oneBacon = RecipeIngredient(name: "Bacon")
let sixEggs = RecipeIngredient(name: "Eggs", quantity: 6)

print("\(oneMysteryItem.name) : \(oneMysteryItem.quantity) ea")
print("\(oneBacon.name) : \(oneBacon.quantity) ea")
print("\(sixEggs.name) : \(sixEggs.quantity) ea")
[Unnamed] : 1 e
Bacon : 1 ea
Eggs : 6 ea
3 ) Subclass: ShoppingListItem
class ShoppingListItem: RecipeIngredient {
    var purchased = false
    var description: String {
        var output = "\(quantity) x \(name)"
        output += purchased ? " ✔" : " ✘"
        return output
    }
}
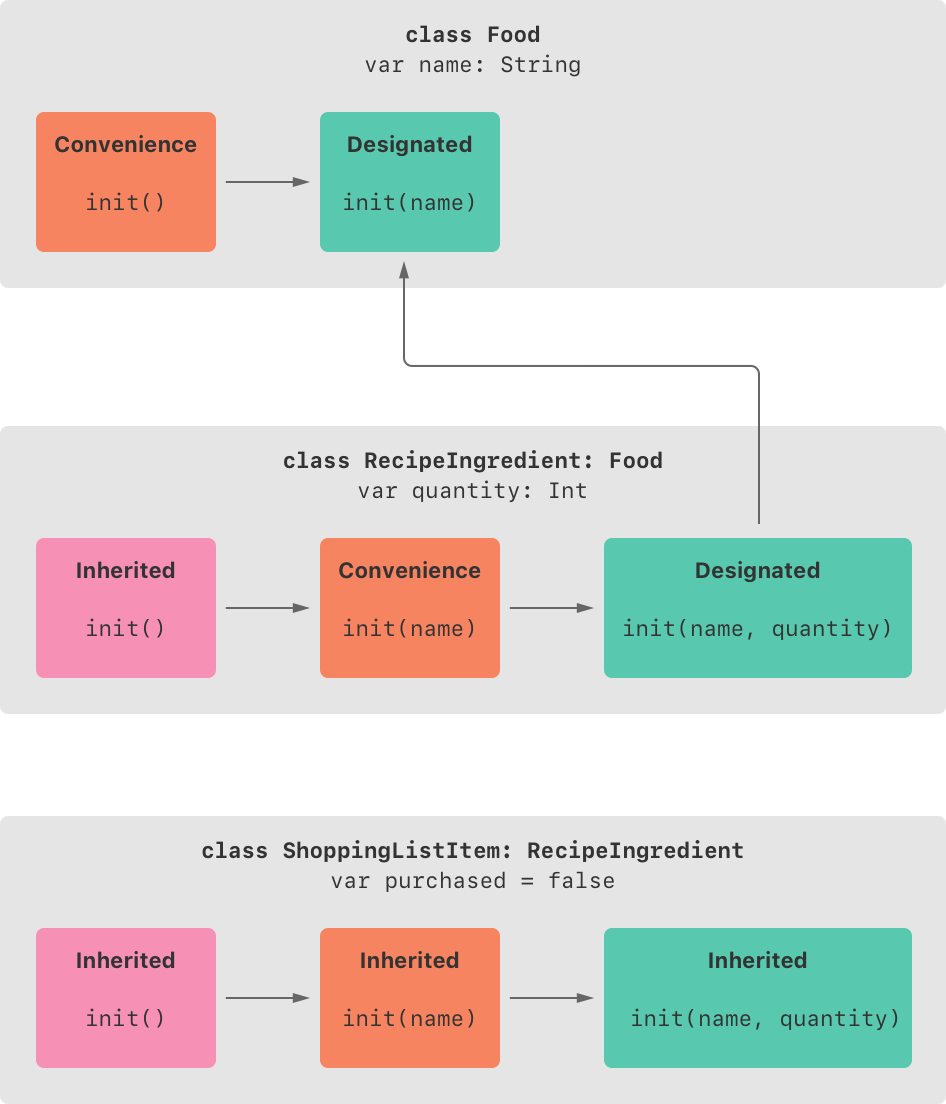
즉, 사용 가능한 Initializers는 3개가 된다.
- Designated Initializers:
ShoppingListItem() - Convenience Initializers:
ShoppingListItem(name:) - Convenience Initializers:
ShoppingListItem(name:quantity:)
RecipeIngredient 의 Subclass ShoppingListItem 은 자신의 Stored Property 에 default value 를 정의했고, Instance 는 해당 값을 항상 false 로 시작하므로 Initial Values 를 위한 Initializers 가 필요하지 않다.
따라서 ShoppingListItem 은 아무런 Designated Initializers 도 정의하지 않았기 때문에
Automatic Initializer Inheritance 가
발생해 Superclass 의 모든 Designated Initializers 를 상속
하고, 이로서 **Superclass 의 모든 Designated Initializers 를 모두 제공해Superclass 의 Convenience Initializers 도 자동으로 상속한다.
var breakfastList = [
    ShoppingListItem(),
    ShoppingListItem(name: "Bacon"),
    ShoppingListItem(name: "Eggs", quantity: 6)
]

breakfastList[0].name = "Orange juice"
breakfastList[0].purchased = true

breakfastList.forEach { print($0.description) }
1 x Orange juice ✔
1 x Bacon ✘
6 x Eggs ✘
Failable Initializers
Syntax
Classes, Structures, Enumerations의 Initialization 이 실패할 수 있는 경우 이에 대한 정의를 해주는 것이 유용할 수 있다. Initialization 이 실패할 수 있는 경우는 다음과 같다.
- 유효하지 않은 초기화 파라미터 값
- 필수 외부 리소스의 부재
- 초기화 성공을 방해하는 기타 다른 조건
Failable Initializers는 init? 키워드를 사용해 만들며, Parameters 의 개수와 Parameter Types, Argument Labels 가
모두 동일한 경우 Nonfailable Initializers 와 Failable Initializers 는 공존할 수 없다.
Failable Initializers 는 return nil을 이용해 Initialization 실패를 트리거 할 수 있고, 해당 Types 의 Optional 을 생성한다.
즉, Int Type 의 Nonfailable Initializers 가 Int 를 생성한다면, Failable Initializers 는 Int?를 생성한다.
엄밀히 말하면 Objective-C 와 달리
Swift 의 Initializers 는 값을 반환하지 않는다. Swift 에서 Initializers 의 역할은self 가 완전하고 정확히 초기화되도록 하는 것으로,return nil 은 오직 Failable Initializers 를 트리거 하기 위한 것으로, Initialization 이 성공인 경우return키워드를 사용하지 않는다.
Syntax
struct SomStructure {
    var someProperty: SomeType
    init?(someProperty: SomeType) {
        if someProperty.isEmpty { return nil }
        self.someProperty = someProperty
    }
}
다음은 Int Types Structures 의 Initialization 이 성공하는 경우와 실패하는 경우를 보여준다.
let wholeNumber: Double = 12345.0
let pi = 3.14159

if let valueMaintained = Int(exactly: wholeNumber) {
    print("\(wholeNumber) conversion to Int maintains value of \(valueMaintained)")
}
// 12345.0 conversion to Int maintains value of 12345

let valueChanged = Int(exactly: pi)
if valueChanged == nil {
    print("\(pi) conversion to Int doesn't maintain value")
}
// 3.14159 conversion to Int doesn't maintain value

print(type(of: valueChanged))   // Optional<Int>
Int Types의 Nonfailable Initializers는 Int를 생성하고, Failable Initializers는 Int?를 생성한다.
Failable Initializers for Enumerations
enum TemperatureUnit {
case kelvin, celsius, fahrenheit
init?(symbol: Character) {
switch symbol {
case "K": self = .kelvin
case "C": self = .celsius
case "F": self = .fahrenheit
default: return nil
}
}
}
let fahrenheitUnit = TemperatureUnit(symbol: "F")
if fahrenheitUnit != nil {
print("This is a defined temperature unit, so initialization succeeded.")
}
// This is a defined temperature unit, so initialization succeeded.
let unknownUnit = TemperatureUnit(symbol: "X")
if unknownUnit == nil {
print("This isn't a defined temperature unit, so initialization failed.")
}
// This isn't a defined temperature unit, so initialization failed.
Failable Initializers for Enumerations with Raw Values
Initializing from a Raw Value 를 다시 한 번 떠올려보자.
enum CompassPoint: String {
case east, west, south, north
}
print("\(CompassPoint.east) is type of \(type(of: CompassPoint.east))")
print("\(CompassPoint.east.rawValue) is type of \(type(of: CompassPoint.east.rawValue))")
let east = CompassPoint(rawValue: "east")
print("Constant 'east' is type of \(type(of: east))")
east is type of CompassPoint
east is type of String
Constant 'east' is type of Optional<CompassPoint>
RawValues 를 갖는 Enumerations 는 자동으로 Failable Initializers
init?(rawValue:)를 생성한다.
따라서, 위 TemperatureUnit Enumerations 는 Raw Values 가 자동 생성하는 init?(rawValue:)를 이용해
다음과 같이 바꿀 수 있다.
enum TemperatureUnit: Character {
case kelvin = "K", celsius = "C", fahrenheit = "F"
}
let fahrenheitUnit = TemperatureUnit(rawValue: "F")
if fahrenheitUnit != nil {
print("This is a defined temperature unit, so initialization succeeded.")
}
// This is a defined temperature unit, so initialization succeeded.
let unknownUnit = TemperatureUnit(rawValue: "X")
if unknownUnit == nil {
print("This isn't a defined temperature unit, so initialization failed.")
}
// This isn't a defined temperature unit, so initialization failed.
Propagation of Initialization Failure
1 ) Failable Initializers 를 Failable Initializers 에 delegates 하는 경우
- Classes, Structures, Enumerations 의 Failable Initializers 는 context 내 다른
Failable Initializer에
delegates될 수 있다. - Subclass 의 Failable Initializers 는 Superclass 의 Failable Initializers 에
delegates up될 수 있다.
이 프로세스는
즉시 Initialization 실패를 유발하고,전체 Initialization 프로세스를 중단시킨다.
class Product {
let name: String
init?(name: String) {
if name.isEmpty { return nil }
self.name = name
}
}
class CartItem: Product {
let quantity: Int
init?(name: String, quantity: Int) {
if quantity < 1 { return nil }
self.quantity = quantity
super.init(name: name)
}
}
2 ) Failable Initializers 를 Nonfailable Initializers 에 delegates 하는 경우
- 달리
실패하지 않는 기존의 Initialization 프로세스에 잠재적인 실패 상태를 추가해야하는 경우Failable Initializers 를 Nonfailable Initializers 에 delegates하는 접근법을 사용한다. - 이 프로세스는 Initialization 프로세스에
failure state를 추가할 뿐,Initialization 은 성공한다
정확히는
Failable Initializers의 실패 처리를 하지 않고failur state를 추가한다. 즉, 결과물만 보면 에러처리 후Nonfailable Initializers를Nonfailable Initializers로delegates하는 것과 같다.
이것은 아래 Overriding a Failable Initializer 의 Case 3 와 연결된다.
class CartItem: Product {
let quantity: Int
init?(name: String, quantity: Int) {
if quantity < 1 {
self.quantity = -1
} else {
self.quantity = quantity
}
super.init(name: name)
}
}
if let twoSocks = CartItem(name: "sock", quantity: 2) {
print("Item: \(twoSocks.name), quantity: \(String(describing: twoSocks.quantity))")
}
if let zeroShirts = CartItem(name: "shirt", quantity: 0) {
print("Item: \(zeroShirts.name), quantity: \(String(describing: zeroShirts.quantity))")
} else {
print("Unable to initialize zero shirts")
}
Item: sock, quantity: 2
Item: shirt, quantity: -1
위 예제에서 확인할 수 있듯이 결론적으로 Failable Initializers 는 실패 처리를 하지 않았고, delegates 를
위임 받은 Initializers 는 Nonfailable Initializers 이기 때문에 모두 Instnace 생성에 성공했다.
단, 실패했어야 하는 케이스인 zeroShirt 는 실패 상태를 논리적으로 나타내기 위해 -1 이라는 failur state를
Custom Values 로 저장했다.
Overriding a Failable Initializer
Initializers Overriding 에 Failable Initializers 를 추가해 정리하면 다음과 같다.
| Superclass | Subclass | Allowed | |
|---|---|---|---|
| Case 1 | Nonfailable Initializer(init) | Nonfailable Initializer(init) | O |
| Case 2 | Failable Initializer(init?) | Failable Initializer(init?) | O |
| Case 3 | Failable Initializer(init?) | Nonfailable Initializer(init) | △ |
| Nonfailable Initializer(init) | Failable Initializer(init?) | X |
Failable Initializers 를 Failable Initializers 로 Overriding 하는 것은 기존에 Nonfailable Initializers 를 Nonfailable Initializers 로 Overriding 하는 것과 같다.
주의 깊게 봐야할 것은 위 표에서 Case 3과 Case 4다.
- Case 3 : Failable Initializers 를 Nonfailable Initializers 로 Overriding 하는 방법은
Superclass 의 Failable Initializers 결과를 Subclass 에서 Forced Unwrapping 하는 것이다.
(Superclass 의 Initializers 가 Optional Types 를 생성하는 반면, Subclass 의 Initializers 는 Normal Types 를 생성해야하기 때문이다. 위 Failable Initializers 를 Nonfailable Initializers 에 delegates 하는 경우 와 연관되므로 함께 보도록 한다.) - Case 4 :
Nonfailable Initializers 를 Failable Initializers 로 Overriding 하는 것은 허용되지 않는다.
(Phase 1에서 이미 Superclass 에서 초기화를 했는데, Subclass 가 Phase 2에서 수정 기회에 초기화를 실패하는 케이스가 발생할 수 있기 때문이다.)
1 ) Case 3의 첫 번째 방법 - without Forced Unwrapping
Overriding 하려는 Superclass 의 Initializers 가 Failable Initializers일 때, Superclass 에
존재하는 다른 Nonfailable Initializers를 찾아 delegates up한다.
이름이 없거나(init -> nil), Empty String(init? -> ““)인 케이스가 초기화를 실패하지 않도록
Superclass 의 Nonfailable Initializers 쪽으로 우회시킨 후, Superclass 의 Failable Initializers 가
했어야 하는 일까지 모두 Subclass 가 Phase 2 에서 처리한다.
즉, 이 방법을 사용하기 위해서는 두 가지 조건이 반드시 필요하다.
- Superclass 에
Nonfailable Initializers가 존재할 것.- Superclass 의 Failable Initializers 가 Stored Properties 에 값을 저장하는 경우, Phase 2 에서 Customizing 할 기회를 이용해 처리할 수 있도록
Superclass 의 Properties가Variable일 것.
class Document {
var name: String?
// this initializer creates a document with a nil name value
init() {}
// this initializer creates a document with a nonempty name value
init?(name: String) {
if name.isEmpty { return nil }
self.name = name
}
}
class AutomaticallyNamedDocument: Document {
override init() {
super.init()
self.name = "[Untitled]"
}
override init(name: String) {
super.init()
if name.isEmpty {
self.name = "[Untitled]"
} else {
self.name = name
}
}
}
이 방법은
Forced Unwrapping없이 처리할 수 있다는 장점이 있지만 우회하기 위한 조건을 갖고 있어야하며, 우회한 결과가 논리적으로 동일한 결과를 도출할 수 있는지에 대한 책임이 개발자에게 주어진다.
2 ) Case 3의 두 번째 방법 - with Forced Unwrapping
Superclass 의 Failable Initializers 가 실패하지 않도록 예외 처리를 한 후, 생성된 Optional Instance 를
Subclass 에서 Forced Unwrapping한다.
class Document {
var name: String?
// this initializer creates a document with a nil name value
init() {}
// this initializer creates a document with a nonempty name value
init?(name: String) {
if name.isEmpty { return nil }
self.name = name
}
}
class AutomaticallyNamedDocument: Document {
override init() {
super.init(name: "[Untitled]")!
}
override init(name: String) {
if name.isEmpty {
super.init(name: "[Untitled]")!
} else {
super.init(name: name)!
}
}
}
이 방법의 장점은 우회를 하지 않기 때문에 우회했을 때 필요한
논리적 검증을 개발자가 할 필요가 없다는 것이다. 또한 우회를 하지 않으므로 Superclass 에Nonfailable Initializers 가 존재할 필요가 없으며, 코드가 더 직관적이게된다.그리고 마지막으로, 위 우회하는 케이스의 경우는 Subclass 에서 Phase 2에서 수정할 기회를 사용하기 때문에 Superclass 의 Stored Properties가 반드시
Variable이어야 했지만, 이 경우는Constant여도 문제 없이 Initialization 을 처리할 수 있다.
The init! Failable Initializer
일반적으로 Failable Initializers 는 ?를 붙여 만들지만, !를 붙여 암시적으로 unwrapping 된
Optional Instance 를 생성하는 Failable Initializer 를 정의할 수도 있다.
init!은 init?과 거의 동일하며 차이점은 다음과 같다.
| Nonfailable Initializers | Failable Initializers | ||
|---|---|---|---|
| Keyword | init | init? | init! |
| Created Instance | 'self' Type | 'self?' Type | 'self' Type |
init?은 Optional Types 를 반환하기 때문에delegates 를 위임한 Initializers 가 Unwrapping해야한다.init!은delegates 를 위임 받은 Initializers 가 Unwrapping후 결과를 반환한다.
따라서 바로 위 Case 3의 두 번째 방법을 init?에서 init!으로 바꾸면 다음과 같다.
class Document {
var name: String?
// this initializer creates a document with a nil name value
init() {}
// this initializer creates a document with a nonempty name value
init!(name: String) {
if name.isEmpty { return nil }
self.name = name
}
}
class AutomaticallyNamedDocument: Document {
override init() {
super.init(name: "[Untitled]")
}
override init(name: String) {
if name.isEmpty {
super.init(name: "[Untitled]")
} else {
super.init(name: name)
}
}
}
예외 처리를 하지 않았을 경우, init?은 delegate 를 위임한 Class 에서 결과를 받아 Unwrapping 하기 때문에
에러가 발생할 경우 위임한 Class 에서 에러가 발생하고, init!은 Unwrapping 을 해서 반환하기 때문에 위임을 받은 Class
에서 에러가 발생한다.
즉, 위 경우 예외 처리를 제대로 하지 않았을 경우 init?은 Subclass 에서 에러가 발생하고,
init!은 Superclass 에서 에러가 발생한다.
Summary
| Nonfailable Initializers | Failable Initializers | ||
|---|---|---|---|
| Keyword | init | init? | init! |
| Created Instance | 'self' Type | 'self?' Type | 'self' Type |
| Case | delegates | Overriding | |||
|---|---|---|---|---|---|
| when overriding | Superclass | Subclass | Allowed | ||
| init? ↔ init? | O | init? | init? | O | |
| init! ↔ init! | O | init! | init! | O | |
| init? ↔ init! | O | init? or init! | init? or init! | O | |
| init ← init? | O | init | init? | X ✶ | |
| init ← init! | O | init | init! | X ✶ | |
| init? ← init | △ ✶✶ | init? | init | △ ✶✶ | |
| init! ← init | △ ✶✶ | init! | init | △ ✶✶ | |
✶ Overriding - Case 4 :
Nonfailable Initializers를 Failable Initializers로 Overriding하는 것은 허용되지 않는다.
✶✶ Overriding - Case 3 :
Failable Initializers를 Nonfailable Initializers로 Overriding하는 방법은 Superclass 의 Failable
Initializers 가 실패하지 않도록 예외 처리를 한 후, 생성된 Optional Instance 를 Subclass 에서 Forced Unwrapping하는 것이다.
Required Initializers
Classes, Structures, Enumerations 에 Protocols를 채택(adopt)해 특정 구현을 강요할 수 있듯이
Classes 의 경우 Superclass 의 특정 Initializers 를 Subclass 에서 구현하도록 required modifier 를 사용해
강요할 수 있다.
Required Initializers는 Overriding 할 때overridemodifier 는 생략하고requiredmodifier 만 작성한다.- Protocols 와 달리 상속된 Initializers 로 조건이 충족된다면, Overriding 을 명시적으로 구현하지 않아도 충족된다.
Syntax
class SomeClass {
required init() {
// initializer implementation goes here
}
}
class SomeSubclass: SomeClass {
required init() {
// subclass implementation of the required initializer goes here
}
}
13. Deinitialization 👩💻
Deinitializer on Class Types
Deinitializer는 class instance 의 할당이 해제(deallocate)되기 직전에 호출되며, deinit keyword 를 이용해 작성한다.
Deinitializer는 class 타입에서만 사용될 수 있다.
일반 코드 블럭을 탈출하기 직전에 호출되는 코드는 defer keyword 를 사용해 정의한다.
How Deinitialization Works
Swift 는 리소스 확보를 위해 자동으로 더 이상 필요하지 않은 instances를 deallocate한다. 이를 위해 Swift 는
ARC(Automatic Reference Counting)를 이용해 instances 의 메모리를 관리한다.
일반적으로 instances 의 deallocate 를 수동으로 할 필요는 없다. 하지만 자기 자신의 리소스를 이용하는 경우 직접 cleanup 을
수행해줘야한다. 예를 들어, 파일을 열고 데이터를 쓰기 위해 custom class를 생성하는 경우 class instance 가 deallocated 되기
전 반드시 파일을 닫아 리소스를 정리해야한다.
deinit {
// perform the deinitialization
}
Deinitializer 는 Class 에 하나만 존재하며,파라미터가 존재하지 않으므로, 별도의 괄호 없이 작성한다.
Deinitializer 는 instance 가 deallocation 되기 전 자동으로 호출되며,명시적으로 호출할 수 없다.
Superclasses 의 Deinitializer 는 Subclasses 에 상속되며, Superclasses 의 Deinitializer 는Subclasses 의 Deinitializer 의 마지막에 자동으로 호출된다. Superclasses 의 Deinitializer 는 Subclasses 가 자신의 Deinitializer 를 제공하지 않더라도 항상 호출된다.Class Instance 는 Deinitializer 가 호출되기 전까지 deallocated 되지 않기 때문에,
Deinitializer 는 instance 의 모든 Properties 에 접근 및 수정할 수 있다.
Deinitializers in Action
Bank 와 Player classes 를 이용한 게임을 통해 Deinitializers 를 이해하도록 하자.
1 ) Bank class
Back class 는 유통중인 코인이 10,000 개를 넘지 않도록 조절한다. 게임에서 하나의 Bank 만 존재할 수 있기 때문에, Bank 는
Class 로 구현되며, 코인을 관리하기 위한 properties 와 methods 를 갖는다.
Bank 는 coinsInBank property 를 이용해 현재 유통중인 코인의 개수를 추적한다.
또한 코인의 분배와 수집을 처리하기 위해 2개의 methods distribute(coins:)와 receive(coins:)를 제공한다.
distribute(coins:)는 코인을 분배하기 전 은행에 남은 코인의 수를 검사해 은행 잔고보다 많은 코인을 요구할 경우,
분배 가능한 남은 코인 만큼만 분배한다.
class Bank {
static var coinsInBank = 10_000
static func distribute(coins numberOfCoinsRequested: Int) -> Int {
let numberOfCoinsToVend = min(numberOfCoinsRequested, coinsInBank)
coinsInBank -= numberOfCoinsToVend
return numberOfCoinsToVend
}
static func receive(coins: Int) {
coinsInBank += coins
}
}
2 ) Player class
Player class 는 지갑의 코인을 관리하기 위한 coinsInPurse property 를 가지고 있으며, 초기화 할 때 Bank 로부터
일정량의 코인을 분배 받는다. Player 는 win(coins:) methods 를 통해 은행으로부터 코인을 획득하고, 게임을 그만둘 때
Deinitializer 를 통해 소유한 모든 코인을 은행에 반환한다.
class Player {
var coinsInPurse: Int
init(coins: Int) {
coinsInPurse = Bank.distribute(coins: coins)
}
func win(coins: Int) {
coinsInPurse += Bank.distribute(coins: coins)
}
deinit {
Bank.receive(coins: coinsInPurse)
}
}
3 ) Play Game and Deinitializers in Action
플레이어는 언제든 게임을 떠날 수 있기 때문에 Optional로 선언하고, ? 또는 !를 붙여 접근한다.
var playerOne: Player? = Player(coins: 100)
print("A new player has joined the game with \(playerOne!.coinsInPurse) coins")
print("There are now \(Bank.coinsInBank) coins left in the bank")
A new player has joined the game with 100 coins
There are now 9900 coins left in the bank
playerOne?.win(coins: 2_000)
print("A new player has joined the game with \(playerOne?.coinsInPurse ?? 0) coins")
print("There are now \(Bank.coinsInBank) coins left in the bank")
A new player has joined the game with 2100 coins
There are now 7900 coins left in the bank
그리고 플레이어가 추가로 게임에 참가했다.
var playerTwo: Player? = Player(coins: 1000)
print("PlayerOne has joined the game with \(playerOne!.coinsInPurse) coins")
print("PlayerTwo has joined the game with \(playerTwo!.coinsInPurse) coins")
print("There are now \(Bank.coinsInBank) coins left in the bank")
PlayerOne has joined the game with 2100 coins
PlayerTwo has joined the game with 1000 coins
There are now 6900 coins left in the bank
playerOne 이 게임을 떠난다.
playerOne = nil
if playerOne != nil {
print("PlayerOne has joined the game with \(playerOne!.coinsInPurse) coins")
} else {
print("PlayerOne has left the game")
}
if playerTwo != nil {
print("PlayerTwo has joined the game with \(playerTwo!.coinsInPurse) coins")
} else {
print("PlayerTwo has left the game")
}
print("There are now \(Bank.coinsInBank) coins left in the bank")
PlayerOne has left the game
PlayerTwo has joined the game with 1000 coins
There are now 9000 coins left in the bank
플레이어가 게임을 떠나는 행위는
Optional playerOne 변수에 'nil' 을 할당하는 것으로 이루어진다.
playerOne 에nil을 할당한다는 것은no Player instance 를 의미하며,Player instance 에 대한 playerOne 변수의 'reference'가 깨진다.
아무런 Properties 또는 Variables 도 Player instance 를 참조하지 않는다면, 메모리 리소스 확보를 위해 instance 에 대한 참조 할당이 해제된다(it’s deallocated in order to free up its memory).이러한 일이 발생되기 직전, Deinitializer 가 자동으로 호출되며, 정의한대로 소유한 모든 코인을 은행에 반환한다.
playerTwo = nil
if playerOne != nil {
print("PlayerOne has joined the game with \(playerOne!.coinsInPurse) coins")
} else {
print("PlayerOne has left the game")
}
if playerTwo != nil {
print("PlayerTwo has joined the game with \(playerTwo!.coinsInPurse) coins")
} else {
print("PlayerTwo has left the game")
}
print("There are now \(Bank.coinsInBank) coins left in the bank")
PlayerOne has left the game
PlayerTwo has left the game
There are now 10000 coins left in the bank
playerTwo 역시 게임을 떠나며 Deinitializer 가 호출됨으로 은행에 모든 코인이 반환된다.
14. Optional Chaining 👩💻
What is Optional Chaining?
Optional Chaining은 Properties, Methods, Subscripts 가 nil일 가능성이 있는 경우에 안전하게 조회(querying)하고
호출(calling)하기 위한 프로세스다.
Optional 이 값을 가지고 있을 경우, Property, Method, Subscript 호출은 성공하고, nil일 경우 nil을 반환한다.
Multiple queries는 서로 chaining 될 수 있으며, 어느 하나라도 nil을 포함한다면 전체 chain은 실패한다.
그리고 Optional Chaining 의 return type 은 언제나 Optional 이다.
Optional Chaining in Swift 는 Messaging nil in Objective-C 와 유사하지만
모든 타입에 작동하며,success or failure 를 확인할 수 있다.
Alternative to Forced Unwrapping
Property, Method, Subscript 를 non-nil 값으로 얻고싶을 때 할 수 있는 가장 쉬운 방법은 Forced Unwrapping(!)이다.
하지만 Forced Unwrapping은 Optional 이 nil 일 때 Runtime Error를 발생시키는 반면, Optional Chaining은
프로세스를 실패하고 nil을 반환한다.
단,
Optional Chaining 을 통해 얻은 값은 ‘nil’ 이 발견되지 않아 프로세스를 성공적으로 진행했더라도Optional이다.
Accessing Properties
- Get
let john = Person()
if let roomCount = john.residence?.numberOfRooms {
print("John's residence has \(roomCount) room(s).")
} else {
print("john.residence? is nil")
}
- Set
Optional Chaining 은 call 하기 위한 접근 뿐 아니라, set을 하기 위한 접근에도
사용할 수 있다.
john.residence?.address = createAddress()
Calling Methods
Optional Channing 을 Methods 에 사용하면 메서드 호출의 success or failure 여부를 확인할 수 있다.
이것은 반환 값이 없는 메서드에 대해서도 유효하다.
반환 값이 없는 메서드에서도 메서드 호출의 success or failure 여부를 확인할 수 있는 이유는 Functions Without Return Values 에서 살펴본 것처럼, 암시적으로
Void라는 타입의 특수한 값(()로 쓰여진Empty Tuple)을 반환하기 때문이다. 따라서 return type 은Void가 아닌Void?가 된다.
Accessing Subscripts
Subscripts 역시 Optional Chaining 을 사용해 john.residence[237].name이 아닌
john.residence?[237].name와 같이 접근할 수 있다.
let john = Person()
if let firstRoomName = john.residence?[0].name {
print("The first room name is \(firstRoomName).")
} else {
print("Unable to retrieve the first room name.")
}
Linking Multiple Levels of Chaining
Optional Chaining 을 이용하면 Subproperties에 대한 접근 역시 간결한 코드로 안전하게 접근
(drill down into subproperties more than one level deep) 할 수 있으며 다음 규칙을 따른다.
- 조회하려는 타입이
Non-Optional이더라도Optional Chaining에 의해 항상Optional이 된다.Optionalwrapping 은 중복되지 않는다.
let john = Person()
if let johnsStreet = john.residence?.address?.street {
print("John's street name is \(johnsStreet).")
} else {
print("Unable to retrieve the address.")
}
15. Error Handling 👩💻
Representing and Throwing Errors
Swift 의 에러 처리는 Cocoa 와 Objective-C 에서 'NSError class'를 사용하는 에러 처리 패턴과 상호 운용 된다.
Handling Cocoa Errors in Swift
Swift 에서 에러는 Error protocol 을 따르는 Types 의 값으로 표현된다. 그러기 위해서 Error protocol 을 채택하도록 해야한다.
Swift 의 Enumerations 는 연관된 Error conditions 를 그룹화하는데 적합하다.
enum VendingMachineError: Error {
case invalidSelection
case insufficientFunds(coinsNeeded: Int)
case outOfStock
}
에러를 던지기 위해 throw statement 를 사용할 수 있다. 다음 예제는 자판기가 동전이 5개 더 필요하다는 에러를 발생시키는 경우다.
throw VendingMachineError.insufficientFunds(coinsNeeded: 5)
에러가 발생하면 에러는 주변 코드에 의해 문제를 수정하거나, 대안 접근 방식을 시도하거나, 사용자에게 알림 등의 방법을 통해
반드시 처리되어야한다.
함수에서 에러가 발생하면 프로그램의 흐름이 변경되므로, 코드에서 에러가 발생한 위치를 빠르게 찾는 것이 매우 중요하다. 이를 위해
Functions, Methods, Initializers 를 호출하는 코드 앞에 try(or try? or try!) keyword 를 작성해
try expression 으로 코드를 작성한다.
Swift 의 에러 처리는 다른 언어의
try-catch & throw와 유사하다. 하지만 Objective-C 를 포함한 많은 언어와 달리 Swift 의 에러 처리는 계산 비용이 많이 드는Call Stack 해제(unwinding)을 포함하지 않는다.
Swift 의throw statement의 성능 특성은return statement와 유사하다.
Propagating Errors
- Using Throwing Functions
func canThrowErrors() throws -> String
- Using Throwing Initializers
struct PurchasedSnack {
let name: String
init(name: String, vendingMachine: VendingMachine) throws {
try vendingMachine.vend(itemNamed: name)
self.name = name
}
}
Catching Errors
do {
try expression
statements
} catch pattern 1(let errorConstant) {
statements
} catch pattern 2 where condition {
statements
} catch pattern 3, pattern 4 where condition {
statements
} catch {
statements
}
Catch, Catch, Catch…
let favoriteSnacks = [
"Alice": "Chips",
"Queen": "Licorice",
"Eve": "Pretzels"
]
func buyFavoriteSnack(person: String, vendingMachine: VendingMachine) throws {
let snackName = favoriteSnacks[person] ?? "Candy Bar"
try vendingMachine.vend(itemNamed: snackName)
}
var vendingMachine = VendingMachine()
vendingMachine.coinsDeposited = 8
do {
try buyFavoriteSnack(person: "Alice", vendingMachine: vendingMachine)
print("Success! Yum.")
} catch VendingMachineError.invalidSelection {
print("Invalid Selection.")
} catch VendingMachineError.outOfStock {
print("Out of Stock.")
} catch VendingMachineError.insufficientFunds(let coinsNeeded) {
print("Insufficient funds. Please insert an additional \(coinsNeeded) coins.")
} catch {
print("Unexpected error: \(error).")
}
Catch Is
catch is를 이용해 연관된 에러를 한 번에 처리할 수 있다.
func buySnack(with item: String) throws {
do {
try vendingMachine.vend(itemNamed: item)
} catch is VendingMachineError {
print("Couldn't buy that from the vending machine.")
}
}
do {
try buySnack(with: "Beat-Flavored Chips")
} catch {
print("Unexpected non-vending-machine-related error: \(error)")
}
Catch with Comma
catch is 대신 연관된 에러를 필요한 만큼 , 를 이용해 나열해 처리할 수 있다.
func buySnack(with item: String) throws {
do {
try vendingMachine.vend(itemNamed: item)
} catch VendingMachineError.invalidSelection,
VendingMachineError.insufficientFunds,
VendingMachineError.outOfStock {
print("""
Couldn't buy that from the vending machine
because of invalid selection, out of stock, or not enough money.
""")
}
}
do {
try buySnack(with: "Beat-Flavored Chips")
} catch {
print("Unexpected non-vending-machine-related error: \(error)")
}
Converting Errors to Optional Values
Optional Chaining always returns Optional Types 을 다시 떠올려보자. Optional Chaining은 ?을 이용해
Instance 또는 Value 가 존재하지 않는 경우에도 별도의 에러 처리 없이 코드를 간결하게 처리했다. 결과를 항상 Optioanl로
Wrapping 하고 에러가 발생하면 nil을 담아 반환하기 때문이다.
Optional Chaining 과 마찬가지로 Throwing Functions 역시 try 대신 try?를 이용하면 결과를 항상 Optional로
Wrapping 하도록 한다. 그러면 Optional Chaining을 할 때와 마찬가지로 일반 코드를 작성하듯 처리할 수 있다.
let p = try? someThrowingFunction(0)
print(p as Any) // nil
let q = try? someThrowingFunction(1)
print(q as Any) // Optional(1)
try?를 사용함으로써 얻는 장점은 모든 에러를 같은 방식으로 처리하는 경우 do-catch 없이 짧고 간결한 코드로 작성할 수 있다는 것이고,
단점은 모든 에러를 같은 방식으로 처리하므로 cases 별로 자세한 에러 처리를 하는 것이 불가능하다는 것이다.
예를 들어 fetch와 같은 함수는 try?를 이용해 다음과 같이 간결하게 작성할 수 있다.
func fetchData() -> Data? {
if let data = try? fetchDataFromDisk() { return data }
if let data = try? fetchDataFromServer() { return data }
return nil
}
try?는Optional Chaining의?와 마찬가지로 항상 Optional Types 를 반환한다.try!는Optional Chaining의!와 마찬가지로 항상 반환값을 Forced Unwrapping 한다.
Disabling Error Propagation
절대로 에러가 발생하지 않는다는 것을 알고 있는 경우, Throwing Functions 를 호출할 때 try! 를 이용할 수 있다.
이 경우 다음 두 가지가 작동하지 않는다.
- Error Propagation
- 반환 값의 Optional Wrapping
let x = try? someThrowingFunction(1)
print(x as Any) // Optional(1)
let y = try! someThrowingFunction(1)
print(y) // 1
try?를 이용한 호출과 달리 Unwrapped된 값을 얻을 수 있다.
단, 이 때 주의해야할 것이
throws -> Int가 아닌throws -> Int?일 경우func someThrowingFunction(_ input: Int) throws -> Int? { if input == 0 { throw SomeError.zero } else { return input } }
throw에 한 번,Int?에 한 번 => 총 2번의Optional Wrapping이 이루어진다.
따라서throw에 의해 Wrapping 된 Optional 을 해제하더라도 다시 Int? 에 의해 Optional Wrapping 된 값을 얻는다. 함수가 반환한 값이Optional(Optional(1))이기 때문이다.let y = try! someThrowingFunction(1) print(y) // Optional(1)
로컬 경로에서 이미지를 가져오는 코드를 생각해보자.
let photo = try! loadImage(atPath: "./Resources/John Appleseed.jpg")
이미지가 존재할 것이라 확신하고 try!를 사용했는데 이미지가 존재하지 않거나 가져오는 데 실패했다면
Runtime Error 가 발생한다. 따라서 try!를 사용할 때는
절대 에러가 발생하지 않는다는 것에 대한 보증을 개발자가 해야하므로 신중한 판단이 필요
하다.
16. Concurrency 👩💻
Syntax
Swift 에서 Asynchronous Functions 를 정의하는 방법은 함수를 정의할 때 arrow(->) 앞에 async keyword 를 작성하는 것으로
정의된다.
func listPhotos(inGallery name: String) async -> [String] {
let result = // ... some asynchronous networking code ...
return result
}
Asynchronous Functions 가 에러를 throws 하는 경우 async throws 순서로 keyword 를 작성한다.
func listPhotos(inGallery name: String) async throws -> [String] {
let result = // ... some asynchronous networking code ...
return result
}
Asynchronous and Parallel
Swift 는 구조화된 방법으로 Asynchronous, Parallel 코드 작성을 지원한다.
- Asynchronous code 는
Single Thread로 작동해 한 번에 하나의 코드만 실행이 가능하지만, 코드를 잠시 중단 후 다시 재개할 수 있는 코드 블럭으로, Fetching data 또는 Parsing files 와 같은long-running background task을 요청 후 기다리는 동안 UI Update와 같은short-term을 수행할 수 있다. - Parallel code 는
Multi Threads로 작동해 한 번에 코드의 여러 부분을 동시에 실행한다.
Asynchronous code 와 Parallel code 로 인한 scheduling 유연성 추가는 코드의 복잡성 증가를 수반한다.
대신 Swift's language-level support를 지원하여 Compiler 가 문제를 찾을 수 있도록 한다. 예를 들어 Actor를 사용해
mutable state에 안전하게 접근할 수 있도록 하는 것과 같은 의도를 표현하도록 해 compile-time checking을 가능케 한다.
Concurrent code 코드를 사용할 때 유의해야 할 점은 이것이 느리거나 버그가 있는 코드를 빠르고 정확하게 작동하도록 해준다는 보장이 없다는 것이다. 오히려 Concurrency 는 코드의 디버깅을 어렵게 해 문제를 해결하기 어렵게 만든다.
Swift 에서
Concurrency model은 스레드의 최상단에서 작동하지만 직접적으로 상호작용 하지 않는다. Swift 의 Asynchronous Function 은 실행 중인 스레드를 중단할 수 있다. 그러면 첫 번째 Asynchronous Function 이 중단된 동안 동일 프로그램의 다른 Asynchronous Function 이 해당 스레드에서 실행될 수 있다. 따라서 Asynchronous Function 이 재개될 때어떤 스레드가 그 함수를 실행할지에 대해 아무런 보장도 하지 않는다.
1 ) Without Swift’s Language Support
Swift’s language support 없이도 Concurrent code 를 작성할 수 있으나 코드를 읽기 어렵다. 아래 코드는 Swift’s language support 없이 작성된 Concurrent code 로 갤러리에서 사진 이름 목록을 다운로드하고, 이 목록에서 다시 첫 번째 사진을 다운로드해 사용자에게 보여주는 코드다.
listPhotos(inGallery: "Summer Vacation") { photoNames in
let sortedNames = photoNames.sorted()
let name = sortedNames[0]
downloadPhoto(named: name) { photo in
show(photo)
}
}
간단한 코드이지만 completion handler가 연속적으로 작성되어야하므로 Nested Closures를 사용해야한다. 문제는 이런 코드가 더
복잡해질 경우 중첩은 더 많은 depth 를 갖게 될 것이고, 이는 코드를 다루기 어렵게 만들 것이다.
2 ) With Swift’s Language Support
Swift’s language support 를 이용한 Asynchronous Functions를 사용한다는 것은 async/await를 사용해 코드를 작성하는
것을 의미한다.
listPhotos(inGallery: "Summer Vacation") { photoNames in
let sortedNames = photoNames.sorted()
let name = sortedNames[0]
downloadPhoto(named: name) { photo in
show(photo)
}
}
Encapsulation the Code within an Asynchronous Code
비동기 함수 내에서 await keyword 외 다른 코드는 Synchronous 로 작동하며 코드를 순차적으로 실행한다. 하지만 이것 만으로는
충분하지 않은 케이스가 존재한다. 다음 코드는 사진을 Road Trip 갤러리에 추가하고, Summer Vacation 갤러리에서 삭제하는 코드다.
let firstPhoto = await listPhotos(inGallery: "Summer Vacation")[0]
add(firstPhoto toGallery: "Road Trip")
// At this point, firstPhoto is temporarily in both galleries.
remove(firstPhoto fromGallery: "Summer Vacation")
그리고 add(_:toGallery:)와 remove(_:fromGallery:) 사이에 다른 코드는 없다. 일시적이지만 이 순간 사진은 양쪽 모두에 존재하게되고,
앱의 불변성(invariant) 중 하나를 위반한다. 만약, 이 두 코드 사이에 await 가 추가된다면 앱의 불변성 위반은 일시적이 아니라 오랜 시간 지속될
수도 있게된다.
따라서 이 코드 덩어리(chunk)는 await keyword 가 추가되면 안 된다는 것을 명시적으로 표현하고 분리시키기 위해 이를 리팩토링해
Synchronous Function/Closure로 분리시켜야한다.
func move(_ photoName: String, from source: String, to destination: String) {
add(photoName, to: destination)
remove(photoName, from: source)
}
// ...
let firstPhoto = await listPhotos(inGallery: "Summer Vacation")[0]
move(firstPhoto, from: "Summer Vacation", to: "Road Trip")
이로써 move(_:from:to:) 함수는 await 중단점을 추가할 경우 Swift’s language-level support 애 의해 compile-time error 가
발생하므로(async 가 명시되어 있지 않으므로 Synchronous Function 이다), Synchronous 작동을 보장받을 수 있다.
Asynchronous Sequences(for-await-in)
Iterating Over an Asynchronous Sequence는 for-await-in을 이용해 접근하며, Collection이 모두 준비되는 것을
기다리지 않고 elements가 준비되는대로 Iterating한다.
import Foundation
let handle = FileHandle.standardInput
for try await line in handle.bytes.lines {
print(line)
}
위 코드에서 handle 은 파일의 모든 데이터를 한 번에 준비하지 않고 라인 하나를 읽은 후 iteration이 진행됨에 따라 중단/재개를 반복한다.
Custom Types 를 만들 때
iteration을 하도록 하기 위해서는 다음 protocol 의 채택이 필요하다.
Sequenceprotocol 을 채택하면for-inloop 사용이 가능하다.AsyncSequenceprotocol 을 채택하면for-await-inloop 사용이 가능하다.
Swift 의
for-await-in은 JavaScript 의 for-await-of와 비교해서 보면 좋을 것 같다.
Asynchronous Functions in Parallel
let firstPhoto = await downloadPhoto(named: photoNames[0])
let secondPhoto = await downloadPhoto(named: photoNames[1])
let thirdPhoto = await downloadPhoto(named: photoNames[2])
let photos = [firstPhoto, secondPhoto, thirdPhoto]
show(photos)
위와 같은 코드는 첫 번째 다운로드가 완료된 후 두 번째 다운로드를 진행한다. 네트워크를 통한 다운로드는 멀티 다운로드를 하는 것이 더 효율적이다. 따라서 위 3개의 Asynchronous Function 은 다음과 같이 하나의 중단점으로 묶어 관리할 수 있다.
async let firstPhoto = downloadPhoto(named: photoNames[0])
async let secondPhoto = downloadPhoto(named: photoNames[1])
async let thirdPhoto = downloadPhoto(named: photoNames[2])
let photos = await [firstPhoto, secondPhoto, thirdPhoto]
show(photos)
이렇게 하면 Asynchronous Property 가 담긴 Array에 await 중단점이 걸려 있기 때문에 Array 에 모든 값이 assign 되는
것을 기다린 후 재개된다.
Swift 의
await [func1, func2]은 JavaScript 의 Promise.all()와 비교해서 보면 좋을 것 같다.
Tasks and Task Groups
Structured Concurrency
Task는 프로그램의 일부를 Asynchronously 하게 실행할 수 있는 작업의 단위(A unit of asynchronous work)를 말하며,
모든 Asynchronous code 는 Task 의 일부로써 실행된다. 앞에서 본 async let syntax 는 Task 내에 Child Task를 만들어 낸다.
Child Task 가 여러 개일 경우 이를 관리하기 위한 Task Group을 생성하고, 이 그룹에 Child Task 를 추가할 수 있다. 이를 그룹화 함으로써
우선순위와 취소를 더 잘 제어할 수 있으며, 동적으로 작업의 수를 생성할 수 있다.
await withTaskGroup(of: Data.self) { taskGroup in
let photoNames = await listPhotos(inGallery: "Summer Vacation")
for name in photoNames {
taskGroup.addTask { await downloadPhoto(named: name) }
}
}
Task Group 과 각 Task 는 parent-child 구조를 갖는다. 따라서 Task Group 내 각각의 Child Task 는 동일한 Parent Task를 갖는다.
그리고 이 각각의 Child Task 는 또 다른 Child Task 를 가질 수 있다. 이들은 Task Group 으로 묶인 hierarchy 구조를
채택하고 있으며, 이들 Task Group 과 Tasks 관계를 Structured Concurrency라 한다.
Structured Concurrency 는 정확성에 대한 일부 책임(some responsibility for correctness)이 사용자에게 주어지지만 이로써 Swift 는
Propagating Cancellation을 처리할 수 있으며,compile-time error를 감지할 수 있다.
Unstructured Concurrency
Structured Concurrency 에서 Tasks 는 Task Group 에 속해 동일한 Parent Task를 갖는 것과 달리
Unstructured Task는 Parent Task를 갖지 않는다. 이를 Unstructured Concurrency라 한다.
따라서 프로그램이 요구하는대로 Unstructured Task를 관리할 수 있는 완전한 유연성(complete flexibility)을 갖는 대신,
정확성에 대한 완전한 책임(completely responsibility for correctness)이 사용자에게 주어진다.
With great flexibility comes great responsibility
- 현재 Actor 에서 실행되는
Unstructured Task를 생성하기 위해서는 Task.init(priority:operation:) initializer 를 호출해야한다. - 현재 Actor 가 아닌 분리된 작업(detached task)으로
Unstructured Task를 생성하기 위해서는 Task.detached(priority:operation:) class method 를 호출해야한다.
두 작업은 모두 결과를 기다리거나(wait), 취소하는(cancel) 상호 작용을 할 수 있는
Task를 반환한다.
let newPhoto = // ... some photo data ...
let handle = Task {
return await add(newPhoto, toGalleryNamed: "Spring Adventures")
}
let result = await handle.value
Task Cancellation
Swift 의 Concurrency 는 협동 취소 모델(Cooperative Cancellation Model)을 사용한다. 각의 Tasks 는 실행 중
적절한 시점에 취소되었는지를 확인 후, 적절한 방식으로 취소에 응답한다.
Task Cancellation은 수행중인 작업에 따르며, 일반적으로 다음 중 하나를 의미한다.
- Throwing an error like CancellationError
- Returning nil or an empty collection
- Returning the partially completed work
작업이 취소되었는지를 확인하려면 다음 둘 중 한 가지 방법을 사용한다.
- Task 가 취소되면
CancellationError를 throw 하는 Type Method Task.checkCancellation 를 호출한다. - Type Property Task.isCancelled 의 값을 확인한다.
그리고 취소가 확인된다면, 현재의 코드에서 취소를 처리(handle)해야한다. 예를 들어, downloadPhoto(named:)이 취소된 경우,
1. 부분 다운로드를 삭제하고, 2. 네트워크 접속을 닫음을 처리해야한다. 그리고 취소를 수동으로 전파하려면
Instance Method Task.cancel() 을 호출한다.
Actors
Actors in Swift
프로그램을 isolated, concurrent pieces로 분리시키기 위해 Tasks 를 사용할 수 있다. 기본적으로 Tasks 는 isolated 되어 있어
동시에 실행하는 것이 안전하지만 Tasks 사이에 정보를 공유할 필요가 있는데 이때 Actors를 사용한다. Actors 는 Concurrent code 간에
정보를 안전하게 공유할 수 있게 한다.
Actors 는 Reference Types로 Classes 와 비슷하지만, Classes 와 다르게 Actor 는 동시에 하나의 Task 만
mutable state의 접근을 허용하므로, 여러 Tasks 가 동시에 하나의 Actor instance 와 상호작용해도 안전하다.
즉, Actors 의 mutable state 에 접근하기 위해서는 isolated 된 Task 단위로 접근해야한다. 이로 인해 접근하는 즉시 요청한
값을 반환 받는다는 보장이 없기 때문에 Actor 의 Variable Properties 또는 Methods 에 접근하기 위해서는 반드시 await을
사용해 접근해야한다.
let으로 선언한 상수에 접근할 때는awaitkeyword 를 명시하지 않아도 된다.immutable이기 때문이다.var로 선언한 변수라 하더라도 이 변수는actor-isolated properties이므로 외부context에서 임의로 값을 수정하는 것은 불가능하다.mutable이기 때문에 반드시awaitkeyword 를 이용해 접근해야한다.- 메서드는 반환값이 없는 메서드라 하더라도 암시적으로
Void라는 타입 특수한 값(()로 쓰여진Empty Tuple)을 반환한다.
그리고 단순히 메서드의 타입만으로는 이 메서드가Actor의mutable state와 상호작용을 하지 않는다는 것을 보장할 수 없다. 예를 들어 따라서Dictionaries의 값을 조회시 항상Optional로 반환하는 것처럼Actor의 모든 메서드는 호출시 항상awaitkeyword 를 이용해 접근해야한다.
다음 예제는 온도를 기록하는 Actor다.
actor TemperatureLogger {
let label: String
var measurements: [Int]
private(set) var max: Int
init(label: String, measurement: Int) {
self.label = label
self.measurements = [measurement]
self.max = measurement
}
}
Actors 는 actor keyword 를 이용해 정의한다. 위 TemperatureLogger Actor 는 3개의 properties 를 가지고 있으며,
그 중 max 는 var로 선언되었으며, private(set) modifier 애 의해 get 은 internal, set 은 private의
Access Level 을 갖는다.
Actor Isolation
Swift 는 Actor 의 local state에 접근할 수 있는 것은 Actor 의 context로 제한함으로써 Asynchronous work에서도
mutable state를 안전하게 공유할 수 있음을 보장(guarantee)한다.
이 보장성으로 Actor 의 let properties 를 제외한 모든 var properties 와 Methods는 반드시 await keyword 를
이용해 접근해야하며, 그렇지 않으면 에러가 발생한다.
let logger = TemperatureLogger(label: "Outdoors", measurement: 25)
print(await logger.max) // 25
Swift 의 이런 보장성을 Actor Isolation이라 한다.
Extensions of Actor
actor TemperatureLogger {
let label: String
var measurements: [Int]
private(set) var max: Int
init(label: String, measurement: Int) {
self.label = label
self.measurements = [measurement]
self.max = measurement
}
}
extension TemperatureLogger {
func update(with measurement: Int) {
measurements.append(measurement)
if measurement > max {
max = measurement
}
}
}
Swift 의 Extensions 는 extension keyword 를 이용해 Class, Structure,
Enumeration, Protocol 을 확장한다. 이는 Objective-C 의 Categories 와 유사하다.
즉, update(with:) 메서드는 이미 Actor 내부에 있는 것이기 때문에 Actor 의 context에 포함되므로 await keyword
없이 mutable state에 접근할 수 있다.
Sendable Types
Concurrency Domain
Tasks 와 Actors 는 프로그램의 일부를 조각으로 분리시켜 Concurrent code 가 안전하도록 만든다. Task 또는 Actor instance 의
내부에 var로 선언된 mutable state를 포함하는 경우가 있는데 이를 Concurrency domain이라 한다. 이렇게 mutable state 를
포함하지만 동시 접근(overlapping access)에 대해 보호되지 않는 경우는 Concurrency domain 간에 공유될 수 없다.
Sendable Protocol
Concurrency domain 간에 공유될 수 있는 타입을 Sendable Types라 한다. Sendable Types 는 Actor 의 메서드를 호출할 때
arguments 로 전달되거나 Task 의 결과로써 반환될 수 있다.
Value Types 는 언제나 안전한 공유가 가능하다. 따라서 Concurrency domain 간에도 안전하게 공유할 수 있다.
반면, Reference Types 는 Concurrency domain 간에 전달하기에 안전하지 않다. Class 가 mutable properties 를 포함하고,
순차적 접근(serialize access)을 하지 않는다면, 서로 다른 Tasks 간에 Class 의 instance 를 전달할 때 예측 불가능하고
잘못된 결과를 전달할 수 있다(무분별한 순서로 접근할 경우 Reference Types 의 값이 의도한 시점이 아닌데도 불구하고 변경될 수 있다).
이 문제를 해겷하기 위해 우리는 Sendable Protocol 을 준수하도록(conformance) 선언해 Sendable Types로 만들 수 있다.
Sendable Protocol 은 코드적인 요구사항(code requirements)은 없지만,
Swift 가 강제하는 의미론적인 요구사항(semantic requirements)이 있다.
Sendable 의 설명을 다시 읽어보자.
Sendable Types 의 값은 하나의 Concurrency domain 에서 다른 Concurrency domain 으로 안전하게 보낼 수 있다. 예를 들어, Sendable Values 는 Actor 의 메서드를 호출할 때 arguments 로 전달될 수 있다. 다음은 모두 Sendable 로 표시 가능하다(marked as sendable).
- Value Types
- Reference types with no mutable storage
- Reference types that internally manage access to their state
- Functions and closures (by marking them with
@Sendable)
위에서 이미 살펴보았든이 이 프로토콜은 required methods 나 required properties 와 같은 요구사항은 없지만, `compile-time 에 강제되는 의미론적인 요구사항(semantic requirements)*이 있다. 그리고 Sendable은 반드시 Type이 선언된 파일 내에서 선언되어야한다. 이러한 요구사항에 대해서는 아래 번호에 이어서 설명한다.
Compiler 의 강제성 없이 Sendable 을 선언하려면 Sendable protocol 대신 @unchecked Sendable protocol 을 채택한다.
이 경우 정확성에 대한 책임이 사용자에게 있으며, 사용자는 lock 또는 queue를 이용해 타입의 상태에 대한 모든 접근을 보호해야한다.
또한 이 Unchecked conformance to Sendable은 Sendable 이 반드시 Type 이 선언된 파일 내에서 선언되어야 한다는 규칙 역시
따르지 않는다.
Sendable Structures and Enumerations
Structures 와 Enumerations 가 Sendable Protocol 을 만족시키기 위해 Sendable Members 와 Associated Values 만
가져야한다.
일부 케이스의 경우 암시적으로 Sendable 을 따르는데 그것은 다음과 같다.
Frozenstructures and enumerations- Structures and enumerations that
aren’t publicandaren’t marked @usableFromInline.
이 외 경우는 Sendable 에 대한 적합성을 명시적으로 선언해야한다.
Structures 가 nonsendable stored properties를 가지고 있거나, Enumerations 가 nonsendable associated values를
가지고 있다면 Sendable 적합성을 따를 수 없다. 따라서 이 경우 위에서 설명했듯이 @unchecked Sendable를 표시해
compile-time error 를 비활성화 한 후 사용자가 직접 해당
Types 가 Sendable Protocol 의 의미론적인 요구사항(semantic requirements)을 만족하는지 검증해야한다.
Sendable Actors
Actors 는 모든 mutable state 에 순차적인 접근만 허용하기 때문에 암시적으로 Sendable 을 만족한다.
Sendable Classes
Classes 가 Sendable Protocol 을 따르기 위해서는 다음을 만족해야한다.
- Be marked final
- Contain only stored properties that are immutable and sendable
- Have no superclass or have NSObject as the superclass
예를 들면 다음과 같은 Classes 는 Swift 에 의해 Sendable Protocol 을 채택해 적합성을 따르도록 할 수 있다.
final class Abc: Sendable {
let x: String
init(x: String) {
self.x = x
}
}
1 ) @MainActor가 표시된 Classes는 암시적으로 Sendable을 만족한다.
Main Actor는 자신의 state 에 대한 모든 접근을 조정하기 때문에 암시적으로 Sendable 을 만족하며, 이 Classes 는
mutable 하고 nonsendable한 Stored Properties 를 저장할 수 있다.
2 ) Verify conform to sendable protocol manually
위 사항을 따르지 않는 Classes 는 @unchecked Sendable을 표시하고 사용자가 적합성을 만족하는지 확인한다.
class Abc: @unchecked Sendable {
let x: String
init(x: String) { self.x = x }
}
@unchecked Sendable를 표시해 compile-time error 를 비활성화 한 후 사용자가 직접 해당Types 가 Sendable Protocol 의 의미론적인 요구사항(semantic requirements)을 만족하는지 검증해야한다.
Sendable Functions and Closures
Sendable Protocol 을 따르게 하는 대신 @Sendable attribute 사용해 Sendable Functions 또는 Sendable Closures
을 나타낼 수 있다.
당연히 전달되는 Functions 또는 Closures 의 모든 값은 Sendable 을 만족해야한다. 추가로 Closures는 오직 Value
캡처만 사용해야하며, 그 값은 반드시 Sendable Type이어야 한다.
Task.detached(priority:operation:) 호출과 같이 Sendable Closures 를 예상하는 context 에서 요구사항을 만족하는 클로저는
암시적으로 Sendable 을 만족한다.
다음과 같이 Type Annotation의 일부로 @Sendable을 표시하거나 parameters 의 앞에 @Sendable을 표시함으로 명시적으로
Sendable 을 만족함을 나타낼 수 있다.
let sendableClosure = { @Sendable (number: Int) -> String in
if number > 12 {
return "More than a dozen."
} else {
return "Less than a dozen"
}
}
Sendable Tuples
Sendable protocol 을 만족하기 위해서는 Tuples의 모든 elements 가 Sendable 을 만족해야하며, 조건이 만족되면
Tuples 역시 암시적으로 Sendable 을 만족한다.
Sendable Metatypes
Int.Type과 같은 Metatypes는 암시적으로 Sendable을 만족한다.
다음은 Int가 어떻게 Sendable protocol 을 만족하는지를 보여준다.
extension Int: Sendable {}
따라서 다음과 같은 Structure 는 암시적으로 Sendable 을 만족한다.
struct Abc {
var xyz: Int
}
만약 Genenric Type이 Sendable 을 만족하지 않을 경우 다음과 같이 적합성을 따르도록 할 수 있다.
struct Box<Val: Sendable> {
var abc: Val
}
17. Type Casting 👩💻
What is Type Casting?
Type Casting은 단순히 타입을 다른 타입으로 변경하는 것만을 의미하는 것이 아니다. Instance 의 타입을 확인하거나,
해당 Instance 를 자신의 Class Hierarchy 구조 안에서 Superclass 또는 Subclass로 다루기 위해 사용한다.
Swift 에서 Type Casting 은 is와 as operators 를 이용해 구현된다. 이 두 operators 는 간단하면서 문장을 표현하는 것과
같은 자연스러운 방법으로 Value에 대한 Checking Type과 Casting Another Types을 지원한다.
그리고 Checking Type은 해당 Instance 의 타입을 확인하는 것 뿐 아니라 그 타입이 특정 Protocols 를 따르고 있는지 확인하는
데 사용되기도 한다.
Casting Operators
Swift 는 Instance 의 타입을 확인하거나 Class Hierarchy 구조 안에서 Downcasting, Upcasting 을 하기 위해
is, as 그리고 as? 또는 as! 와 같은 Operators 를 제공한다.
class MediaItem {
var name: String
init(name: String) {
self.name = name
}
}
class Movie: MediaItem {
var director: String
init(name: String, director: String) {
self.director = director
super.init(name: name)
}
}
class Song: MediaItem {
var artist: String
init(name: String, artist: String) {
self.artist = artist
super.init(name: name)
}
}
MediaItem 이라는 Base Class 와 이를 상속하는 Movie, Song Classes 를 이용해 사용 방법을 확인해보자.
Checking Type (Type Check Operator ‘is’)
Type Check Operator(is)는 일치하는 타입인지 확인 후 Bool을 반환한다.
let aMedia = MediaItem(name: "Avatar")
let aMovie = Movie(name: "Casablanca", director: "Michael Curtiz")
print(aMedia is MediaItem) // true
print(aMedia is Movie) // false
print(aMedia is Song) // false
print(aMovie is MediaItem) // true
print(aMovie is Movie) // true
print(aMovie is Song) // false
Superclass 의 instance 는 Subclass 의 Members 를 모두 갖지 못하므로 Subclass 타입이 될 수 없다.
반면 Subclass 의 instance 는 Superclass 의 모든 Members 를 모두 갖고 있으므로, Superclass 타입이 될 수 있다.
위 library 에 각 타입이 몇 개씩 저장되어 있는지 Type Check Operator를 사용해 확인해보자.
var (movieCount, songCount) = (0, 0)
library.forEach {
switch $0 {
case is Movie: movieCount += 1
case is Song: songCount += 1
default: break
}
}
print("Media library contains \(movieCount) movies and \(songCount) songs")
Media library contains 2 movies and 3 songs
Downcasting (Type Cast Operator ‘as?, as!’)
특정 Class Type 의 상수나 변수는 겉으로 보이는 것과 달리 실제로는 Subclass Instance 를 참조하고 있는 경우도 있다.
위에서 library 가 그런 경우다. 이때 이것의 Type 을 Subclass Type 으로 Downcasting 할 수 있다.
Downcasting 은 실패할 수 있기 때문에 2가지의 Operators 가 제공된다. 조건부 형식(conditional form)인 as?는
Optional을 반환하므로 Downcasting 의 성공 여부를 확인하는 용도로 사용한다. 만약 Downcasting 성공 여부를 확신할 수 있을
경우는 강제 형식(forced form)인 as!를 사용해 Forced Unwrapping된 타입을 얻을 수 있다. 단, Downcasting 이 유효하지
않을 경우 Runtime Error 가 trigger 되므로 반드시 성공함을 확신할 수 있을 때만 사용해야한다.
Casting은실제 instance 를 수정하거나 값을 바꾸지 않는다. instance 는 그대로 유지하면서, 단지 casting 된 타입의 instance 로 다루고 접근할 수 있도록 한다.
library.forEach {
if let movie = $0 as? Movie {
print("Movie: \(movie.name), dir. \(movie.director)")
} else if let song = $0 as? Song {
print("Song: \(song.name), by \(song.artist)")
}
}
Movie: Casablanca, dir. Michael Curtiz
Song: Blue Suede Shoes, by Elvis Presley
Movie: Citizen Kane, dir. Orson Welles
Song: The One And Only, by Chesney Hawkes
Song: Never Gonna Give You Up, by Rick Astley
Type Casting for Any and AnyObject(Upcasting ‘as’)
Swift 는 불특정 타입을 위한 두 가지의 특별한 타입을 제공한다.
- Any : Closure, Function, Class, Structure, Enumeration Types 를 포함한 모든 타입의 instance 를 대신할 수 있다.
- AnyObject : Class Types 를 대신할 수 있다.
Any와AnyObject는 이것이 제공하는 작동 및 기능이 명시적으로 필요한 경우에만 사용해야한다. 그 외 경우는 언제나 명확한 타입을 지정하는 것이 더 좋다.
Any는Optional 을 포함한 모든 타입을 대신할 수 있다.
예제를 위해 Structure 와 Enumeration 을 하나씩 추가하자.
struct Point {
var x = 0.0, y = 0.0
}
enum CompassPoint {
case east, west, south, north
}
1 ) Any
var things: [Any] = []
func testAnyTypes(_ things: [Any]) {
for thing in things {
switch thing {
case 0 as Int:
print("\(thing) : zero as an Int")
case 0 as Double:
print("\(thing) : zero as a Double")
case let someInt as Int:
print("\(thing) : an integer value of \(someInt)")
case let someDouble as Double where someDouble > 0:
print("\(thing) : a positive double value of \(someDouble)")
case is Double:
print("some other double value that I don't want to print")
case let someString as String:
print("\(thing) : a string value of \"\(someString)\"")
case let (x, y) as (Double, Double):
print("\(thing) : an (x, y) point at \(x), \(y)")
case let stringConverter as (String) -> String:
print("\(thing) : \(stringConverter("Michael"))")
case let movie as Movie:
print("\(thing) : a movie called \(movie.name), dir. \(movie.director)")
case let point as Point:
print("\(thing) : a point is at (\(point.x), \(point.y))")
case let direction as CompassPoint:
print("\(thing) : a direction is \(direction)")
default:
print("\(thing) : something else")
}
}
}
[Any]에 여러 타입을 저장하고, 이를 Upcasting을 통해 다시 확인해보자.
- Int and Double
things.append(0) // Int
things.append(0.0) // Double
things.append(42) // Int
things.append(3.14159) // Double
testAnyTypes(things)
0 : zero as an Int
0.0 : zero as a Double
42 : an integer value of 42
3.14159 : a positive double value of 3.14159
- String, Tuple and Closure
things.append("hello") // String
things.append((3.0, 5.0)) // Tuple of type (Double, Double)
things.append({ (name: String) -> String in "Hello, \(name)" }) // Closure of type (name: Stirng) -> String
testAnyTypes(things)
hello : a string value of "hello"
(3.0, 5.0) : an (x, y) point at 3.0, 5.0
(Function) : Hello, Michael
- Class, Structure and Enumeration
things.append(Movie(name: "Avatar", director: "James Francis Cameron")) // Class
things.append(Point(x: 5.2, y: 3.0)) // Structure
things.append(CompassPoint.east) // Enumeration
testAnyTypes(things)
__lldb_expr_81.Movie : a movie called Avatar, dir. James Francis Cameron
Point(x: 5.2, y: 3.0) : a point is at (5.2, 3.0)
east : a direction is east
2 ) AnyObject
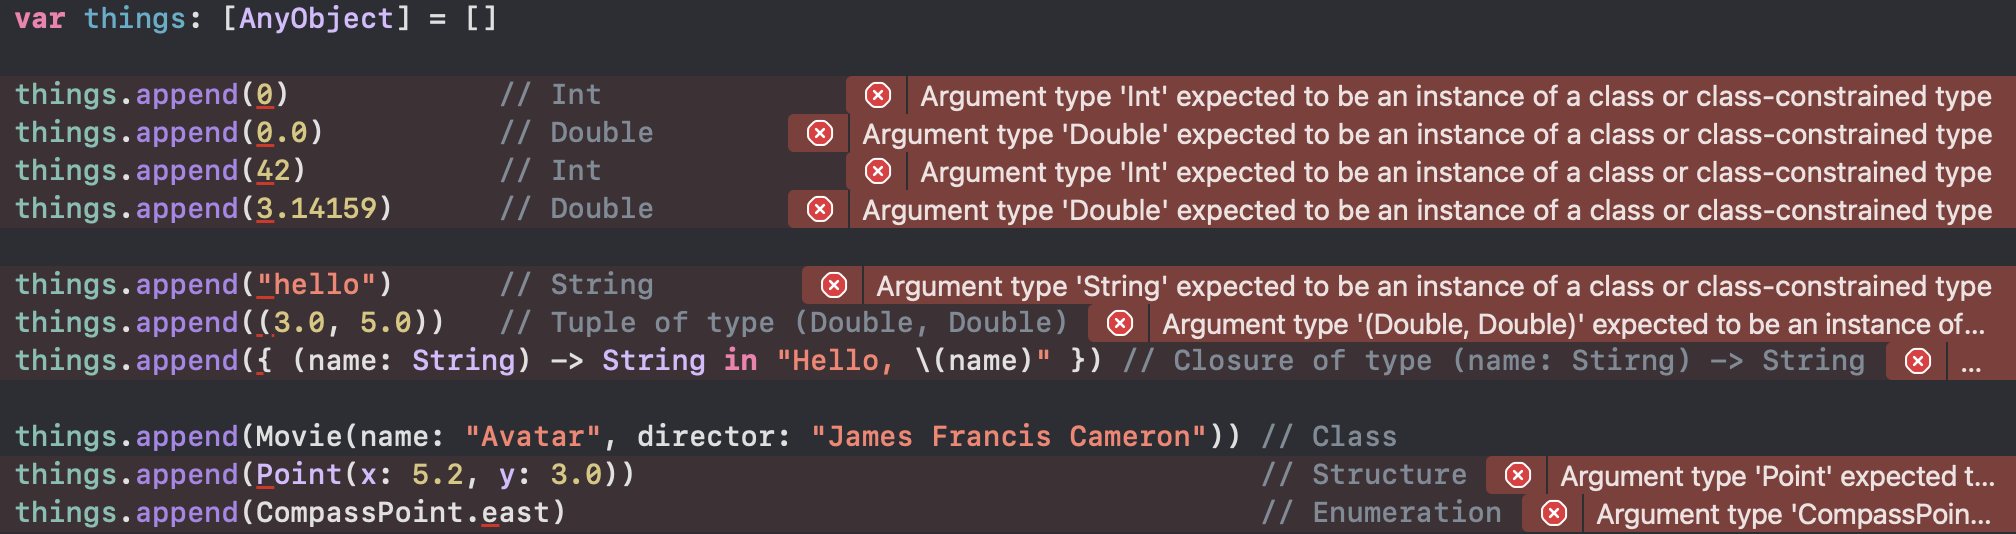
AnyObject는 Any와 달리 오직 Class Types만 대신할 수 있다.
var things: [AnyObject] = []
things.append(Movie(name: "Avatar", director: "James Francis Cameron")) // Class
if let aMovie = things[0] as? Movie {
print("\(aMovie) : a movie called \(aMovie.name), dir. \(aMovie.director)")
}
__lldb_expr_92.Movie : a movie called Avatar, dir. James Francis Cameron
3 ) Do Explicit Casting Optional to Any
다음 코드를 보자. Optional 을 그대로 사용하면 작동은 되지만 Swift 는 이를 해결할 것을 경고한다.
let optionalNumber3: Int? = 3
things.append(optionalNumber3) // Warning: Expression implicitly coerced from 'Int?' to 'Any'
testAnyTypes(things)
Optional(3) : an integer value of 3
이때 경고를 제거하기 위해 Nil-Coalescing Operator(??)나 Forced Unwrapping(!)을 사용할 수 있다.
let optionalNumber5: Int? = 5
let optionalNumber7: Int? = 7
things.append(optionalNumber5 ?? 0)
things.append(optionalNumber7!)
testAnyTypes(things)
5 : an integer value of 5
7 : an integer value of 7
사실 Error 가 아닌 Warning 이므로 작동에 문제는 없다. 하지만 경고는 제거하고, Unwrapping 은 하지 않은 채 Optional 상태를 유지할 수는 없을까?
Any casting 은 이를 가능하게 한다.
let optionalNumber9: Int? = 9
things.append(optionalNumber9 as Any)
testAnyTypes(things)
Optional(9) : an integer value of 9
19. Nested Types 👩💻
Nested Types
Enumerations 는 주로 특정 Classes 또는 Structures 의 기능을 지원하기 위해 사용된다. 유사하게 더 복잡한 타입의
context 에서 사용하기 위해 순수하게 Utility Classes or Structures를 정의하는 것이 편리할 수도 있다.
이를 위해 Swift 의 Classes, Structures, Enumerations 는 모두 Nested Types를 지원한다. 이를 통해 scope를
제한할 수 있다. Nested Types 는 지원하는 타입의 내부 중괄호 내에 작성해야하며, Nested Types 는 필요한 만큼 중첩이 가능하다.
struct BlackjackCard {
// nested Suit enumeration
enum Suit: Character {
case spades = "♠", hearts = "♡", diamonds = "♢", clubs = "♣"
}
// nested Rank enumeration
enum Rank: Int {
case two = 2, three, four, five, six, seven, eight, nine, ten
case jack, queen, king, ace
struct Values {
let first: Int, second: Int?
}
var values: Values {
switch self {
case .ace:
return Values(first: 1, second: 11)
case .jack, .queen, .king:
return Values(first: 10, second: nil)
default:
return Values(first: self.rawValue, second: nil)
}
}
}
// BlackjackCard properties and methods
let rank: Rank, suit: Suit
var description: String {
var output = "suit is \(suit.rawValue),"
output += " value is \(rank.values.first)"
if let second = rank.values.second {
output += " or \(second)"
}
return output
}
}
let aceOfSpades = BlackjackCard(rank: .ace, suit: .spades)
let kingOfHearts = BlackjackCard(rank: .king, suit: .hearts)
let sixOfDiamonds = BlackjackCard(rank: .six, suit: .diamonds)
print("The ace of spades : \(aceOfSpades.description)")
print("The king of hearts : \(kingOfHearts.description)")
print("The six of diamonds : \(sixOfDiamonds.description)")
The ace of spades : suit is ♠, value is 1 or 11
The king of hearts : suit is ♡, value is 10
The six of diamonds : suit is ♢, value is 6
Nested Functions
Swift 는 First-Class Citizens 를 지원하는 언어로 Classes, Structures, Enumerations Types 의 중첩뿐 아니라 Function Types 를 중첩하는 것 역시 가능하다.
func chooseStepFunction(backward: Bool) -> (Int) -> Int {
func stepForward(_ input: Int) -> Int {
print(#function)
return input + 1
}
func stepBackward(_ input: Int) -> Int {
print(#function)
return input - 1
}
return backward ? stepBackward(_:) : stepForward(_:)
}
chooseStepFunction(backward:) 함수를 위해 사용되는 stepForward(_:), stepBackward(_:) 함수를
chooseStepFunction(backward:) 함수의 body에 중첩해 접근을 제한하고 가독성읖 높였다.
func movingStart(initialValue: Int) {
var currentValue = initialValue
let moveNearToZero = chooseStepFunction(backward: currentValue > 0)
print("Counting to zero:")
while currentValue != 0 {
print("\(currentValue)... Call ", terminator: "")
currentValue = moveNearToZero(currentValue)
}
print("zero!\n")
}
movingStart(initialValue: 4)
movingStart(initialValue: -3)
Conting to zero:
4... Call stepBackward(_:)
3... Call stepBackward(_:)
2... Call stepBackward(_:)
1... Call stepBackward(_:)
zero!
Conting to zero:
-3... Call stepForward(_:)
-2... Call stepForward(_:)
-1... Call stepForward(_:)
zero!
Referring to Nested Types
Nested Types는 기본적으로 이것이 정의된 context 의 내부로 범위가 제한된다. 이렇게 캡슐화 함으로써 전역에서 접근할 필요가 없는
Types 를 숨겨 코드를 더욱 안전하고 가독성 높게 만들 수 있다. 하지만 Nested Types 는 Closures 의 Capturing Values 와 다르게
완전히 격리되는 것은 아니다.
만약 2~3개의 타입에서만 사용할 어떤 Nested Types가 있다고 해보자. 이를 전역으로 만들면 2~3개의 타입에서 공유가 가능하다. 하지만 이런
타입이 많아지면 전역 scope 오염이 일어나 불필요하게 복잡해질 가능성이 높다. 이를 피하기 위해 2~3개의 타입마다 동일한 Nested Types 를
만들면 전역 scope 오염은 되지 않겠지만, 코드의 중복이 발생하고 유지보수 시 코드의 변경 사항을 놓쳐 Human Errors 를 만드는 원인이 될 수 있다.
이런 경우 가장 연관성이 높은 곳에 하나의 Nested Types 를 정의하고, 외부 타입에서 접근할 경우 해당 Nested Types 가 정의된 가장 외부
Types 에 접근해 Hierarchy 구조를 타고 내려가 명시적으로 접근할 수 있다. 이렇게 명시적인 접근을 허용함으로써 Nested Types 는
전역 scope 의 오염을 예방하며 필요에 따라 명시적 접근을 통한 코드의 재사용성을 동시에 확보할 수 있다.
let heartsSymbol = BlackjackCard.Suit.hearts.rawValue
print(heartsSymbol) // ♡
20. Extensions 👩💻
Extension vs. Inheritance
기존의 Types 를 확장하기 위한 방법 중 하나인 Inheritance 는
Class 에서만 사용할 수 있다.
Inheritance 는 기존 Class 는 그대로 둔 채 별도의 Class 를 생성하며, 이들은 Superclass/Subclass 라는 관계로 연결된
Hierarchy 구조를 갖는다. Subclass 는 기존의 Superclass 에 기능을 추가해 확장하는 것 뿐 아니라
이미 존재하는 기능을 Overriding 하는 것도 가능하다.
Extension은 Class, Structure, Enumeration, Protocol 타입에서 사용이 가능하며 Extensions 가 할 수 있는 것은 다음과 같다.
- Add computed instance properties and computed type properties
- Define instance methods and type methods
- Provide new initializers
- Define subscripts
- Define and use new nested types
- Make an existing type conform to a protocol
Extension 은 Inheritance 와 마찬가지로 기존에 존재하는 타입에 기능을 추가할 수 있다. 그리고 Extension 이 갖는 특징으로 Inheritance 와 다른점은 다음과 같다.
- Original source code 에 접근 권한이 없는 경우에도 Extension 이 가능하다.
이를
Retroactive Modeling(소급 모델링) 이라 한다. - Extension 은 Inheritance 와 달리 Stored Properties, Property Observers 는 확장이 불가능하다.
오직 Computed Instance Properties 와 Computed Type Properties 만 확장 가능하다. - Extension 은 기능을 추가만 가능할 뿐 Inheritance 와 달리
Overriding 이 불가능하다.
Swift 의 Extensions 는 Objective-C 의 Categories 와 유사하다. 단, Extensions 는 이름을 갖지 않는다.
Syntax
extension SomeType {
// new functionality to add to SomeType goes here
}
Extension 은 하나 이상의 Protocol을 채택해 기존의 타입을 확장할 수 있다.
extension SomeType: SomeProtocol, AnotherProtocol {
// implementation of protocol requirements goes here
}
이뿐 아니라 Generic Type을 확장하는 것 역시 가능하다.
Computed Properties
Extensions 를 이용해 Computed Instance Properties 또는 Computed Type Properties를 확장하는 것이 가능하다. 이것은
사용자가 정의한 타입 뿐 아니라 Built-in Types 를 확장하는 것을 포함한다.
다음 예제는 TypeScript 가 Prototype 을 이용해 Built-in Types 에 기능을 추가하듯 다양한 길이 단위를 ‘meter’ 단위로 변경하기 위해 Double 에 5개의 Computed Instance Properties 를 추가한다.
extension Double {
var km: Double { return self * 1_000.0 }
var m: Double { return self }
var cm: Double { return self / 100.0 }
var mm: Double { return self / 1_000.0 }
var ft: Double { return self / 3.28084 }
}
let oneInch = 25.4.mm
print("One inch is \(oneInch) meters") // One inch is 0.0254 meters
let threeFeet = 3.ft
print("Three feet is \(threeFeet) meters") // Three feet is 0.914399970739201 meters
let aMarathon = 42.km + 195.m
print("A marathon is \(aMarathon) meters long") // A marathon is 42195.0 meters long
Extensions 는 Computed Instance Properties 나 Computed Type Properties 를 추가하는 것만 가능하다.
Stored Properties 를 추가하거나, 이미 존재하는 Properties 에 Property Observers 를 추가하는 것은 불가능하다.
Initializers
Extensions 는 Convenience Initializers 를 추가하는 것만 가능하다.
Designated Initializers 나 Deinitializers 를 추가하는 것은 불가능하다.
1 ) Without Initializer Extensions
struct Size {
var width = 0.0, height = 0.0
}
struct Point {
var x = 0.0, y = 0.0
}
struct Rect {
var origin = Point()
var size = Size()
init() {}
init(origin: Point, size: Size) {
self.origin = origin
self.size = size
}
init(center: Point, size: Size) {
let originX = center.x - (size.width / 2)
let originY = center.y - (size.height / 2)
self.init(origin: Point(x: originX, y: originY), size: size)
}
}
2 ) With Initializer Extensions
struct Size {
var width = 0.0, height = 0.0
}
struct Point {
var x = 0.0, y = 0.0
}
struct Rect {
var origin = Point()
var size = Size()
}
extension Rect {
init(center: Point, size: Size) {
let originX = center.x - (size.width / 2)
let originY = center.y - (size.height / 2)
self.init(origin: Point(x: originX, y: originY), size: size)
}
}
- Without Extensions : 사용자 정의 Initializers 를 추가하는 순간 Default Initializers 와 Memberwise Initializers 는 자동 생성되는 조건을 만족하지 않게 된다. 따라서 필요한 만큼 Default Initializers 와 Memberwise Initializers 를 명시적으로 생성해야한다.
- With Extensions :
Original implementation은 Default Initializers 와 Memberwise Initializers 의 조건을 만족하므로 자동으로 해당 Initializers 를 생성한다. 따라서Default Initializers 와 Memberwise Initializers 의 생성 조건을 유지한 채 Custom Initializers 를 추가하는 것을 가능하게 한다.
Methods
With Method Extensions
Extensions 를 이용해 Instance Methods와 Type Methods를 확장하는 것이 가능하다. 이것은
Computed Property Extensions 와 마찬가지로 사용자가 정의한 타입 뿐 아니라
Built-in Types 를 확장하는 것을 포함한다.
extension Int {
func repetitions(task: () -> Void) {
for _ in 0..<self {
task()
}
}
}
3.repetitions { print("Hello!") }
Hello!
Hello!
Hello!
Mutating Method of Value Types
Swift 에서 Structures 와 Enumerations 는 Value Types 로 instance 자기 자신의 Properties 수정하기
위해서는 반드시 메서드 앞에 mutating keyword 를 적어야한다.
Swift 에서 Double 또는 Int 와 같은 자료형은 Structure 로 구현되었다. 따라서 Extensions 를 사용할 때 역시 자신의
Properties 를 수정하려면 mutating이 필요하다.
var someDouble: Double = 3.342
let rounded = someDouble.rounded()
print(rounded) // 3
print(someDouble) // 3.342
someDouble.round()
print(someDouble) // 3
rounded() 메서드는 func rounded() -> Self로 자신의 타입을 반환하는 메서드다. 반면 round() 메서드는
mutating func round()로 자시 자신의 Properties 를 변경하는, 즉, mutating 메서드다.
Int Structure 에 자기 자신을 제곱해 값을 변경하는(mutating) 메서드를 Extensions 를 이용해 추가해보자.
extension Int {
func squared() -> Self {
self * self
}
mutating func square() {
self = self * self
}
}
var someInt: Int = 3
let squared = someInt.squared()
print(squared) // 9
print(someInt) // 3
someInt.square()
print(someInt) // 9
Subscripts
Subscripts 역시 Built-in Types 를 확장하는 것을 포함한다.
다음은 10진법에서 해당 자릿수의 숫자를 구하는 알고리즘이다.
(3782 / 1) % 10 // 2
(3782 / 10) % 10 // 8
(3782 / 100) % 10 // 7
(3782 / 1000) % 10 // 3
3782를 10으로 나눈나머지는 2가 되므로1의 자리는 2다.3782를 10으로 나누면Int / Int이므로 결과 역시 Int 가 되어야한다. 따라서 결과는378이 되고, 이제 378을 10으로 나눈나머지는 8이 되므로10의 자리는 8이다.
이 로직을 Built-in Types Int에 Subscripts 를 이용해 확장해보자.
extension Int {
subscript(digitIndex: Int) -> Int {
var decimalBase = 1
for _ in 0..<digitIndex {
decimalBase *= 10
}
return (self / decimalBase) % 10
}
}
3782[0] // 2, 10^0 의 자릿수는 2다.
3782[1] // 8, 10^1 의 자릿수는 8이다.
3782[2] // 7, 10^2 의 자릿수는 7이다.
3782[3] // 3, 10^3 의 자릿수는 3이다.
3782[4] // 0, 10^4 의 자릿수는 존재하지 않으므로 0이다.
Nested Types
Extensions 를 이용해 이미 존재하는 Classes, Structures, Enumerations 에 Nested Types 를 추가할 수 있으며,
이것 역시 Built-in Types 를 확장하는 것을 포함한다.
extension Int {
enum Kind {
case negative, zero, positive
}
var kind: Kind {
switch self {
case 0:
return .zero
case let x where x > 0:
return .positive
default:
return .negative
}
}
}
0.kind // zero
1.kind // positive
(-2).kind // negative
Extensions 를 이용해 Built-in Types를 확장하면 다음과 같은 로직을 좀 더 우아하게 구현할 수 있다.
func printIntegerKinds(_ numbers: Int...) {
for number in numbers {
switch number.kind {
case .negative:
print("- ", terminator: "")
case .zero:
print("0 ", terminator: "")
case .positive:
print("+ ", terminator: "")
}
}
print("")
}
printIntegerKinds(1, 3, 0, -7, 9, 2, 0, -3) // + + 0 - + + 0 -
21. Protocols 👩💻
Protocols
Syntax
Protocol은 Methods, Properties, 그리고 특정 작업이나 기능의 요구사항을 정의하기위한 blueprint로, Protocol 은
Class, Structure, Enumeration 에 채택(adopt)되어 요구사항을 구현하도록 한다. 그리고 Protocol 의 모든 요구사항에
충족하면 그 Type 은 해당 Protocol 을 준수(conform)한다고 표현한다.
protocol SomeProtocol {
// protocol definition goes here
}
Protocol 을 정의하는 방법은 Class, Structure, Enumeration 을 정의하는 방법과 유사하다.
Adopt Protocol
Protocol 을 채택하는 것 역시 Class 의 Inheritance 와 유사하다.
struct SomeStructure: FirstProtocol, AnotherProtocol {
// structure definition goes here
}
단, Class에서는 주의해야할 것이 Inheritance가 종료된 후 Protocol의 채택이 가능하다.
class SomeClass: SomeSuperclass, FirstProtocol, AnotherProtocol {
// class definition goes here
}
Adopt Protocol vs. Class Inheritance
| Protocol | Class | |
|---|---|---|
| Class | O | O |
| Structure | O | X |
| Enumeration | O | X |
| Multiple Inheritance(or Adapt) | O | X |
Protocol Requirements
Property Requirements
1 ) Syntax
You can define
varkeyword- type
- name
- { get set } or { get }
static,classkeyword
protocol SomeProtocol {
var mustBeSettable: Int { get set }
var doesNotNeedToBeSettable: Int { get }
}
get set을 모두 정의할 경우 자동으로 Constant Stored Properties 와 Read-Only Computed Properties 는 준수하는 것이 불가능하다.반면
get만 정의할 경우 모든 종류의 Properties 에 대해 Protocol 을 준수할 수 있다. 그리고 이것이 유효할 때set이 유효한 타입이라면set은 자동으로 유효하다.
여기서 주의해야 할 것이 { get set }은 이 Protocol 을 채택하는 Type 이 반드시 get set을 만족하도록 구현해야한다는
의미이고, { get }은 반드시 get을 만족하도록 구현해야한다는 의미다. ‘get’ 만 만족하고 ‘set’ 을 만족하지 않도록
Read-Only임을 강제하는 것이 아니다.
You cannot define
letkeyword- What type of properties (i.e. stored properties or computed properties)
Protocol 이 Properties 요구사항을 정의할 때는 반드시
varkeyword 만 사용하며, Properties 의 유형은 정의할 수 없다.
2 ) Type Properties
protocol AnotherProtocol {
static var someTypeProperty: Int { get set }
}
또한 Protocol 이 Type Properties 를 정의할 때는 마찬가지로 static keyword 를 반드시
작성해야한다(이 규칙은 Classes 에의해 구현될 때 class 또는 static keyword 를 요구하는 경우 모두 적용된다).
3 ) Examples
single instance property 만 요구하는 매우 간단한 Protocol FullyNamed 를 정의한다.
protocol FullyNamed {
var fullName: String { get }
}
이를 채택하는 Structure 를 하나 만들어보자.
struct Person: FullyNamed {
var fullName: String
}
위 Person 은 FullyNamed Protocol 을 완벽하게 준수하고 있다.
var john = Person(fullName: "John Park")
print(john.fullName) // John Park
john 의 fullName 은 “John Park” 이다.
john.fullName = "John Kim"
print(john.fullName) // John Kim
이제 john 의 fullName 은 “John Kim” 이다. Protocol 에서 var fullName: String { get }로 정의했으나
이것은 get만 만족해야한다는 의미가 아니고 get을 만족해야한다는 의미이고, 이것을 채택한 Person Structure 는
fullName 을 Variable Stored Properties로 정의했기 때문에 set 역시 자동으로 유효하게된다. 따라서 set
역시 유효한 것이다.
이번에는 위 FullyNamed Protocol 을 채택하는 좀 더 복잡한 Class 를 하나 정의해본다.
class Starship: FullyNamed {
var prefix: String?
var name: String
init(name: String, prefix: String? = nil) {
self.name = name
self.prefix = prefix
}
var fullName: String {
return (prefix != nil ? "\(prefix!) " : "") + name
}
}
이번에는 fullName 을 Read-Only Computed Properties로 정의했고, Protocol 이 get set이 아닌 get만
정의했기 때문에 역시 이 Starship 은 FullyNamed Protocol 을 완벽하게 준수하고 있다.
var ncc1701 = Starship(name: "Enterprise", prefix: "USS")
print(ncc1701.fullName) // USS Enterprise
Method Requirements
Methods 에 대한 요구사항 역시 Properties 와 유사하다.
1 ) Syntax
You can define
- name
- parameter(including variadic parameter)
- return type
statickeyword
protocol SomeProtocol {
func someTypeMethod() -> SomeType
}
You cannot define
- parameter default value
- method
body
2 ) Type Methods
protocol AnotherProtocol {
static func anotherTypeMethod() -> SomeType
}
3 ) Examples
protocol RandomNumberGenerator {
func random() -> Double
}
이를 채택하는 Class 를 하나 만들어보자.
class LinearCongruentialGenerator: RandomNumberGenerator {
var lastRandom = 42.0
let m = 139968.0
let a = 3877.0
let c = 29573.0
func random() -> Double {
lastRandom = ((lastRandom + a + c).truncatingRemainder(dividingBy: m))
return lastRandom / m
}
}
이 Class 는 선형 합동 생성기(linear congruential generator) 로 알려진 의사 난수(pseudorandom number) 생성기 알고리즘이다.
let generator = LinearCongruentialGenerator()
print("Here's a random number: \(generator.random())")
print("And another one: \(generator.random())")
Here's a random number: 0.23928326474622771
And another one: 0.4782664609053498
Mutating Method Requirements
Protocol 에서 Methods 를 mutating으로 정의했을 때 이 Protocol 을 채택하는 Type 이 Classes인 경우는
Reference Types 이므로 mutating keyword 를 작성할 필요가 없다. 오직 Value Types 인
Structures 와 Enumerations에서만 작성한다.
Example
protocol Toggleable {
mutating func toggle()
}
enum OnOffSwitch: Toggleable {
case off, on
mutating func toggle() {
switch self {
case .off: self = .on
case .on: self = .off
}
}
}
var lightSwitch = OnOffSwitch.off
print("light switch is \(lightSwitch) now.")
lightSwitch.toggle()
print("light switch is \(lightSwitch) now.")
lightSwitch.toggle()
print("light switch is \(lightSwitch) now.")
light switch is off now.
light switch is on now.
light switch is off now.
Initializer Requirements
Methods 에 대한 요구사항 역시 Properties 와 유사하다.
1 ) Syntax
You can define
- parameter
Methods 와 유사하다. 하지만 Initializers 는 name 과 explicit return type, static 이 허용되지 않기
때문에 당연히 Protocol 역시 불가능하다. 즉, 어떤 Custom Initializrer를 구현해야 하는지 그 Type 만 정의한다.
protocol SomeProtocol {
init(someParameter: SomeType)
}
You cannot define
- parameter default value
- method
body
2 ) Examples
protocol Human {
var name: String { get set }
var age: Int { get set }
init(name: String, age: Int)
}
struct Student: Human {
var name: String
var age: Int
init(name: String = "[Unknown]", age: Int) {
self.name = name
self.age = age
}
func identification() {
print("My name is \(self.name) and I am \(self.age) years old")
}
}
var jamie = Student(name: "Jamie", age: 20)
jamie.identification()
var kate = Student(age: 22)
kate.identification()
My name is Jamie and I am 20 years old
My name is [Unknown] and I am 22 years old
3 ) Class Implementations of Protocol Initializer Requirements
위에서 Structures 를 이용한 예제를 살펴보았다. 그런데 Protocol 의 Initializers 를 Classes에 채택하려면
반드시 Required Initializers를 사용해 이 Class 의 Subclasses 가 반드시 이를
구현하도록 강제해야한다.
class Student: Human {
var name: String
var age: Int
required init(name: String = "[Unknown]", age: Int) {
self.name = name
self.age = age
}
func identification() {
print("My name is \(self.name) and I am \(self.age) years old")
}
}
requiredkeyword 를 작성하지 않으면 compile-time error 가 발생한다.
하지만 Classes 가 final modifier 를 이용해 정의되는 경우, 이 Class 는 더 이상
Subclassing 될 수 없기 때문에 required를 작성할 필요가 없다.
final class Student: Human {
var name: String
var age: Int
init(name: String = "[Unknown]", age: Int) {
self.name = name
self.age = age
}
func identification() {
print("My name is \(self.name) and I am \(self.age) years old")
}
}
4 ) Class Implementations Overriding Designated Initializer by Protocol Initializer Requirements
만약 어떤 Subclass가 Protocol 에 의해 Initializers 의 구현을 요구받는 데, 그 Initializers 의 Type 이
Superclass 의 Designated Initializer인 경우 override keyword 와 함께 사용한다.
protocol SomeProtocol {
init()
}
class SomeSuperClass {
init() {
// initializer implementation goes here
}
}
class SomeSubClass: SomeSuperClass, SomeProtocol {
// "required" from SomeProtocol conformance; "override" from SomeSuperClass
required override init() {
// initializer implementation goes here
}
}
5 ) Failable Initializer Requirements
Failable Initializers 역시 해당 Protocol 을 채택항 Types 가 이를 준수하도록 정의할 수 있다.
Failable Initializer Requirements는 Failable Initializer 또는 Nonfailable Initializer 에 의해 충족될 수 있다.Nonfailable Initializer Requirements는 Nonfailable Initializer 또는 Implicitly Unwrapped Failable Initializer 에 의해 충족될 수 있다.
Protocols as Types
Protocols 는 자체적으로 어떠한 기능도 구현하지 않는다. 그럼에도 불구하고 코드에서 Fully Fledged Types으로 사용할 수 있다.
Types 로 Protocols 를 사용하는 것은 “there exists a type T such that T conforms to the protocol”라는
구절에서 비롯된 존재 타입(Existential Type)이라 한다.
즉, Protocols 역시 First-Class Citizen 으로 다룰 수 있다는 것을 의미한다.
- Function, Method, Initializer 의
Parameter Type또는Return Type으로 사용될 수 있다. Constant, Variable, Property 의 Type으로 사용될 수 있다.Array, Dictionary, 또는 다른 Container 의 Type으로 사용될 수 있다.
Protocols 역시
Swift Types이므로 이름은대문자로 시작한다.
Superclass 에서 Subclasss 로 Downcasting 하던 것처럼
Protocol Type에서 이것을 준수하는Underlying Type으로 Downcasting 할 수 있다.
protocol RandomNumberGenerator {
func random() -> Double
}
class Dice {
let sides: Int
let generator: RandomNumberGenerator
init(sides: Int, generator: RandomNumberGenerator) {
self.sides = sides
self.generator = generator
}
func roll() -> Int {
return Int(generator.random() * Double(sides)) + 1
}
}
class LinearCongruentialGenerator: RandomNumberGenerator {
var lastRandom = 42.0
let m = 139968.0
let a = 3877.0
let c = 29573.0
func random() -> Double {
lastRandom = ((lastRandom + a + c).truncatingRemainder(dividingBy: m))
return lastRandom / m
}
}
var d6 = Dice(sides: 6, generator: LinearCongruentialGenerator())
Array(1...5).forEach { _ in print("Random dice roll is \(d6.roll())") }
Random dice roll is 2
Random dice roll is 3
Random dice roll is 5
Random dice roll is 6
Random dice roll is 2
Delegation
Delegation은 Class 또는 Structure 가 일부 책임을 다른 Type 의 Instance 에게 hand off(or delegate) 할 수
있도록 하는 Design Pattern이다. 이 Design Pattern 은 위임된 책임이 캡슐화(encapsulates)된 Protocol 을 정의하는 것으로 구현되어지며,
대리자(delegate)가 위임된 기능을 제공하는 것을 보장한다. 따라서 Delegation 은 특정 작업에 응답하거나 캡슐화된 유형을 알
필요 없이 기능을 제공하고자 하는데 사용된다.
자세한 코드는 Delegation Examples 를 참고한다.
Adding Protocol Conformance with an Extension
기존 타입에 대해 소스 코드에 직접 접근할 수 없더라도 새로운 프로토콜을 채택하고 준수하도록 해 확장할 수 있다. 이를 이용해 기존 타입에 새로운 Properties, Methods, Subscripts 를 추가할 수 있다.
class Dice {
let sides: Int
let generator: RandomNumberGenerator
init(sides: Int, generator: RandomNumberGenerator) {
self.sides = sides
self.generator = generator
}
func roll() -> Int {
return Int(generator.random() * Double(sides)) + 1
}
}
protocol TextRepresentable {
var textualDescription: String { get }
}
Dice Class 를 위 Protocol 을 이용해 확장해보자.
extension Dice: TextRepresentable {
var textualDescription: String {
return "A \(sides)-sided dice"
}
}
Extending Primitive Types using Protocols
protocol easyIndex {
subscript(_ digitIndex: Int) -> Self { get }
}
1 ) Adopting to Int Type
extension Int: easyIndex {
subscript(digitIndex: Int) -> Int {
var decimalBase = 1
for _ in 0..<digitIndex {
decimalBase *= 10
}
return (self / decimalBase) % 10
}
}
위 Subscript 는 기존 챕터에서 살펴본 것과 마찬가지로
10진법의 n 승수 를 index로 접근한다.
3782[0] // 2, 10^0 의 자릿수는 2다.
3782[1] // 8, 10^1 의 자릿수는 8이다.
3782[2] // 7, 10^2 의 자릿수는 7이다.
3782[3] // 3, 10^3 의 자릿수는 3이다.
3782[4] // 0, 10^4 의 자릿수는 존재하지 않으므로 0이다.
2 ) Adopting to String Type
extension String: easyIndex {
subscript(digitIndex: Int) -> String {
String(self[self.index(self.startIndex, offsetBy: digitIndex)])
}
}
위 Subscript 는 TypeScript 와 동일하게
앞에서부터 zero-based index로 접근한다.
let greeting = "Guten Tag!"
print(greeting[0]) // G
print(greeting[1]) // u
print(greeting[2]) // t
print(greeting[greeting.count - 1]) // !
Conditionally Conforming to a Protocol (where)
Generic Type은 오직 Generic parameter 가 Protocol 을 준수하는 경우와 같은 특정 조건에서만 Protocol 의 요구사항을
만족할 수 있다. 따라서 Generic Type 을 확장할 때 where를 이용해 constraints를 나열해 조건부로 준수하도록 만들어야한다.
이것은 추후 Generic Where Clauses 에서 자세히 다룬다.
Switch Value Binding with Where 에서 본 것 처럼 조건을 매칭시킬 때
where는 주로 추가적인 조건을constraints로 추가하기 위해 사용된다.
extension Array: TextRepresentable where Element: TextRepresentable {
var textualDescription: String {
let itemsAsText = self.map { $0.textualDescription }
return "[" + itemsAsText.joined(separator: ", ") + "]"
}
}
위 Protocol 은 Array 에 TextRepresentable Protocol 을 채택하는 것으로 확장한다. 그리고 이것이 작동하는 조건은
Array 의 Element 가 TextRepresentable 을 준수하는 경우로 제한한다.
그래야만 self.map { $0.textualDescription }에서 에러가 발생하지 않기 때문이다.
let myDice = [d6, d12]
print(myDice.textualDescription) // [A 6-sided dice, A 12-sided dice]
Element 가 TextRepresentable Protocol 을 따르는 Array이므로 Computed Property textualDescription를
Member 로 갖는다.
let myNumber = [1, 2, 4, 6]
let myString = ["A", "C", "F"]
myNumber.textualDescription // Property 'textualDescription' requires that 'Int' conform to 'TextRepresentable'
myString.textualDescription // Property 'textualDescription' requires that 'String' conform to 'TextRepresentable'
Element 가 TextRepresentable Protocol 을 따르지 않는 Array이므로 Computed Property textualDescription를
Member 로 갖지 않아 에러가 발생한다.
Declaring Protocol Adoption with an Extension
Protocol 을 채택해 확장하려는 기능이 이미 Type 에 존재한다면, 어떻게 해야할까? Swift Extensions
에서 살펴본 것처럼 Extension 은 Overriding 을 할 수 없다.
하지만 이 Type 이 어떤 Protocol 을 만족함을 명시적으로 표현해야 할 수 있다. 이 경우 extension을 이용해 Protocol 을 채택하되,
아무런 구현도 하지 않으면 된다. 즉, extension 의 body 를 아예 비워두면 된다.
이미 TextRepresentable 이 구현되어있는 Hamster Structure 가 있다.
struct Hamster {
var name: String
var textualDescription: String {
return "A hamster named \(name)"
}
}
let simonTheHamster = Hamster(name: "Simon")
print(simonTheHamster.textualDescription) // A hamster named Simon
let somethingTextRepresentable: TextRepresentable = simonTheHamster // Value of type 'Hamster' does not conform to specified type 'TextRepresentable'
이미 해당 기능이 구현되어있기 때문에 사용 가능하지만, TextRepresentable Protocol 을 따르고 있는 것은 아니기 때문에 에러가 발생한다.
따라서 위 Hamster 가 TextRepresentable Protocol 을 만족하도록 만들어보자.
extension Hamster: TextRepresentable {}
let somethingTextRepresentable: TextRepresentable = simonTheHamster
print(somethingTextRepresentable.textualDescription) // A hamster named Simon
Protocol 을 채택하지만 구현을 하지 않기 때문에 Overriding이 발생하지 않으므로 정상적으로 Extension 이 가능하다. 결과적으로
이제 Hamster 는 TextRepresentable 를 만족하는 것을 확인할 수 있다.
Adopting a Protocol Using a Synthesized Implementation
Swift 는 많은 Simple Cases 에 대해 자동으로 Equatable, Hashable, Comparable Protocol 을 만족하도록
할 수 있다. 이를 Synthesized Implementation(함성된 구현)이라 하며, Protocol 요구사항 구현을 직접 할 필요가 없다.
Synthesized Implementation of Equatable
Swift 는 다음 조건을 만족하는 Custom Types 에게 Equatable을 제공한다.
- Structures that have only stored properties & That stored properties conform to the Equatable protocol
- Enumerations that have only associated types & That associated types conform to the Equatable protocol
- Enumerations that have no associated types
위 조건을 만족하는 경우 ==, != 를 직접 구현하지 않고 Equatabe Protocol 을 채택함으로써
Synthesized Implementation을 제공할 수 있다.
struct Vector3D {
var x = 0.0, y = 0.0, z = 0.0
}
let alpha = Vector3D(x: 2.0, y: 3.0, z: 4.0)
let beta = Vector3D(x: 2.0, y: 3.0, z: 4.0)
if alpha == beta { // Binary operator '==' cannot be applied to two 'Vector3D' operands
print("These two vectors are also equivalent.")
}
==비교를 하기 위한 피연산 함수가 존재하지 않는다고 에러가 발생된다. 그런데 이 Structure 는 Stored Properties 만 저장
하고 있으며, 그 Stored Properties 는 Equatable Protocol 을 만족하므로 첫 번째 조건에 의해 Equatable Protocol 을
채택하는 것 만으로 자동으로 Synthesized Implementation을 제공할 수 있다.
struct Vector3D: Equatable {
var (x, y, z) = (0.0, 0.0, 0.0)
}
let alpha = Vector3D(x: 2.0, y: 3.0, z: 4.0)
let beta = Vector3D(x: 2.0, y: 3.0, z: 4.0)
if alpha == beta {
print("These two vectors are also equivalent.")
}
These two vectors are also equivalent.
Synthesized Implementation of Hashable
Swift 는 다음 조건을 만족하는 Custom Types 에게 Hashable을 제공한다.
- Structures that have only stored properties & That stored properties conform to the Hashable protocol
- Enumerations that have only associated types & That associated types conform to the Hashable protocol
- Enumerations that have no associated types
위 Equatable과 거의 동일하다는 것을 알 수 있다. 위 조건을 만족하는 경우 hashValue, hash(into:)를 직접 구현하지 않고
Hashable Protocol 을 채택함으로써 Synthesized Implementation을 제공할 수 있다.
참고로
HashableProtocol 은EquatableProtocol 을 준수한다.extension AnyHashable : Equatable {}따라서
HashableProtocol 을 준수하는 경우EquatableProtocol 의Synthesized Implementation을 함께 제공한다.
struct Vector3D: Hashable {
var (x, y, z) = (0.0, 0.0, 0.0)
}
let alpha = Vector3D(x: 2.0, y: 3.0, z: 4.0)
let beta = Vector3D(x: 2.0, y: 3.0, z: 4.0)
let hashAlpha = alpha.hashValue
let hashBeta = beta.hashValue
if alpha == beta {
print("These two vectors are also equivalent.")
}
print(hashAlpha)
print(hashBeta)
These two vectors are also equivalent.
-4042012231002845599
-4042012231002845599
Synthesized Implementation of Comparable
Swift 는 Raw Values 를 갖고 있지 않은 Enumerations 에게 다음 조건을 만족하는 경우 Comparable을
제공한다.
- Enumerations that have no Raw Values
- Enumerations that have no Raw Values
& Enumerations that have associated types
& That associated types conform to the Comparable protocol
위 조건을 만족하는 경우 <, <=, >, >= operator 를 직접 구현하지 않고 Comparable Protocol 을 채택함으로써
Synthesized Implementation을 제공할 수 있다.
enum SkillLevel: Comparable {
case beginner
case intermediate
case expert(stars: Int)
}
var levels = [SkillLevel.intermediate,
SkillLevel.beginner,
SkillLevel.expert(stars: 5),
SkillLevel.expert(stars: 3)]
if SkillLevel.intermediate > SkillLevel.beginner {
print("intermediate is higher level than beginner")
}
for level in levels.sorted() {
print(level)
}
intermidiate is higer level than beginner
beginner
intermediate
expert(stars: 3)
expert(stars: 5)
Collections of Protocol Types
[Protocols as Types]#h-protocols-as-types 이미 살펴보았듯이 Protocols 역시 First-Class Citizen 으로 다룰 수 있으므로 이것을 Collections 에 저장하는 것 역시 가능하다.
let d6 = Dice(sides: 6, generator: LinearCongruentialGenerator())
let d12 = Dice(sides: 12, generator: LinearCongruentialGenerator())
let simonTheHamster = Hamster(name: "Simon")
let things: [TextRepresentable] = [d6, d12, simonTheHamster]
for thing in things {
print(thing.textualDescription)
}
A 6-sided dice
A 12-sided dice
A hamster named Simon
Protocol Inheritance
Protocol 을 Classes, Structures, Enumerations 에 Adapt 시키는 것 말고도 Protocol 이
다른 Protocol 을 Inheritance하는 것 역시 가능하다.
Multiple Adapt 이 가능했던 것처럼 Multiple Inherit 역시 가능하다.
protocol InheritingProtocol: SomeProtocol, AnotherProtocol {
// protocol definition goes here
}
protocol TextRepresentable {
var textualDescription: String { get }
}
extension SnakesAndLadders: TextRepresentable {
var textualDescription: String {
return "A game of Snakes and Ladders with \(finalSquare) squares"
}
}
이제 이 TextRepresentable 를 상속해 PrettyTextRepresentable Protocol 을 만들고, 이것을 한 번 더 SnakesAndLadders 에 확장해보자.
protocol PrettyTextRepresentable: TextRepresentable {
var prettyTextualDescription: String { get }
}
extension SnakesAndLadders: PrettyTextRepresentable {
var prettyTextualDescription: String {
var output = textualDescription + ":\n"
for index in 1...finalSquare {
switch board[index] {
case let ladder where ladder > 0:
output += "▲ "
case let snake where snake < 0:
output += "▼ "
default:
output += "○ "
}
}
return output
}
}
let game = SnakesAndLadders()
print(game.prettyTextualDescription)
A game of Snakes and Ladders with 25 squares:
○ ○ ▲ ○ ○ ▲ ○ ○ ▲ ▲ ○ ○ ○ ▼ ○ ○ ○ ○ ▼ ○ ○ ▼ ○ ▼ ○
Class-Only Protocols
protocol SomeClassOnlyProtocol: AnyObject, SomeInheritedProtocol {
// class-only protocol definition goes here
}
Delegation Examples 에서 본 것처럼, Class 의 채택만 허용하려면, AnyObject를 상속시킴으로써
Class-Only Protocols로 marking 된다.
Class-Only Protocols 를 채택한 Class 는 반드시
delegate 를 Week Reference 로 선언해야한다.
Protocol 의 요구사항에 정의된 작동이
Value Semantics가 아닌Reference Semantics임을 가정하거나 요구하는 경우Class-Only Protocols를 사용한다.Which one choose Structures or Classes 에서 애플은
Inheritance관계를 설계할 때 처음부터Protocol을 사용하는 것을 권장하고있다. 따라서 Class 에만 채택되어야 하는 기능을 상속 구조로 설계할 때 Class Inheritance 대신Class-Only Protocols를 사용할 수 있다.
Protocol Composition
Protocol Composition between Protocols
동시에 여러 Protocols 를 준수하는 경우, 이것을 단일 요구사항으로 결합하는 것이 유용할 수 있다.
Protocol Composition은 SomeProtocol & Another Protocol과 같이 & 를 이용해 결합하며, 이것은
Temporary Local Protocol인 것처럼 작동한다.
다음은 Named 와 Aged Protocols 의 두 요구사항을 하나로 결합한다.
protocol Named {
var name: String { get }
}
protocol Aged {
var age: Int { get }
}
struct Person: Named, Aged {
var name: String
var age: Int
}
func wishHappyBirthday(to celebrator: Named & Aged) {
print("Happy birthday, \(celebrator.name), you're \(celebrator.age)!")
}
&에 의해 Named 와 Aged Protocols 는 결합되어 요구사항을 한 번에 만족하도록 구현할 수 있다.
let birthdayPerson = Person(name: "Harry", age: 11)
wishHappyBirthday(to: birthdayPerson) // Happy birthday, Harry, you're 11!
Protocol Composition with Classes
Named Protocol 과 Location Class 를 정의한다.
protocol Named {
var name: String { get }
}
class Location {
var latitude: Double
var longitude: Double
init(latitude: Double, longitude: Double) {
self.latitude = latitude
self.longitude = longitude
}
}
이제 Location 을 상속하고 Named 를 채택하는 City Class 를 정의한다.
class City: Location, Named {
var name: String
init(name: String, latitude: Double, longitude: Double) {
self.name = name
super.init(latitude: latitude, longitude: longitude)
}
}
let seattle = City(name: "Seattle", latitude: 47.6, longitude: -122.3)
이제 City seattle의 이름과 위치를 출력하는 함수를 만들어보자.
1 ) Case 1 - Subclass
func whereIs(_ city: City) {
print("\(city.name), latitude: \(city.latitude), longitude: \(city.longitude)")
}
가장 간단한 방법이다. 처음부터 Named 를 준수하는 Subclass City를 사용하는 것이다.
2 ) Case 2 - Downcasting
하지만 City가 아닌 위치 정보와 이름을 갖는 다른 Subclass Type 이 추가된다면 위 함수는 재사용을 할 수 없게된다.
따라서 Parameter 를 Superclass Location을 받도록 해야한다.
func whereIs(_ location: Location) {
print("\((location as? City)!.name), latitude: \(location.latitude), longitude: \(location.longitude)")
}
Downcating을 이용하면 Location 을 상속하고 Named 를 채택하는, 다른 Subclass Type 이 추가되더라도 Switch와
as를 이용한 Type Casting 을 이용해 함수를 재사용 할 수 있다.
3 ) Protocol Composition with Class
위 경우도 함수를 재사용 할 수는 있지만, Type 이 추가될 때마다 함수의 구현을 매번 수정해줘야하는 문제가 있다.
Protocol Composition는 이러한 경우 더욱 유연하게 대응할 수 있다.
func whereIs(_ location: Location & Named) {
print("\(location.name), latitude: \(location.latitude), longitude: \(location.longitude)")
}
Location 을 상속하고 Named 를 채택하는, 다른 Subclass Type이 추가되더라도 함수는 재사용 가능하며, 구현을 수정할 필요가 없다.
위 세 가지 방법 중 어떤 방법을 사용하든 다음 결과를 얻는다. 다만 Protocol Composition를 사용하는 것이 코드를 더 유연하게 만든다.
whereIs(seattle) // Seattle, latitude: 47.6, longitude: -122.3
Checking for Protocol Conformance
Type Casting 에서 설명했듯이 is와 as 연산자를 사용할 수 있다.
- is : Instance 가 Protocol 을 준수하면
true, 아니면false를 반환. - as? : Instance 가 Protocol 을 준수하면
Optional<Protocol Type>, 아니면nil을 반환. - as! : Instance 가 Protocol 을 준수하면
Protocol Type, 아니면Runtime Error를 trigger.
protocol HasArea {
var area: Double { get }
}
class Circle: HasArea {
let pi = 3.1415927
var radius: Double
var area: Double { pi * radius * radius }
init(radius: Double) { self.radius = radius }
}
class Animal {
var legs: Int
init(legs: Int) { self.legs = legs }
}
이제 3개의 Classes 를 하나의 배열에 담아 Type Checking 을 이용해 안전하게 순환시켜보자.
let objects: [AnyObject] = [
Circle(radius: 2.0),
Country(area: 243_610),
Animal(legs: 4)
]
objects.forEach {
if let objectWithArea = $0 as? HasArea {
print("Area is \(objectWithArea.area)")
} else {
print("Something that doesn't have an area")
}
}
Area is 12.5663708
Area is 243610.0
Something that doesn't have an area
Optional Protocol Requirements
Syntax
Protocol 의 Requirements 를 정의할 때 Optional 을 사용할 수 있다. 이를 Optional Requirements라 하며,
이것은 반드시 구현해야하는 책임을 갖지 않는다.
주의해야할 것이
Optional Requirements 는 Objective-C 와 상호 운용(interoperates)
을 위한 것으로, Protocol 의 Type 은 반드시 @objc 를 이용해 @objc Protocol로 정의해야한다.
또한 Optional Requirements 를 적용할 attributes 는 반드시 @objc를 이용해 @objc attribute로만 정의될 수 있다.
마지막으로 이것이 Optional임을 나타내기 위해 optional modifier 도 함께 작성해줘야한다.
@objc protocol SomeProtocol {
@objc optional var mustBeSettable: Int { get set }
@objc optional var doesNotNeedToBeSettable: Int { get }
@objc optional func someTypeMethod() -> SomeType
@objc optional init(someParameter: SomeType)
}
참고로 Protocol 이 구현 의무를 갖지 않도록 하는 방법은 Optional Protocol 외에도 Protocol Extensions 가 있다. 물론, Optional Protocols 와 작동 방식은 다르지만 기본 구현을 제공하며, 사용자 정의 구현도 가능하게 할 뿐 아니라 Class 가 아닌 Structure 나 Enumeration 에서도 사용할 수 있다는 장점을 갖는다.
Optional Protocols 의 구현 의무 면제가 왜 위험하고 주의해야하는지 잠시 후 Optional Protocols as Types 에서 소개한다.
단순히 Protocol 의 일부를
Optional로 정의하는 것이 목적이라면 다음 챕터인 Protocol Extensions 를 사용하는 것이 좋은 대안이 될 수 있다.
Optional Protocol Requirements in Action
@objc protocol Member {
var name: String { get set }
var age: Int { get set }
@objc optional var address: String { get }
}
Swift 만 사용해 코드를 작성하더라도 Optional Requirements 를 사용하려면 반드시
Optional Reuirements와Protocols모두@objc로 정의해야한다.
struct Teacher: Member { // Non-class type 'Teacher' cannot conform to class protocol 'Member'
var name: String
var age: Int
var address: String
}
Objective-C 와 상호 운용한다는 것은 이것이 Class이어야 함을 의미한다.
따라서 Structure 로 정의할 수 없다.
class Teacher: Member {
var name: String
var age: Int
var address: String
init(name: String, age: Int, address: String) {
self.name = name
self.age = age
self.address = address
}
}
class Student: Member {
var name: String
var age: Int
init(name: String, age: Int) {
self.name = name
self.age = age
}
}
Teacher 는 optional 을 포함해 name, age, address 를 모두 member 로 갖는다. 반면, Student 는 optional 을 제외하고 name, age 만 member 로 갖는다. 실제 객체가 정상적으로 작동되는지 확인해보자.
let jamie = Teacher(name: "Jamie", age: 42, address: "서울시 강남구")
let mike = Student(name: "Mike", age: 20)
var MemberList: [Member] = [jamie, mike]
for member in MemberList {
switch member {
case let manager as Teacher:
print("Teacher name is \(manager.name), he(she) is \(manager.age) years old, and lives in \(manager.address).")
case let student as Student:
print("Student name is \(student.name), he(she) is \(student.age) years old.")
default: break
}
}
Teacher name is Jamie, he(she) is 42 years old, and lives in 서울시 강남구.
Student name is Mike, he(she) is 20 years old.
Optional Members make them Optional Types
위 예제 만 보면 굉장히 유용해 보인다. 하지만 Optional Protocols 를 사용하는 것은 매우 조심해야한다.
Protocol 은 직접 채택하는 것 뿐 아니라 Protocol 을 Type 으로 사용할 수 있음을 앞에서 확인했다. 바로 이때 Optional Protocols 를 Types 로 사용할 때 왜 위험한지 알아보자.

Optional Members 는 구현 의무가 없기 때문에 이것을 Types 로 사용할 때, Members 의 Type 은 항상 Optional 이다.
즉, @objc optional var something: Int { get }의 Type 은 Int가 아니라 Int?다.
마찬가지로 @objc optional func someFunc(num: Int) -> String의 Type 은 (Int) -> String이 아니라
((Int) -> String)?이다.
for member in MemberList {
userInformation(user: member)
print("")
}
func userInformation(user: Member) {
print(user.name)
print(user.age)
print(user.address as Any)
}
Jamie
42
Optional("서울시 강남구")
Mike
20
nil
- 위 예제에서 Teacher, Student 는 switch 를 통해
Type Casting을 했기 때문에Member Protocol 을 채택한 Teacher, Student Types임을 명확히 알 수 있다. 따라서 Teacher Class 는 address 를StringType 을 명백히 갖고 있으므로 Optional 이 아니다. 또한, Student Class 는 address 를 갖고 있지 않음을 확힐히 알 수 있다.- 하지만 이번 예제는 Member 를 Type 으로 사용했다. 즉, Member Protocol 을 따르지만
Optional 이기 때문에 Class 가 구현 했는지 여부를 알 수 없다. 그렇기 때문에Optional("서울시 강남구")가 출력되는 것이다. 따라서 Optional Protocol 을 채택하는 Classes 를 사용할 때는 Protocols 를 Type 으로 사용하는 대신 적절한 Type 으로Downcasting하거나Optional Chaining으로 접근해야한다.
Optional Protocols as Types
위에서 살펴본 것처럼 Optional Protocols 를 Type 으로 사용할 때는 주의해야한다. 이것을 좀 더 극단적인 케이스를 이용해 더 깊게 알아보자.
@objc protocol CounterDataSource {
@objc optional func increment(forCount count: Int) -> Int
@objc optional var fixedIncrement: Int { get }
}
CounterDataSource 는 increment 라는 Optional Method 와 fixedIncrement 라는 Optional Property 를
갖고 있으며, 둘 다 Optional Members다.
즉, Protocol 을 채택하더라도 아무런 구현도 하지 않았을 가능성이 존재한다.
이런 요구사항을 준수하는 Class 를 만드는 것이 기술적으로는 가능하지만, 좋은 방법은 아니다. 이 Protocol 을 사용하지 않고 해당 요구사항을 준수하는 Class 의 구현을 할 수 있다.
이 Protocol 을 Class 가 직접 채택하지 말고 Type 으로 사용해보자.
class Counter {
var count = 0
var dataSource: CounterDataSource
func increment() {
if let amount = dataSource.increment?(forCount: count) {
count += amount
} else if let amount = dataSource.fixedIncrement {
count += amount
}
}
init(dataSource: CounterDataSource) {
self.dataSource = dataSource
}
convenience init(count: Int, dataSource: CounterDataSource) {
self.init(dataSource: dataSource)
self.count = count
}
}
그런데 dataSource 가 Type 으로 사용하는 CounterDataSource Protocol 은 모든 Members 를 구현하지 않아도 되므로,
실제 아무런 구현도 하지 않았을 가능성이 존재한다. 따라서 CounterDataSource 가 아닌 CounterDataSource?를 사용하는 것이
적합하다.
class Counter {
var count = 0
var dataSource: CounterDataSource?
func increment() {
if let amount = dataSource?.increment?(forCount: count) {
count += amount
} else if let amount = dataSource?.fixedIncrement {
count += amount
}
}
}
increment(forCount:)호출을 보자. 첫 번째?은CounterDataSource? Type이므로 사용되었고, 두 번째?은 increment 가Optional Member이므로 구현 여부를 알 수 없어 사용되었다. 즉, 이렇게Optional Chaining을 이용해 접근해야 안전하다.- 함수에서 if clause 와 else clause 에서
let amount가 가능한 이유는increment(forCount:)와fixedIncrement모두 Optional Types 이므로Optional Binding이 가능한 것이다.
Counter 를 작동시켜보자.
var counter = Counter()
for _ in 1...4 {
counter.increment()
print(counter.count)
}
0
0
0
0
var dataSource: CounterDataSource?가 nil이기 때문에 count = 0 에 의해 0에 매번 0을 더하므로 모두 0이다.
dataSource 에 할당할 CounterDataSource Type 의 Class 를 하나 만들어보자.
class ThreeSource: NSObject, CounterDataSource {
let fixedIncrement = 3
}
이번에는 이 Class 를 var dataSource: CounterDataSource?에 할당 후 Counter 를 작동시켜보자.
var counter = Counter()
counter.dataSource = ThreeSource()
for _ in 1...4 {
counter.increment()
print(counter.count)
}
3
6
9
12
이번에는 fixedIncrement가 아닌 increment(forCount:)를 이용해 Counter 를 작동시켜보자.
class TowardsZeroSource: NSObject, CounterDataSource {
func increment(forCount count: Int) -> Int {
if count == 0 {
return 0
} else if count < 0 {
return 1
} else {
return -1
}
}
}
var counter = Counter()
counter.count = -4
counter.dataSource = TowardsZeroSource()
Array(1...5).forEach { _ in
counter.increment()
print(counter.count)
}
-3
-2
-1
0
0
Protocol Extensions
Providing Default Implementations
Protocol 은 이것을 준수하는 Type 에 기능을 제공하기 위해 Extensions 을 이용해
Computed Properties, Initializers, Methods, Subscripts의 기본 구현을 적합성을 준수하는 Type 에
추가할 수 있다.
이는 Global Function 을 추가하거나 추가된 Protocol 채택으로 인해 개별 Type 마다 적합성을 다시 추가하는 대신
Protocol Extensions를 사용해 기능을 제공할 수 있다.
Protocol Extensions이 기본 구현을 반드시 제공하기 때문에 이 Protocols 를 채택하는 Types 는 적합성을 만족하기 위한 구현을 강요받지 않으며, 기능의 구현이 보장되므로 Optional Protocols 와 다르게 Optional Chaining 없이 호출될 수 있다.
protocol RandomNumberGenerator {
func random() -> Double
}
class LinearCongruentialGenerator: RandomNumberGenerator {
var lastRandom = 42.0
let m = 139968.0
let a = 3877.0
let c = 29573.0
func random() -> Double {
lastRandom = ((lastRandom + a + c).truncatingRemainder(dividingBy: m))
return lastRandom / m
}
}
의사 난수(pseudorandom number) 생성기에 Bool을 반환하는 함수를 추가해보자.
1 ) Class Inheritance
protocol RandomBoolGenerator: RandomNumberGenerator {
func randomBool() -> Bool
}
extension LinearCongruentialGenerator: RandomBoolGenerator {
func randomBool() -> Bool {
random() > 0.5
}
}
상속을 이용할 경우 우리는 다음과 같이 3가지를 구현해야한다.
- RandomNumberGenerator 를 상속한 RandomBoolGenerator Protocol 정의.
- Extension 을 이용해 LinearCongruentialGenerator Class 에 RandomBoolGenerator 를 추가로 채택.
- 채택된 RandomBoolGenerator Protocol 을 준수하도록 정의.
2 ) Protocol Extensions
그런데 LinearCongruentialGenerator Class 는 이미 RandomNumberGenerator Protocol 을 준수하고있다.
따라서 Protocol Extensions를 사용하면 Protocol 을 준수하는 Type 에 Protocol 자체를 확장함으로써 기능을
쉽게 추가할 수 있다.
extension RandomNumberGenerator {
func randomBool() -> Bool {
random() > 0.5
}
}
Array(1...5).forEach { _ in print("Here's a random Boolean: \(generator.randomBool())") }
Here's a random Boolean: false
Here's a random Boolean: false
Here's a random Boolean: true
Here's a random Boolean: true
Here's a random Boolean: false
Overriding Default Implementations
protocol RandomNumberGenerator {
func random() -> Double
}
extension RandomNumberGenerator {
func randomBool() -> Bool {
random() > 0.5
}
}
RandomNumberGenerator 를 확장하고, RandomNumberGenerator 를 채택해 다음과 같이 LinearCongruentialGenerator 에 적합성을 추가하면
class LinearCongruentialGenerator: RandomNumberGenerator {
var lastRandom = 42.0
let m = 139968.0
let a = 3877.0
let c = 29573.0
func random() -> Double {
lastRandom = ((lastRandom + a + c).truncatingRemainder(dividingBy: m))
return lastRandom / m
}
}
이 LinearCongruentialGenerator Class 는 확장된 RandomNumberGenerator의 기본 구현을 받아 다음과 같은 형태인 것처럼
작동할 것이다.
class LinearCongruentialGenerator: RandomNumberGenerator {
var lastRandom = 42.0
let m = 139968.0
let a = 3877.0
let c = 29573.0
func random() -> Double {
lastRandom = ((lastRandom + a + c).truncatingRemainder(dividingBy: m))
return lastRandom / m
}
func randomBool() -> Bool {
random() > 0.5
}
}
그런데 이것의 구현을 변경하고 싶다면 어떻게 해야할까? Default 로 제공된 이 구현을 다르게 하고 싶다면 어떻게 해야할까?
만약 이것을 Protocol Extensions 가 아닌 Protocols 로 정의했다면 매번 RandomBoolGenerator Protocol 을 채택할 때 적합성 구현을 해야하므로 필요한 Type 에 맞게 구현을 변경하면 된다.
extension LinearCongruentialGenerator: RandomBoolGenerator {
func randomBool() -> Bool {
random() > 0.8
}
}
반면 Extensions 은 구현의 의무가 없기 때문에 그냥 RandomNumberGenerator Protocol 을 채택한 후 Extensions 가 기본 구현을 제공하기로 한 기능을 직접 구현하면 된다.
class LinearCongruentialGenerator: RandomNumberGenerator {
var lastRandom = 42.0
let m = 139968.0
let a = 3877.0
let c = 29573.0
func random() -> Double {
lastRandom = ((lastRandom + a + c).truncatingRemainder(dividingBy: m))
return lastRandom / m
}
func randomBool() -> Bool {
random() > 0.8
}
}
그러면 Extensions 은 기본 구현을 제공할 뿐 어떠한 구현도 강요하지 않기 때문에 Protocol 의 기능을 직접적으로 수행하지 않는다.
따라서 randomBool()은 LinearCongruentialGenerator Class 의 구현에 의해 Overriding 된다.
let generator = LinearCongruentialGenerator()
Array(1...5).forEach { _ in print("Here's a random Boolean: \(generator.randomBool())") }
Here's a random Boolean: false
Here's a random Boolean: false
Here's a random Boolean: false
Here's a random Boolean: true
Here's a random Boolean: false
이로써 별도의 구현 변경이 필요하지 않은 경우 RandomBoolGenerator Protocol 을 채택하는 것 만으로 우리는
func randomBool() -> Bool {
random() > 0.5
}
를 기본 구현으로 사용할 수 있으며, 필요시 이를 직접 구현해 Overriding 시켜 사용할 수 있다.
Adding Constraints to Protocol Extensions (where)
Conditionally Conforming to a Protocol (where) 에서
이미 Protocol 에 where를 이용해 constraints를 추가하는 것을 확인했다.
extension Array: TextRepresentable where Element: TextRepresentable {
var textualDescription: String {
let itemsAsText = self.map { $0.textualDescription }
return "[" + itemsAsText.joined(separator: ", ") + "]"
}
}
이번엔 이를 좀 더 일반화 시켜 Collection 에 기능을 추가해보자. 단, 정상적인 동작을 위해 Element 이 Equatable 에 적합한
경우로 제한하도록한다.
extension Collection where Element: Equatable {
func allEqual() -> Bool {
for element in self {
if element != self.first {
return false
}
}
return true
}
}
위 Protocol 은 모든 Element 가 Equatable을 만족하는 Collection 에게 자기 자신의 모든 Element 가 동일한지를 판별 후
Boolean 을 반환하는 allEqual() 메서드를 추가한다.
let equalNumbers = [100, 100, 100, 100, 100]
let differentNumbers = [100, 100, 200, 100, 200]
print(equalNumbers.allEqual()) // true
print(differentNumbers.allEqual()) // false
위 코드는 Protocol Extensions 와 constraints 를 이용해 기능을 확장하는 것을 어떤식으로 활용할 수 있는가 설명하기 위한 것으로 실제 위와 같이 단순한 코드는 따로 구현할 필요 없이 Swift 가 이미 모든걸 제공하고있다.
Higher-order Functions를 사용하면 Collection 의 모든 값이 같은지 또는 어떤 값을 포함하고 있는지를 손쉽게 처리할 수 있다.
- Swift 는
allSatisfy와contains를 이용해 손쉽게 처리할 수 있다.
print(equalNumbers.allSatisfy { $0 == equalNumbers[0] }) // true
print(differentNumbers.allSatisfy { $0 == differentNumbers[0] }) // false
print(equalNumbers.contains { $0 == 200 }) // false
print(differentNumbers.contains { $0 == 200 }) // true
- TypeScript 는
every와some을 이용해 손쉽게 처리할 수 있다.
const equalNumbers: Array<number> = [100, 100, 100, 100, 100]
const differentNumbers: Array<number> = [100, 100, 200, 100, 200]
console.log(equalNumbers.every(v => v === equalNumbers[0])) // true
console.log(differentNumbers.every(v => v === equalNumbers[0])) // false
console.log(equalNumbers.some(v => v === 200)) // false
console.log(differentNumbers.some(v => v === 200)) // true
22. Generics 👩💻
Generic Functions
Syntax
Generic code는 정의한 요구사항에 맞는 모든 타입에서 작동(work with any type)할 수 있는 유연하고 재사용 가능한
함수와 타입을 작성할 수 있다.
Generic 은 Swift 의 강력한 특징 중 하나로 대부분의 Swift stardard library는 Generic code 로 작성되었다.
예를 들어 Swift 의 Array 와 Dictionary Types 는 Generic Collections다. Array 를 이용해 우리는
Int 를 저장할 수도 있고, String 을 저장할 수도 있고, Swift 에서 생성될 수 있는 모든 Type 을 저장할 수 있다.
다음은 Swift stardard library에 이미 built-in 된 swap(_:_:) 이라는 함수가 어떤 식으로 정의되었는지를 보여준다.
func swap<T>(_ a: inout T, _ b: inout T) {
let temporaryA = a
a = b
b = temporaryA
}
var someDouble = 6.2
var anotherDouble = 20.2
swap(&someDouble, &anotherDouble)
print("someDouble is now \(someDouble), and anotherDouble is now \(anotherDouble)")
// someDouble is now 20.2, and anotherDouble is now 6.2
var someString = "Apple"
var anotherString = "Pear"
swap(&someString, &anotherString)
print("someString is now '\(someString)', and anotherString is now '\(anotherString)'")
// someString is now 'Pear', and anotherString is now 'Apple'
위 swap(_:_:) 함수는 Parameter Types 에 따라 (Int, Int) -> Void, (Double, Double) -> Void,
(String, String) -> Void 로 작동하는 하나의 함수로 정의된다. Generic Functions 없이 정의한다면 위 함수는
3개를 만들어 Overloading 처리를 해야 한다.
Placeholder Type T
func swap(_ a: inout Int, _ b: inout Int)
func swap<T>(_ a: inout T, _ b: inout T)
Nongeneric Function 와 Generic Function 를 비교해보자.
swap<T>: Swift 에게 swap 함수를 정의할 때<T>라는Type Parameters를 사용할 것임을 알린다.- (_ a: inout T, _ b: inout T) : 이 함수 내에서 함수의 호출 시점에 Types 가 정해지는 Generic Types
T를 사용할 수 있다.
T라는 Type 은 Swift 내에 존재하지 않는다. 이것은 미리 정의되지 않은 함수가 호출될 때Type Inference에 의해 Type 이 정해짐을 의미한다.따라서 Generic Function
swap(_:_:)은 위에서 정의한 Int, Double, String 3가지 타입에 대해 모두 작동한다.
Type Parameters <T>
위 swap(_:_:)에서 Placeholder Type T는 Type Parameters의 한가지 예시를 보여준다. Type Parameters 는 함수의
이름 뒤에 위치하며 <T>와 같이 angle brackets < >로 감싸 정의한다.
Type Parameters 를 정의하면, 함수의 정의에서 Parameters 에 이것을 Placeholder Type 으로 사용할 수 있게 한다.
바로 (_ a: inout T, _ b: inout T) 부분이다. Type Parameter <T> 를 정의했기 때문에 함수 정의에서 Parameters
a, b에 Type Parameter T 를 Placeholder Type 으로 사용할 수 있는 것이다.
Naming Type Parameters
위에서는 Type Parameters 의 이름으로 T를 사용했지만 이것은 반드시 T를 쓰도록 정해진 것은 아니다. 다만 의도를 내치비기 위해 보통
다음과 같이 정의한다.
- 구분되는 관계가 있는 경우 :
Dictionary<Key, Value>,<Key, Value>,<K, V>,Array<Element>,<E>와 같이 이름을 통해 관계를 유추할 수 있도록 사용한다. - 별다른 관계가 없는 경우 : 정해진 규칙은 없지만 전통적으로
T,U,V와 같은 단일 대문자를 사용하는 것이 일반적이다.
Type Parameters 를 정의할 때는 이것이
Placeholder Type 으로 사용된다는 것을 나타내기 위해Upper Camel Case를 사용한다. (i.e. T, U, Key, Value, MyTypeParameter)
Generic Types
Syntax
Swift 의 Array 와 Dictionary Types 는 Generic Collections라고 설명했다. 이렇듯 Swift 는 Generic Functions
외에도 Generic Types를 정의할 수 있으며, Array, Dictionary 와 유사하게 모든 타입에서 작동할 수 있는 Custom Classes,
Structures, Enumerations 다.
Stack 은 Pushing과 Popping을 통해 작동하며 LIFO 로 작동한다. 이 Stack 을 이용해 Generic Types 를 설명한다.
struct Stack<Element> {
var items: [Element] = []
mutating func push(_ item: Element) {
items.append(item)
}
mutating func pop() -> Element {
items.removeLast()
}
}
var intStack = Stack(items: [3, 2, 5])
print(intStack) // Stack<Int>(items: [3, 2, 5])
intStack.push(8)
print(intStack) // Stack<Int>(items: [3, 2, 5, 8])
intStack.pop()
print(intStack) // Stack<Int>(items: [3, 2, 5])
Stack 을 이번엔 String 을 저장하는데 사용해보자.
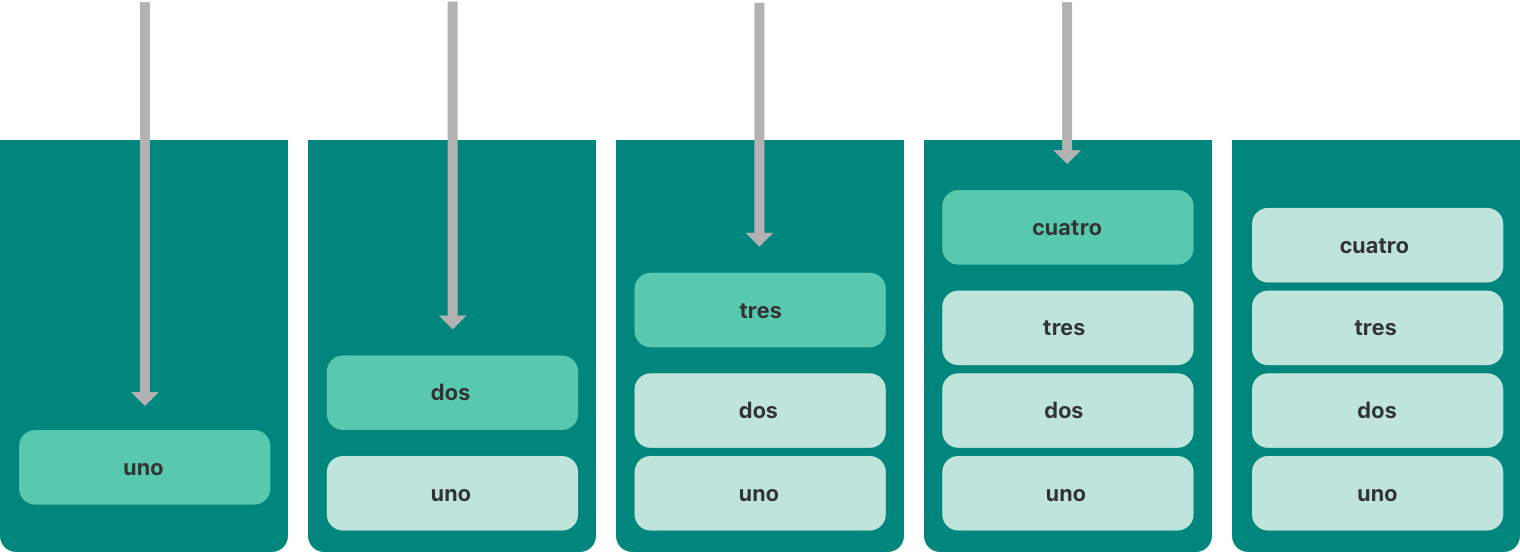
var stringStack = Stack<String>()
stringStack.push("uno")
stringStack.push("dos")
stringStack.push("tres")
stringStack.push("cuatro")
print(stringStack) // Stack<String>(items: ["uno", "dos", "tres", "cuatro"])
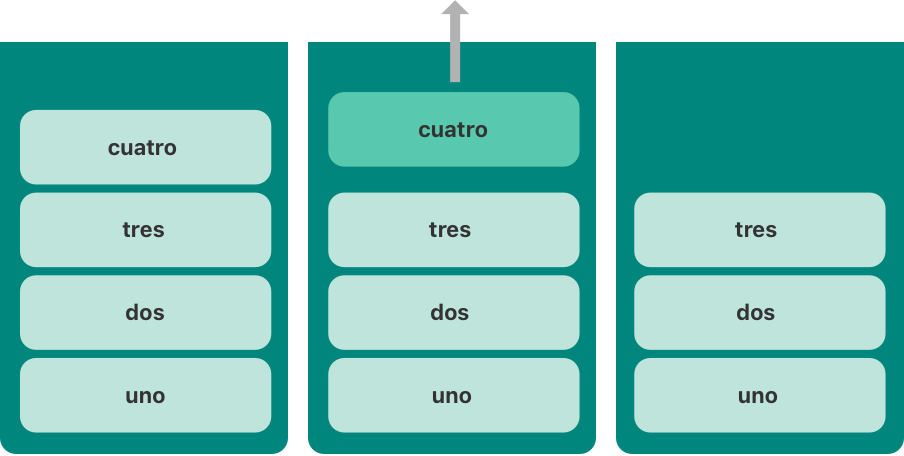
print(stringStack.pop()) // cuatro
print(stringStack) // Stack<String>(items: ["uno", "dos", "tres"])
Extending a Generic Type
Generic Type 을 확장할 때는 다른 Types 를 확장할 때와 마찬가지로 정의할 때 Type 을 정의하지 않는다. 따라서 Extension은
별도의 정의 없이 Original Type Parameters를 그대로 사용한다.
위 Stack 을 확장해 Element 를 제거하지 않고 가장 마지막 Element 를 반환하는 Read-Only Computed Properties 를 추가해보자.
extension Stack {
var topItem: Element? {
items.last
}
}
var stringStack = Stack<String>()
stringStack.push("uno")
stringStack.push("dos")
stringStack.push("tres")
stringStack.push("cuatro")
print(stringStack) // Stack<String>(items: ["uno", "dos", "tres", "cuatro"])
if let topItem = stringStack.topItem {
print(topItem) // cuatro
}
print(stringStack) // Stack<String>(items: ["uno", "dos", "tres", "cuatro"])
Type Constraints
Syntax
위에서 정의한 swap(_:_:) 함수와 Stack 은 모든 타입에서 작동한다.
하지만 때로는 Generic 으로 사용할 수 있는 Types 에 type constraints를 강제하는 것이 유용할 수 있다. Type constraints 는
Type Parameters 가 특정 Class 를 상속하거나 Protocol 을 준수해야함을 지정한다.
예를 들어 Dictionary Type 은 Key 의 Type 은 Hashable 을 준수하는 것으로 제한한다. 그래야만 특정 키에 값이 이미 포함되어 있는지 확인
후 삽입할지 대체할지 판단할 수 있기 때문이다(Swift 의 모든 기본 타입 String, Int, Double, Bool 은 모두 Hashable 을 준수한다).
따라서 사용자는 사용자 정의 Generic Types 를 정의할 때 constraints 를 제공하는 것은 Generic Programming 을 더욱 강력하게 한다. 예를 들어 Hashable 과 같은 추상적 개념을 사용하는 것은 구체적인 유형이 아닌 개념적 특성에서 Type 의 특성을 강화한다.
func someFunction<T: SomeClass, U: SomeProtocol>(someT: T, someU: U) {
// function body goes here
}
위 함수는 2개의 Type Parameters를 갖는다. T 는 SomeClass 의 Subclass이어야하고, U 는 SomeProtocol 을 준수해야한다는
constraints 를 추가한다.
Type Constraints in Action
1 ) Nongeneric Function
다음은 찾아야 할 String과 찾아야 하는 대상 [String]을 받는 findIndex(ofString:in:)이라는 Nongeneric Function 이다.
func findIndex(ofString valueToFind: String, in array: [String]) -> Int? {
for (index, value) in array.enumerated() {
if value == valueToFind {
return index
}
}
return nil
}
let strings = ["cat", "dog", "llama", "parakeet", "terrapin"]
if let dogIndex = findIndex(ofString: "dog", in: strings) {
print("The index of dog is \(dogIndex).")
} else {
print("The dog is not in the array.")
}
if let bearIndex = findIndex(ofString: "bear", in: strings) {
print("The index of bear is \(bearIndex).")
} else {
print("The bear is not in the array.")
}
The index of dog is 1.
The bear is not in the array.
2 ) Generic Function
이제 이 함수를 Generic Function 으로 바꿔보자.
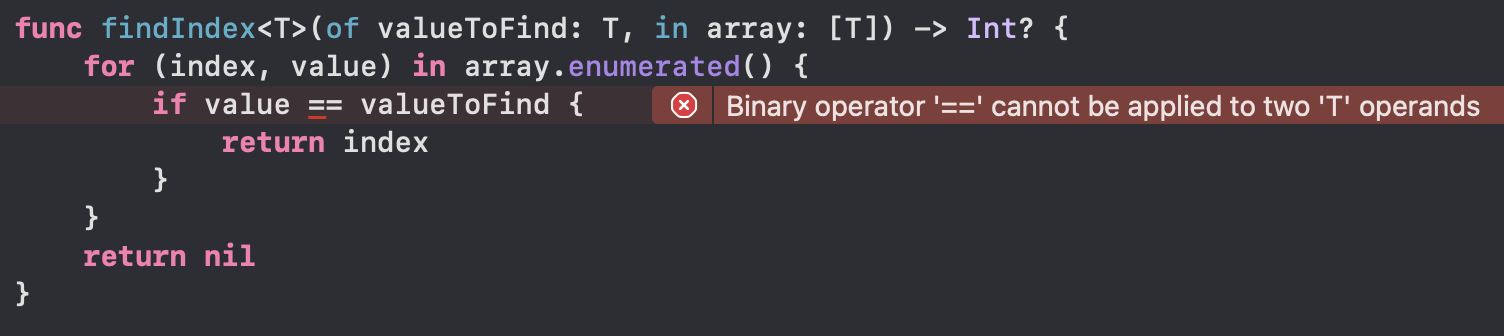
예상과 달리 compile-error 가 발생한다. == operator 를 사용하기 위해서는 Equatable 을 준수해야 하기 때문이다.
따라서 우리는 Type Parameter <T>에 Equatable Protocol 을 준수(confirm)하는 것으로 constraints를 추가해
문제를 해결할 수 있다.
func findIndex<T: Equatable>(of valueToFind: T, in array: [T]) -> Int? {
for (index, value) in array.enumerated() {
if value == valueToFind {
return index
}
}
return nil
}
if let doubleIndex = findIndex(of: 9.3, in: [3.14159, 0.1, 0.25]) {
print("The index of 9.3 is \(doubleIndex).")
} else {
print("The 9.3 is not in the array.")
}
if let stringIndex = findIndex(of: "Andrea", in: ["Mike", "Malcolm", "Andrea"]) {
print("The index of Andrea is \(stringIndex).")
} else {
print("Andrea is not in the array.")
}
The 9.3 is not in the array.
The index of Andrea is 2.
Associated Types
Syntax
Protocol 을 정의할 때 때로는 Associated Type을 사용하는 것이 유용할 때가 있다. Associated Type 은 Protocol 에서
사용될 Type 의 이름을 제공한다. 반면 실제 Type 은 Protocol 이 채택될 때 정해진다는 점에서
Type Parameter 를 이용해 Generic Types 를 정의하는 것과 유사하다.
Classes, Structures, Enumerations 에서 Types 에 대한 판단을 보류하고 Type Inference 를 사용하기 위해 Generic Types 를 사용했다.
Protocols 는 Types 에 대한 판단을 보류하고 Type Inference 를 사용하기 위해 Associated Types 를 사용한다.
만약, Generic Types 를 사용하지 않는다면
n개의 Types 에 대한 Structures 를 위해n 개의 서로 다른 Structures 를 정의해야했다.
마찬가지로, Associated Types 를 사용하지 않는다면n개의 Types 에 대한 Protocols 를 위해n 개의 서로 다른 Protocols 를 정의해야한다.
즉, 3가지 Types 를 정의하고자 할 경우n + n개가 필요하므로6개의 정의와 3번의 Protocols 채택과 준수가 필요하다.Generic Types 와 Associated Types 는 이런 문제를 해결하고 코드를 유연하게 만든다.
protocol SomeProtocol {
associatedtype Item
// protocol body goes here
}
위에서 Item은 [Type Parameter] 의 Dictionary<Key, Value>, Array<Element>, <T>와 같이
Protocol 을 정의할 때 사용할 이름을 제공하는 반면 Type 은 실제 채택될 때 정해지도록 판단을 미룬다.
Protocol 은 함수의 return type 으로 사용될 수 있지만, Associated Types 를 갖고 있는 Protocol 은 return type 으로 사용될 수 없다. 이에 대해서는 다음 챕터의 Protocol Has an Associated Type Cannot Use as the Return Types 에서 설명한다. 이 문제를 해결하기 위해 우리는 잠시 후 Using a Protocol in Its Associated Type’s Constraints 와 같이 명확한 Type 을 반환하도록 함수의 로직을 변경하거나, 이것이 불가능할 경우, Opaque Types 를 사용할 수 있다.
따라서 Associated Types 역시 Generic Types 와 마찬가지로
protocol IntContainer {
mutating func append(_ item: Int)
var count: Int { get }
subscript(i: Int) -> Int { get }
}
protocol StringContainer {
mutating func append(_ item: String)
var count: Int { get }
subscript(i: Int) -> String { get }
}
와 같은 문제를 해결해 하나의 정의로 재사용 할 수 있게 한다.
protocol Container {
associatedtype Item
mutating func append(_ item: Item)
var count: Int { get }
subscript(i: Int) -> Item { get }
}
Associated Types in Action
이번에는 위에서 정의한 Container Protocol 을 실제로 채택하는 것을 살펴보자.
1 ) Nongeneric IntStack Type adopts and conforms to the Container Protocol
struct IntStack {
var items: [Int] = []
mutating func push(_ item: Int) {
items.append(item)
}
mutating func pop() -> Int {
items.removeLast()
}
}
Generic Types 에서 정의한 Nongeneric IntStack Type 에 Container Protocol 을 채택하고 준수하도록 만들어보자.
struct IntStack: Container {
// original IntStack implementation
var items: [Int] = []
mutating func push(_ item: Int) {
items.append(item)
}
mutating func pop() -> Int {
items.removeLast()
}
// conformance to the Container protocol
typealias Item = Int
mutating func append(_ item: Int) {
self.push(item)
}
var count: Int {
items.count
}
subscript(i: Int) -> Int {
items[i]
}
}
typealias Item = Int는 Swift 의 Type Inference 에 의해 유추 가능하기 때문에 생략 가능하다.
2 ) Generic Stack Type adopts and conforms to the Container Protocol
struct Stack<Element> {
var items: [Element] = []
mutating func push(_ item: Element) {
items.append(item)
}
mutating func pop() -> Element {
items.removeLast()
}
}
이번에는 Container Protocol 을 위에서 정의했던 Generic Stack 에 채택해보자.
struct Stack<Element>: Container {
// original Stack<Element> implementation
var items: [Element] = []
mutating func push(_ item: Element) {
items.append(item)
}
mutating func pop() -> Element {
items.removeLast()
}
// conformance to the Container protocol
mutating func append(_ item: Element) {
self.push(item)
}
var count: Int {
items.count
}
subscript(i: Int) -> Element {
items[i]
}
}
var intStack = Stack(items: [3, 2, 5])
intStack.push(8)
print(intStack) // Stack<Int>(items: [3, 2, 5, 8])
intStack.append(7)
print(intStack) // Stack<Int>(items: [3, 2, 5, 8, 7])
print(intStack.count) // 5
print(intStack[3]) // 8
var stringStack = Stack<String>()
stringStack.push("uno")
stringStack.append("dos")
stringStack.push("tres")
stringStack.append("cuatro")
print(stringStack) // Stack<String>(items: ["uno", "dos", "tres", "cuatro"])
print(stringStack[1]) // dos
이제 Stack 은 Int, String 두 타입 모두에서 Associated Types 를 이용한 Container Protocol 까지 준수한다.
Extending an Existing Type to Specify an Associated Type
Adding Protocol Conformance with an Extension 에서 설명한 것처럼 Protocols 에 준수성(conformance)를 추가하기 위해 기존 Type 을 확장할 수 있는데 이때 Associated Types 가 있는 Protocols 를 포함한다.
Swift 의 Array는 이미 append(_:) method, count property, Int index 로 Element 를 조회하는 [i] subscript
를 제공한다. 이것은 위에서 Container protocol 을 통해 적합성을 추가한 것과 일치한다.
즉, Declaring Protocol Adoption with an Extension
에서 설명한 것처럼 Array 에 이미 적합성을 준수하는 구현이 존재하기 때문에 Extension 을 이용해 Protocols 를 채택하고
비워두는 것 만으로 Array 에 Container Protocol 적합성을 추가할 수 있다.
var numbers = [1, 2, 5, 7, 8, 14]
numbers.append(99)
print(numbers) // [1, 2, 5, 7, 8, 14, 99]
print(numbers.count) // 7
print(numbers[2]) // 5
Array 는 이미 Container Protocol 의 구현을 제공하고있다.
if numbers is any Container {
print("numbers conforms the Container protocol.")
} else {
print("numbers do not conform the Container protocol.")
}
numbers do not conform the Container protocol.
하지만 Container Protocol 을 채택하지 않았기 때문에 Container Protocol 을 준수하지는 않는다.
Array 를 확장해 Container Protocol 을 채택하는 것 만으로 적합성을 추가할 수 있다.
extension Array: Container {}
if let _ = numbers as? any Container {
print("numbers conforms the Container protocol.")
} else {
print("numbers do not conform the Container protocol.")
}
numbers conforms the Container protocol.
Adding Constraints to an Associated Type
Protocols 를 채택한 Types 에 특정 요구사항을 준수하도록 하기 위해 constraints 를 추가할 수 있다.
Syntax
protocol SomeProtocol {
associatedtype Item: Equatable
// protocol body goes here
}
우선 Swift 의 기본 Array Type 의 작동을 살펴보자.
var arrayA = [1, 5, 6]
var arrayB = [1, 5, 6]
print(arrayA == arrayB) // true
var arrayC = ["A", "B", "C"]
var arrayD = ["A", "C", "B"]
print(arrayC == arrayD) // false
Array Type 은 Equatable 을 준수하기 때문에 위와 같은 비교가 가능하다.
그렇다면 이 Array 를 담은 Structure 는 어떨까?
struct Some<Element> {
var items: [Element] = []
}
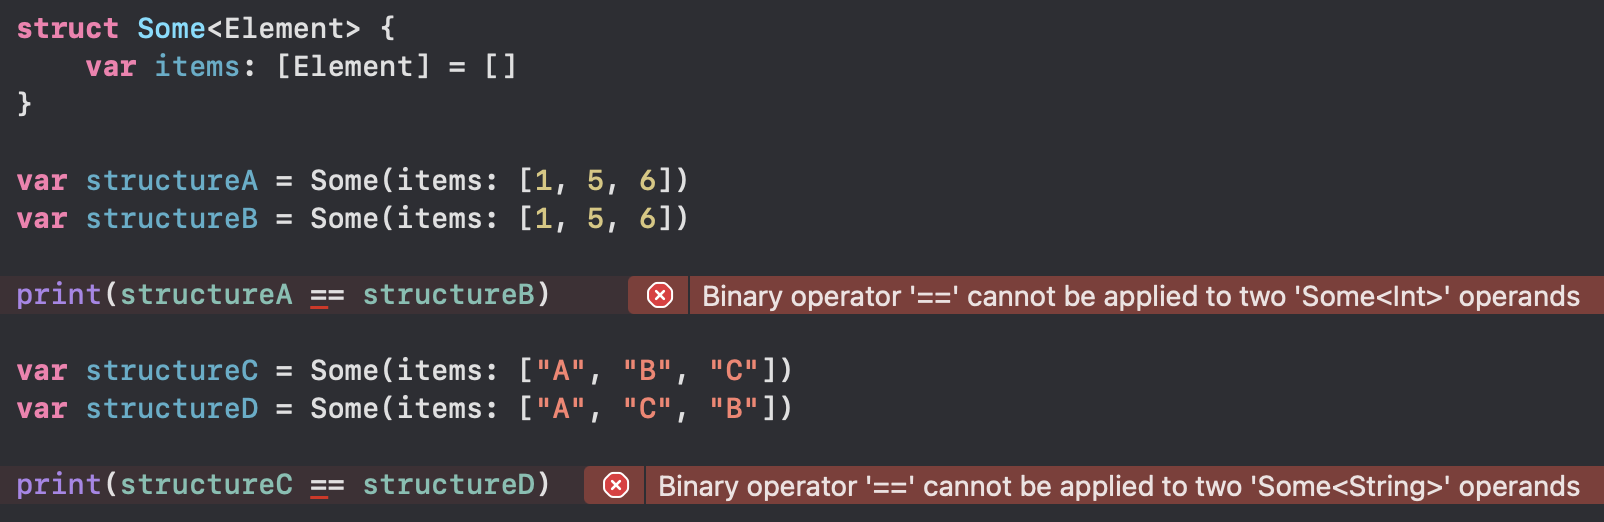
Structure 가 저장하고 있는 Array 는 Equatable 을 준수하더라도 Structure 는 이를 준수하지 않기 때문에 Equatable 을 준수하도록 해야한다.

Structure 에 Equatable 을 추가했다. 이로써 Structure 는 Equatable 을 준수할 수 있어야하지만, Element 가 이미 Equatable 을 준수하는 Int, Double, String 같은 Swift 의 Basic Types 가 아닌 Generic Types 이므로, 이에 대한 Equatable 준수 또한 필요하다.
struct Some<Element: Equatable>: Equatable {
var items: [Element] = []
static func == (lhs: Some<Element>, rhs: Some<Element>) -> Bool {
lhs.items == rhs.items
}
}
이로써 우리는 Generic Types Element 에 Equatable 을 준수하도록 하고,
Structure 역시 Equatable 을 준수하도록 함으로써 == operator 를 사용할 수 있게 된다.
var structureA = Some(items: [1, 5, 6])
var structureB = Some(items: [1, 5, 6])
print(structureA == structureB) // true
var structureC = Some(items: ["A", "B", "C"])
var structureD = Some(items: ["A", "C", "B"])
print(structureC == structureD) // false
이번에는 위에서 정의한 Container Protocol
protocol Container {
associatedtype Item
mutating func append(_ item: Item)
var count: Int { get }
subscript(i: Int) -> Item { get }
}
의 Associated Types 에 constraints 를 추가해 다음과 같이 바꿔보자.
protocol Container {
associatedtype Item: Equatable
mutating func append(_ item: Item)
var count: Int { get }
subscript(i: Int) -> Item { get }
}
이제 이 Protocol 을 준수하려면 Item Type 은 Equatable 을 준수해야한다. Stack 이 Container Protocol 을 준수하도록 해보자.
struct Stack<Element: Equatable>: Container {
// original Stack<Element> implementation
var items: [Element] = []
mutating func push(_ item: Element) {
items.append(item)
}
mutating func pop() -> Element {
items.removeLast()
}
// conformance to the Container protocol
mutating func append(_ item: Element) {
self.push(item)
}
var count: Int {
items.count
}
subscript(i: Int) -> Element {
items[i]
}
// conformance to the Equatable protocol
static func == (lhs: Stack<Element>, rhs: Stack<Element>) -> Bool {
lhs.items == rhs.items
}
}
var someStack = Stack(items: [3, 2, 5])
var anotherStack = Stack(items: [3, 2, 5])
print(someStack == anotherStack) // true
이로써 Container Protocol 의 Item 에 Equatable constraints 를 추가해 채택하는 Types 가 이를 준수하도록 구현을 강제한다.
참고로 위 Container 준수는 다음과 같이 Protocols 채택을 Extensions 로 분리해 코드를 더 명확히 구분지을 수 있다.
struct Stack<Element: Equatable> {
// original Stack<Element> implementation
var items: [Element] = []
mutating func push(_ item: Element) {
items.append(item)
}
mutating func pop() -> Element {
items.removeLast()
}
}
extension Stack: Container {
// conformance to the Container protocol
mutating func append(_ item: Element) {
self.push(item)
}
var count: Int {
items.count
}
subscript(i: Int) -> Element {
items[i]
}
// conformance to the Equatable protocol
static func == (lhs: Stack<Element>, rhs: Stack<Element>) -> Bool {
lhs.items == rhs.items
}
}
Using a Protocol in Its Associated Type’s Constraints
Protocols 를 정의할 때 자기 자신의 일부로 존재할 수 있다.
protocol SuffixableContainer: Container {
associatedtype Suffix: SuffixableContainer where Suffix.Item == Item
func suffix(_ size: Int) -> Suffix
func last() -> Suffix.Item
}
SuffixableContainer Protocol 은 내부 정의에 자기 자신을 포함(Suffix: SuffixableContainer)하고있다. 이 Protocol
에서 Suffix는 2개의 constraints 를 갖고 있다.
- Suffix 는
SuffixableContainerprotocol 을 준수해야한다. - Suffix 의
Itemtype 은Container's Itemtype 과 동일해야한다
여기서 주의해야 할 것이
Suffix.Item == Item이 Item 의 값이 같음을 의미하는 것이 아니라는 것이다. 이것은 어디까지나associatedtype을 정의하는 것이므로Type 의 일치를 의미한다.
Item 에 대한 constraints 는 아래 Associated Types with a Generic Where Clause 에서 설명할 Generic where clause 다.
SuffixableContainer 를 채택하도록 Stack 을 한 번 더 확장해보자.
extension Stack: SuffixableContainer {
func suffix(_ size: Int) -> some SuffixableContainer {
// code
}
func last() -> (some SuffixableContainer).Item {
// code
}
}
func suffix(_ size: Int) -> Suffix의 return type 은 Opaque Typessome SuffixableContainer으로써, 이 Protocol 의 일부여야한다.
func last() -> Suffix.Item의 return type 은 Opaque Types(some SuffixableContainer).Item으로써, 이 Protocol 의 일부의 Item 이어야한다.그리고
Container Protocol 과 이것을 채택한 Stack<Element> 의 관계를 보자.
Container Type 은 곧 이것을 준수하는 Stack<Element>: Container Type 을 의미하고,
Item 은 Element Type 을 의미한다.따라서
SuffixableContainer 의 Type 은 곧 Stack<Element>: Container, SuffixableContainer Type 을 의미하고,
Suffix.Item 은 Element Type 을 의미한다.
이제 확장을 이용해 Stack 이 이를 준수하도록 Default Implementations를 작성해 완성시켜보자.
extension Stack: SuffixableContainer {
func suffix(_ size: Int) -> Stack<Element> {
var result = Stack()
for index in (count - size)..<count {
result.append(self[index])
}
return result
}
func last() -> Element {
self[count - 1]
}
// Inferred that Suffix is Stack.
}
반환할 Type 이 명확하므로 자동 완성된 Opaque Types 대신 반환 Type 을 명시적으로 변경했다.
var someStack = Stack<Int>()
someStack.push(3)
someStack.append(5)
someStack.push(7)
someStack.append(9)
print(someStack.suffix(2)) // Stack<Int>(items: [7, 9])
print(someStack.last()) // 9
Generic Where Clauses
Syntax
Type Constraints 에서 Type 에 constraints 를 추가하는 것이 유용할 수 있음을 보았다.
마찬가지로 Associated Types 역시 Generic Where Clauses를 정의해 Types 에 constraints 를 추가할 수 있다.
위에서 살펴본 것처럼 where keyword 뒤에 작성하며, Associated Types 자체에 대한 constraints 또는
Types 와 Associated Types 의 equality 관계에 대한 constraints가 따른다.
Associated Types 는 Generic Types 의 Protocols 버전과 같았다.
Adding Constraints to an Associated Type 이 Protocols 를 정의할 때 Associated Types 에 constraints 를 추가하는 것이었다면, Generic Where Clauses 는 Generic Types 에 채택된 Protocols 의 Associated Types 에 constraints 를 추가하는 것이다.
Generic Where Clauses 는 Type 또는 Function’s Body 의 curly brace { } 앞에 온다.
protocol Container {
associatedtype Item
mutating func append(_ item: Item)
var count: Int { get }
subscript(i: Int) -> Item { get }
}
func allItemsMatch<C1: Container, C2: Container>(_ containerA: C1, _ containerB: C2) -> Bool
where C1.Item: Equatable, C1.Item == C2.Item
{
// Check that both containers contain the same number of items.
if containerA.count != containerB.count {
return false
}
// Check each pair of items to see if they're euivalent.
for i in 0..<containerA.count {
if containerA[i] != containerB[i] {
return false
}
}
// All items match, so return true.
return true
}
Type Parameters 에 정의된 요구사항은 다음과 같다.
- C1 은 Container Protocol 을 준수해야한다.
- C2 는 Container Protocol 을 준수해야한다.
Generic Where Clauses 에 정의된 요구사항은 다음과 같다.
- C1.Item 은 Equatable Protocol 을 준수해야한다.
- C1.Item 은 C2.Item 과 동일 Type 이어야한다.
(위에서 where clauses 의 Suffix.Item 의 경우와 마찬가지로, 값의 일치가 아닌 Item 이라는 Types 의 일치를 의미한다)
이는 C1 과 C2 모두 Container Protocol 을 준수하고 있고, Items 가 Equatable Protocol 을 준수하고 두 Types 가 같다면 작동한다는 것이다. 즉, C1 과 C2 가 동일 Types 이어야 한다는 조건은 없다는 말이다!
따라서 위에서 정의한
static func == (lhs: Stack<Element>, rhs: Stack<Element>) -> Bool {
lhs.items == rhs.items
}
와 달리 allItemsMatch(_:_:) 메서드는 서로 다른 Types 간의 비교가 가능하다.
우선 Swift Array 를 우리가 정의한 Container protocol 을 준수하도록 확장해야한다. 그런데 Array 의 Element 는
Equatable 을 준수하지 않는다. 따라서 다음 두 가지 방법으로 정의를 할 수 있다.
Generic Where Clauses in Action
1 ) Case 1 - Swift 의 Built-in Type 인 Array 의 Element 를 Equatable Protocol 을 준수하도록 제한
위에서 우리가 만든 Container 를 그대로 사용하기 위한 방법이다.
- Protocols
protocol Container {
associatedtype Item: Equatable
mutating func append(_ item: Item)
var count: Int { get }
subscript(i: Int) -> Item { get }
}
protocol SuffixableContainer: Container {
associatedtype Suffix: SuffixableContainer where Suffix.Item == Item
func suffix(_ size: Int) -> Suffix
func last() -> Suffix.Item
}
- Stack
struct Stack<Element: Equatable> {
// original Stack<Element> implementation
var items: [Element] = []
mutating func push(_ item: Element) {
items.append(item)
}
mutating func pop() -> Element {
items.removeLast()
}
}
extension Stack: Container {
// conformance to the Container protocol
mutating func append(_ item: Element) {
self.push(item)
}
var count: Int {
items.count
}
subscript(i: Int) -> Element {
items[i]
}
// conformance to the Equatable protocol
static func == (lhs: Stack<Element>, rhs: Stack<Element>) -> Bool {
lhs.items == rhs.items
}
}
extension Stack: SuffixableContainer {
func suffix(_ size: Int) -> Stack<Element> {
var result = Stack()
for index in (count - size)..<count {
result.append(self[index])
}
return result
}
func last() -> Element {
self[count - 1]
}
// Inferred that Suffix is Stack.
}
Stack 은 Container Protocol 의 Item 이 Equatable Protocol 을 준수하도록 하기 위해 반드시 ==(lhs:rhs:) -> Bool
메서드를 구현해야한다.
- Array
extension Array: Container where Element: Equatable {}
Swift 의 Built-in Type Array 에 Element 가 Equatable Protocol 을 준수해야한다는 constraints 가 Global 로
추가되었다.
2 ) Case 2 - Swift 의 Built-in Type 인 Array 의 Element 에 constraints 추가 없이 준수하도록 Container Protocol 을 수정
위 Case 1 이 갖는 문제점은 Swift 의 Element 에 constraints 를 추가함으로써 결국 Swift Array 에 대한 Global
constraints 가 추가된다는 것이다. 확장을 이용해 Built-in Types 의 기능을 추가하는 것은 별로 문제가 되지 않지만
위와 같이 제약 조건을 추가해서 기능을 제한시키는 것은 코드의 유연성을 떨어뜨리며 이를 예상하지 못한 앱의 다른 부분의 코드나
외부 라이브러리에서 에러가 발생되는 side effect 의 원인이 될 수 있으므로 좋은 방법이 아니다.
따라서 우리는 위에서 Container 의 Item 에 추가했던 Equatable Protocol 제약 사항을 다시 제거하고 Stack 에서 필요한 메서드를
Protocol 에 의한 강제성 없이 구현하는 방법으로 코드를 유연하게 만들 수 있다.
- Protocols
protocol Container {
associatedtype Item
mutating func append(_ item: Item)
var count: Int { get }
subscript(i: Int) -> Item { get }
}
protocol SuffixableContainer: Container {
associatedtype Suffix: SuffixableContainer where Suffix.Item == Item
func suffix(_ size: Int) -> Suffix
func last() -> Suffix.Item
}
이제 더 이상 Container 는 Item 에 Equatable Protocol 을 준수하도록 강요하지 않는다.
- Stack
struct Stack<Element: Equatable> {
// original Stack<Element> implementation
var items: [Element] = []
mutating func push(_ item: Element) {
items.append(item)
}
mutating func pop() -> Element {
items.removeLast()
}
static func == (lhs: Stack<Element>, rhs: Stack<Element>) -> Bool {
lhs.items == rhs.items
}
}
extension Stack: Container {
// conformance to the Container protocol
mutating func append(_ item: Element) {
self.push(item)
}
var count: Int {
items.count
}
subscript(i: Int) -> Element {
items[i]
}
}
extension Stack: SuffixableContainer {
func suffix(_ size: Int) -> Stack<Element> {
var result = Stack()
for index in (count - size)..<count {
result.append(self[index])
}
return result
}
func last() -> Element {
self[count - 1]
}
// Inferred that Suffix is Stack.
}
이제 Stack 의 ==(lhs:rhs:) -> Bool 메서드는 더 이상 Protocol 의 요구사항을 준수하기 위해 구현을 강요받지 않는다. 따라서
기능 제공을 위해 Stack 이 자체적으로 이 메서드를 제공하도록 구현했다.
- Array
extension Array: Container {}
Array 에 우리가 정의한 Container 를 준수하는 Types 로 사용할 수 있도록 기능이 추가되었을 뿐
기존 Built-in Type Array 에 어떠한 constraints 도 추가하지 않는다.
이제 == 메서드와 allItemsMatch(_:_:) 함수를 테스트해보자.
var someStack = Stack(items: [3, 2, 5])
var anotherStack = Stack(items: [3, 2, 5])
var someArray = [3, 2, 5]
print(someStack == anotherStack) // true
print(someStack == someArray) // error: Cannot convert value of type 'Stack<Int>' to expected argument type '[Int]'
print(allItemsMatch(someStack, someArray)) // true
Extensions with a Generic Where Clause
위에서 extension Array: Container where Element: Equatable {}와 같이 Generic Where Clauses 는
Extensions 의 일부로 사용될 수 있다.
위 Case 2 에서 정의한 Stack 이다.
struct Stack<Element: Equatable> {
// original Stack<Element> implementation
var items: [Element] = []
mutating func push(_ item: Element) {
items.append(item)
}
mutating func pop() -> Element {
items.removeLast()
}
static func == (lhs: Stack<Element>, rhs: Stack<Element>) -> Bool {
lhs.items == rhs.items
}
}
위 Stack 을 Extension 에 Generic Where Clauses 를 이용해 다음과 같이 코드의 관심사를 분리시킬 수 있다.
struct Stack<Element> {
// original Stack<Element> implementation
var items: [Element] = []
mutating func push(_ item: Element) {
items.append(item)
}
mutating func pop() -> Element {
items.removeLast()
}
}
extension Stack where Element: Equatable {
static func == (lhs: Stack<Element>, rhs: Stack<Element>) -> Bool {
lhs.items == rhs.items
}
}
이제 분리된 관심사에 Element 가 Equatable 을 준수하는 것에 대한 코드만 따로 정의해보자.
extension Stack where Element: Equatable {
static func == (lhs: Stack<Element>, rhs: Stack<Element>) -> Bool {
lhs.items == rhs.items
}
func startsWith(_ item: Element) -> Bool {
guard let startItem = items.first else { return false }
return startItem == item
}
func isTop(_ item: Element) -> Bool {
guard let topItem = items.last else { return false }
return topItem == item
}
}
위 코드는 Stack 이 Container Protocol 을 채택하는 것과 무관하게 작동한다. 위 확장이 추가하는 3개의 메서드를 보면
==(lhs:rhs:)와 달리 startsWith(_:) 메서드와 isTop(_:) 메서드는 Stack 에 대해 몰라도 Element 만으로 작동할
수 있다. 만약 이 두 메서드를 Container Protocol 쪽에서 정의하도록 관심사를 옮기고 싶다면 Container Protocol 의 Item 에
Equatable Protocol 준수성을 추가하는 대신 Container Protocol 에 Extensions 를 이용해 다음과 같이 분리시킬 수 있다.
extension Stack where Element: Equatable {
static func == (lhs: Stack<Element>, rhs: Stack<Element>) -> Bool {
lhs.items == rhs.items
}
}
extension Container where Item: Equatable {
func startsWith(_ item: Item) -> Bool {
count >= 1 && self[0] == item
}
func isTop(_ item: Item) -> Bool {
count >= 1 && self[count - 1] == item
}
}
위 2개를 각각 Case 3 과 Case 4 이라 부르도록 하자. 코드를 정리하면 다음과 같다.
3 ) Case 3
- Protocols
protocol Container {
associatedtype Item
mutating func append(_ item: Item)
var count: Int { get }
subscript(i: Int) -> Item { get }
}
protocol SuffixableContainer: Container {
associatedtype Suffix: SuffixableContainer where Suffix.Item == Item
func suffix(_ size: Int) -> Suffix
func last() -> Suffix.Item
}
- Stack
struct Stack<Element> {
// original Stack<Element> implementation
var items: [Element] = []
mutating func push(_ item: Element) {
items.append(item)
}
mutating func pop() -> Element {
items.removeLast()
}
}
extension Stack where Element: Equatable {
static func == (lhs: Stack<Element>, rhs: Stack<Element>) -> Bool {
lhs.items == rhs.items
}
func startsWith(_ item: Element) -> Bool {
guard let startItem = items.first else { return false }
return startItem == item
}
func isTop(_ item: Element) -> Bool {
guard let topItem = items.last else { return false }
return topItem == item
}
}
extension Stack: Container {
// conformance to the Container protocol
mutating func append(_ item: Element) {
self.push(item)
}
var count: Int {
items.count
}
subscript(i: Int) -> Element {
items[i]
}
}
extension Stack: SuffixableContainer {
func suffix(_ size: Int) -> Stack<Element> {
var result = Stack()
for index in (count - size)..<count {
result.append(self[index])
}
return result
}
func last() -> Element {
self[count - 1]
}
// Inferred that Suffix is Stack.
}
- Array
extension Array: Container {}
4 ) Case 4
- Protocols
protocol Container {
associatedtype Item
mutating func append(_ item: Item)
var count: Int { get }
subscript(i: Int) -> Item { get }
}
extension Container where Item: Equatable {
func startsWith(_ item: Item) -> Bool {
count >= 1 && self[0] == item
}
func isTop(_ item: Item) -> Bool {
count >= 1 && self[count - 1] == item
}
}
protocol SuffixableContainer: Container {
associatedtype Suffix: SuffixableContainer where Suffix.Item == Item
func suffix(_ size: Int) -> Suffix
func last() -> Suffix.Item
}
extension Stack where Element: Equatable의 일부로 존재하던 startWith(_:) 메서드와 isTop(_:) 메서드가 이제
extension Container where Item: Equatable의 일부로 존재한다.
- Stack
struct Stack<Element> {
// original Stack<Element> implementation
var items: [Element] = []
mutating func push(_ item: Element) {
items.append(item)
}
mutating func pop() -> Element {
items.removeLast()
}
}
extension Stack where Element: Equatable {
static func == (lhs: Stack<Element>, rhs: Stack<Element>) -> Bool {
lhs.items == rhs.items
}
}
extension Stack: Container {
// conformance to the Container protocol
mutating func append(_ item: Element) {
self.push(item)
}
var count: Int {
items.count
}
subscript(i: Int) -> Element {
items[i]
}
}
extension Stack: SuffixableContainer {
func suffix(_ size: Int) -> Stack<Element> {
var result = Stack()
for index in (count - size)..<count {
result.append(self[index])
}
return result
}
func last() -> Element {
self[count - 1]
}
// Inferred that Suffix is Stack.
}
- Array
extension Array: Container {}
startsWith(_:) 메서드와 isTop(_:) 메서드를 사용해보자.
var someStack = Stack<Int>()
var anotherStack = Stack(items: [3, 2, 5])
print(someStack.startsWith(3)) // false
print(anotherStack.startsWith(2)) // false
print(anotherStack.startsWith(3)) // true
print(someStack.isTop(5)) // false
print(anotherStack.isTop(4)) // false
print(anotherStack.isTop(5)) // true
Contextual Where Clauses
Contextual Where Clauses
우리는 위 Case 3과 Case 4에서 Generic Where Clauses 를 이용해 constraints 를 이용해 조건에 일치할 경우에만
작동하는 Extensions 를 정의했다.
Case 4 에서 Container Protocol 에 사용한 확장을 다시 한 번 보자.
extension Container where Item: Equatable {
func startsWith(_ item: Item) -> Bool {
count >= 1 && self[0] == item
}
func isTop(_ item: Item) -> Bool {
count >= 1 && self[count - 1] == item
}
}
이 코드는 Container Protocol 을 채택한 Types 중 Item 이 Equatable 을 준수하는 경우에만 적용되는 Extension이다.
그리고 우리는 이런 constraints 를 이용해 조건부로 적용할 요구사항을 Extensions 이 아닌 Context 내에 정의할 수도 있다.
이것을 Contextual Where Clauses라 한다.
extension Container where Item == Double {
func average() -> Double {
var sum = 0.0
for index in 0..<count {
sum += Double(self[index])
}
return sum / Double(count)
}
}
extension Container {
func average() -> Double where Item == Int {
var sum = 0.0
for index in 0..<count {
sum += Double(self[index])
}
return sum / Double(count)
}
}
위에서 Container Protocol 을 준수하는 Types 중
- Item 이 Double 인 경우,
Extensions with a Generic Where Clause를 이용해 기능을 추가하고, - Item 이 Int 인 경우,
Contextual Where Clauses를 이용해 기능을 추가한다.
그리고 이 둘은 동일하게 작동한다.
var intStack = Stack(items: [3, 2, 5])
var doubleArray = [3.0, 2.0, 5.0]
print(intStack.average()) // 3.3333333333333335
print(doubleArray.average()) // 3.3333333333333335
Associated Types with a Generic Where Clause
위에서 우리는 이미 SuffixableContainer Protocol 을 정의할 때 Associated Types 에 Generic Where Clause 를
사용한 적이 있다.
(i.e. associatedtype Suffix: SuffixableContainer where Suffix.Item == Item)
다만 위에서는 자기 자신의 일부로써 Associated Type 을 정의해 Container Protocol 과의 연결을 위해 사용했다. 이번에는 Associated Type 에 Generic Where Clauses 를 적용하는 좀 더 일반적인 예를 하나 추가해보자.
var someStack = Stack(items: [9, 2, 5, 7, 3, 4, 2])
for element in someStack { // error: For-in loop requires 'Stack<Int>' to conform to 'Sequence'
print(element)
}
사용자 정의 Type 인 Stack 은 Structure 를 기반으로 하기 때문에 Iterator 를 준수하지 않아 반복을 사용할 수 없다. 우리가 정의한 Stack 이 반복을 할 수 있도록 만들어보자.
protocol Container {
associatedtype Item
mutating func append(_ item: Item)
var count: Int { get }
subscript(i: Int) -> Item { get }
associatedtype Iterator: IteratorProtocol where Iterator.Element == Item
func makeIterator() -> Iterator
}
새로 추가된 Associated Type 인 Iterator 는 IteratorProtocol 을 준수하며, 이것의 Element 의 Type 은 Item 의
Type 과 동일해야한다.
이제 Container Protocol 을 준수하는 Stack 은 makeIterator()를 구현해 준수하도록 해야한다.
extension Stack: Container {
// conformance to the Container protocol
mutating func append(_ item: Element) {
self.push(item)
}
var count: Int {
items.count
}
subscript(i: Int) -> Element {
items[i]
}
func makeIterator() -> IndexingIterator<[Element]> {
items.makeIterator()
}
}
var iteratorStack = someStack.makeIterator()
print(iteratorStack)
print("")
for element in iteratorStack {
print(element, terminator: ", ")
}
print("")
while let element = iteratorStack.next() {
print(element, terminator: ", ")
}
IndexingIterator<Array<Int>>(_elements: [9, 2, 5, 7, 3, 4, 2], _position: 0)
9, 2, 5, 7, 3, 4, 2,
9, 2, 5, 7, 3, 4, 2,
이제 Stack 은 makeIterator() 메서드를 사용해 Container 의 Iterator 에 대한 접근을 제공한다.
Separate Code
이제 위 코드를 다시 관심사를 분리시켜보도록 하자. Container 에서 Iterable 관련된 코드를 분리할 것이다.
protocol Container {
associatedtype Item
mutating func append(_ item: Item)
var count: Int { get }
subscript(i: Int) -> Item { get }
}
protocol IterableContainer: Container where Iterator.Element == Item {
associatedtype Iterator: IteratorProtocol
func makeIterator() -> Iterator
}
Container Protocol 에서 Iterable 관련 요구사항을 분리해 별도의 IterableContainer Protocol 로 만들고, Contextual Where Clauses 대신 Extensions with a Generic Where Clause 를 사용하도록 변경했다.
따라서 Stack 은 Protocol 각각 Protocol 별로 채택하거나
extension Stack: Container {
// conformance to the Container protocol
mutating func append(_ item: Element) {
self.push(item)
}
var count: Int {
items.count
}
subscript(i: Int) -> Element {
items[i]
}
}
extension Stack: IterableContainer {
// conformance to the IterableContainer protocol
func makeIterator() -> IndexingIterator<[Element]> {
items.makeIterator()
}
}
Stack 이 반드시 IterableContainer Protocol 을 준수해야할 경우 이는 Container Protocol 을 준수성을 포함하므로 IterableContainer Protocol 을 채택할 때 한 번에 구현하는 것도 가능하다.
extension Stack: IterableContainer {
// conformance to the Container protocol
mutating func append(_ item: Element) {
self.push(item)
}
var count: Int {
items.count
}
subscript(i: Int) -> Element {
items[i]
}
// conformance to the IterableContainer protocol
func makeIterator() -> IndexingIterator<[Element]> {
items.makeIterator()
}
}
위와 마찬가지로
protocol SuffixableContainer: Container {
associatedtype Suffix: SuffixableContainer where Suffix.Item == Item
func suffix(_ size: Int) -> Suffix
func last() -> Suffix.Item
}
역시 다음과 같이 Extensions with a Generic Where Clause 로 변경할 수 있다.
protocol SuffixableContainer: Container where Suffix.Item == Item {
associatedtype Suffix: SuffixableContainer
func suffix(_ size: Int) -> Suffix
func last() -> Suffix.Item
}
IterableContainer Protocol 을 정의한 것처럼 다양한 요구사항을 Container Protocol 을 준수하는 다양한 하위 Protocols 를 정의할 수 있다. 다음은 Comparable 을 준수하도록 하는 ComparableContainer Protocol 을 정의하기 위해 다음과 같이 추가할 수 있다.
protocol ComparableContainer: Container where Item: Comparable { }
Generic Subscripts
Subscripts 는 Generic 일 수 있고, 이것은 Generic Where Clauses 를 포함할 수 있다. 기존에 Container Protocol 의 요구사항을 준수하도록 하기 위해 Stack 은 Int Type 의 단일 index 를 받아 반환하는 코드를 구현했다.
var stringStack = Stack(items: ["A", "D", "C", "K", "G", "B", "O", "Q"])
var intStack = Stack(items: [7, 23, 3, 17, 62, 5, 13, 34])
print(stringStack[2]) // C
print(stringStack[5]) // B
print(stringStack[2...5]) // error: Cannot convert value of type 'ClosedRange<Int>' to expected argument type 'Int'
print(intStack[3]) // 17
print(intStack[5]) // 5
print(intStack[3..<6]) // error: Cannot convert value of type 'Range<Int>' to expected argument type 'Int'
Container Protocol 의 요구사항은 subscript(i: Int) -> Item { get }이었기 때문에 subscript는 Int Type
만 Parameters 로 허용된다. 따라서 [2...5]와 같은 Sequence는 사용할 수가 없다.
Parameters 를 Int Type 의 Sequence 로 받는 subscript를
Protocol Extensions - Providing Default Implementations 를
이용해 추가적으로 제공해보자.
extension Container {
subscript<Indices: Sequence>(indices: Indices) -> [Item]
where Indices.Iterator.Element == Int {
var result: [Item] = []
for index in indices {
result.append(self[index])
}
return result
}
}
- Generic Parameter
Indices는 Standard LibrarySequenceProtocol 을 준수해야한다. - Parameter 는
IndicesType 의 Single Parameterindices를 받는다. - Generic Where Clauses 에 의해
Sequence 의 Iterator 의 Element는IntType 과 동일해야한다. - Subscripts 구현에 의해
Sequence 의 Iterator 는 indices 로 주어진 Int Type 의 Element 를 통과(traverse)해야한다.
이제 단일 index 및 연속된 indices 모두에서 작동한다.
var stringStack = Stack(items: ["A", "D", "C", "K", "G", "B", "O", "Q"])
var intStack = Stack(items: [7, 23, 3, 17, 62, 5, 13, 34])
print(stringStack[2]) // C
print(stringStack[5]) // B
print(stringStack[2...5]) // ["C", "K", "G", "B"]
print(intStack[3]) // 17
print(intStack[5]) // 5
print(intStack[3..<6]) // [17, 62, 5]
지금까지 Generic, Associated 와 Extensions 를 사용해 코드를 관심사별로 분리하고, 재사용성을 고려해 유연한 코드를 만들어보았다. 이것을 한 번에 정리해둔 코드는 Generic, Associated, Where and Subscripts Summary 을 참고한다.
23. Opaque Types 👩💻
The Problem That Opaque Types Solve
Generics 에서 Opaque Types를 사용했다.
Opaque Types는 함수 또는 메서드의 return type 을 Type이 아닌 some Type으로 바꿔 Type 의 일부임을
암시할 뿐 명확한 Type 정보를 감춘다.
이렇게 자세한 정보를 감추는 것은 모듈과 모듈을 호출하는 코드 사이의 경계(boundaries)에서 유용하다. Protocol Type 의 값을
반환하는 것과 달리 Opaque Type 은 Type Identity를 유지한다(Compiler 는 Type 의 정보에 접근할 수 있지만, 모듈의
클라이언트는 접근할 수 없다).
Nonopaque Types
protocol Shape {
func draw() -> String
}
1 ) Triangle
struct Triangle: Shape {
var size: Int
func draw() -> String {
var result: [String] = []
for length in 1...size {
result.append(String(repeating: "*", count: length))
}
return result.joined(separator: "\n")
}
}
let smallTriangle = Triangle(size: 3)
print(smallTriangle.draw())
*
**
***
2 ) FlippedShape
struct FlippedShape<T: Shape>: Shape {
var shape: T
func draw() -> String {
let lines = shape.draw().split(separator: "\n")
return lines.reversed().joined(separator: "\n")
}
}
Generic Types 를 이용해 FlippedShped Structure 를 구현했다. 그러나 여기에는 중요한 제약이 있는데,
뒤집힌 결과(flipped result)를 생성하는데 사용된 Exact Generic Type 을 노출(expose)시킨다.
let flippedTriangle = FlippedShape(shape: smallTriangle)
print(flippedTriangle.draw())
***
**
*
모듈 사용자가 알아야 하는 것은 모듈 사용자가 제공받기로 한 Shape protocol 의 무언가 (이 경우 draw() 메서드)뿐이다.
그런데 Shape Protocol 을 준수하도록 draw()를 제공하기 위해 Structure flippedTriangle 를 그대로 노출하면 여기 사용된
Wrapper 인 FlippedShape가 그대로 노출된다(= 뒤집힌 결과를 생성하는데 사용된 Exact Generic Type 을 노출시킨다).
print(flippedTriangle.shape) // Triangle(size: 3)
Wrapper의 Exact Generic Type 이 노출되어 불필요한 정보(FlippedShape 의 ‘shape’ Property)가 노출된다.
3 ) JoinedShape
이번에는 Shape Protocol 을 준수하는 2개의 shape 을 결합하는 Structure 를 정의해보자.
struct JoinedShape<T: Shape, U: Shape>: Shape {
var top: T
var bottom: U
func draw() -> String {
top.draw() + "\n" + bottom.draw()
}
}
JoinedShape<T: Shape, U: Shape> structure 는 2개의 shapes 를 수직으로 결합한다.
이것은 아레의 코드와 같이 Flipped Triangle 을 Another Triangle 과 결합해
JoinedShape<FlippedShape<Triangle>, Triangle>과 같은 return type 을 생성한다.
let joinedTriangles = JoinedShape(top: smallTriangle, bottom: flippedTriangle)
print(joinedTriangles.draw())
*
**
***
***
**
*
shape 를 생성하는 것에 대해 자세한 정보를 노출하면, Full Return Type을 명시해야하기 때문에 ASCII 그림 모양을 그리는 모듈의
public interface 에 포함되지 않은 Type 이 유출될 수 있다.
print(joinedTriangles.top) // Triangle(size: 3)
print(joinedTriangles.bottom) // FlippedShape<Triangle>(shape: __lldb_expr_38.Triangle(size: 3))
모듈 내의 코드는 다양한 방법으로 같은 모양을 만들 수 있으며, 모듈 외부의 다른 코드는 이 모듈의 구현 목록과 같은 세부 정보를 알 필요가 없다.
따라서 FlippedShape, JoinedShape 와 같은
Wrapper Types는 모듈 사용자에게 중요하지 않으며,표시되지 않아야한다. 모듈의 public interface 는 shape 을 결합하거나 뒤집는 것과 같은 작업으로 구성되며, 이러한 작업은 또 다른Shape값을 반환한다.
Opaque Types
Opaque Types 는 Generic Types 의 반대로 생각할 수 있다.
Generic Types 를 사용하면, 함수는 추상화된 방식(abstracted away)으로 값을 반환할 수 있으며, return type 은 함수가 호출될 때
결정된다.
func max<T>(_ x: T, _ y: T) -> T where T: Comparable { ... }
max(_:_:) 함수는 호출하는 코드의 x, y 값에 따라 T의 Type 이 정해지고, 이 T는 Comparable protocol 을 준수하는 어떤
Types 나 사용 가능하다.
반면 Opaque Types 를 반환하는 함수의 경우 이러한 역할이 반전된다. Opaque Types 를 사용하면, 함수를 호출하는 코드로부터 추상화된
방식으로 함수의 구현에서 return type 을 선택할 수 있다.
위에서 FlippedShape, JoinedShape 를 그대로 노출해 다른 정보가 노출되었는데
Shape protocol 이 제공하기로 약속한 draw()만 노출되면 되므로
struct SomeStructure: Shape {
func draw() -> String { something }
}
와 같이 FlippedShape, JoinedShape 로부터 return type 을 선택해 불필요한 정보를 포함하지 않는 간단한 형태로 Wrapping 된 값을 제공해야한다.
Opaque Types 를 return type 으로 정의할 때 가능한 Types 는 다음과 같다.
An 'opaque' type must specify only 'Any', 'AnyObject', protocols, and/or a base class
다음 예제를 위해 사각형을 그리는 Square structure 를 추가로 정의하자.
struct Square: Shape {
var size: Int
func draw() -> String {
let line = String(repeating: "*", count: size)
let result = Array<String>(repeating: line, count: size)
return result.joined(separator: "\n")
}
}
다음 예제에서 함수 makeTrapezoid()는 shape 의 명확한 Type 없이 사다리꼴(trapezoid)을 반환한다.
(사용자에게 Triangle, Square, FlippedShape, JoinedShape 의 Exact Generic Type 이 노출되지 않는다.)
func makeTrapezoid() -> some Shape {
let top = Triangle(size: 2)
let middle = Square(size: 2)
let bottom = FlippedShape(shape: top)
let trapezoid = JoinedShape(
top: top,
bottom: JoinedShape(top: middle, bottom: bottom)
)
return trapezoid
}
let trapezoid = makeTrapezoid()
print(trapezoid.draw())
*
**
**
**
**
*
그렇다면 Nonopaque Types 에서 정의한 JoinedShape 와 뭐가 다를까? 한번 비교해보도록 하자.
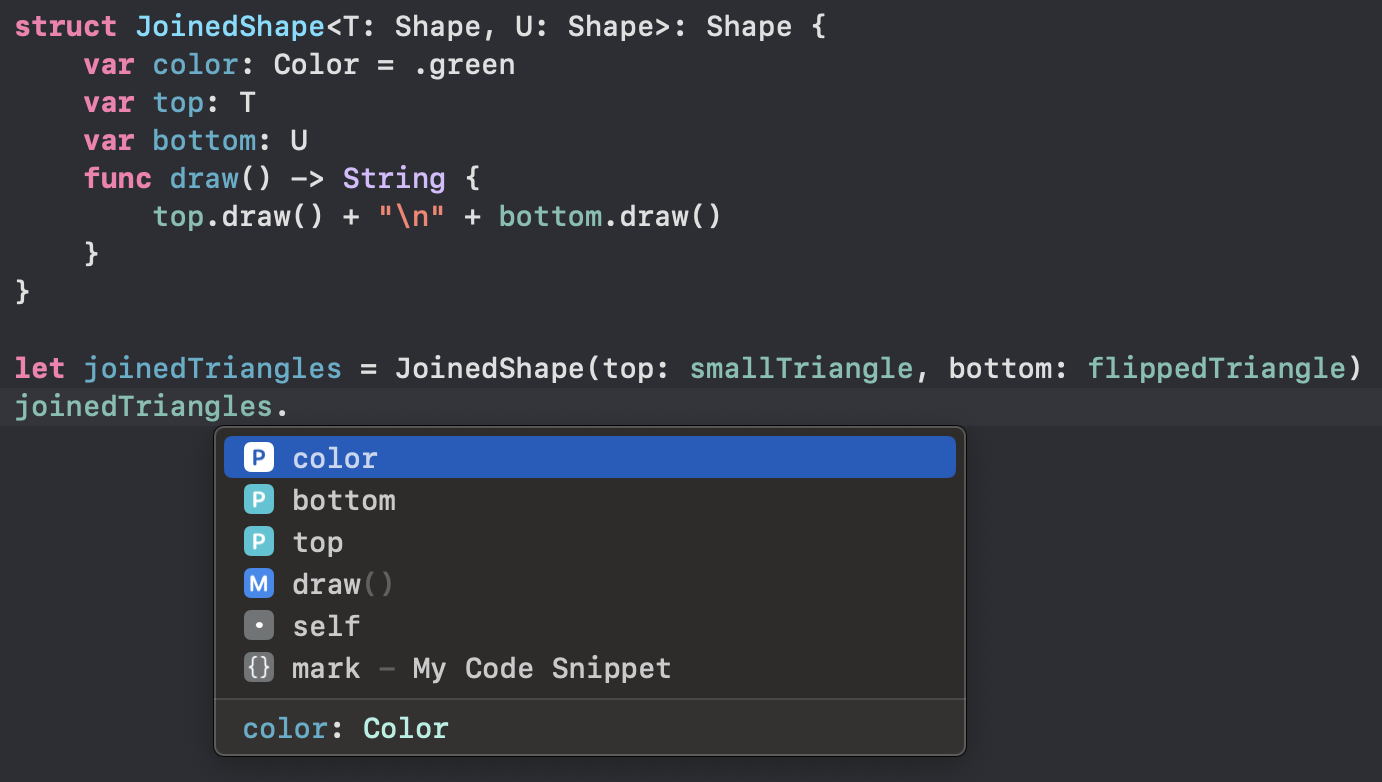
print(joinedTriangles.top) // Triangle(size: 3)
print(joinedTriangles.bottom) // FlippedShape<Triangle>(shape: __lldb_expr_38.Triangle(size: 3))
모듈의 사용자는 draw()의 결과만 알면 된다. 그런데 JoinedShape는 Shape Protocol 을 준수하는 Structure 자체를 정의하기
때문에 이를 구현하는데 사용된 Exact Generic Type JoinedShape가 노출되어 이것이 갖는 top과 bottom에 대한 정보까지
노출시킨다. 위에서도 이미 설명했듯이 FlippedShape, JoinedShape 와 같은
Wrapper Types는 모듈 사용자에게 중요하지 않으며, 표시되지 않아야하는데 Structure 를 그대로 반환하기 때문에 불필요한 정보가 노출된다.
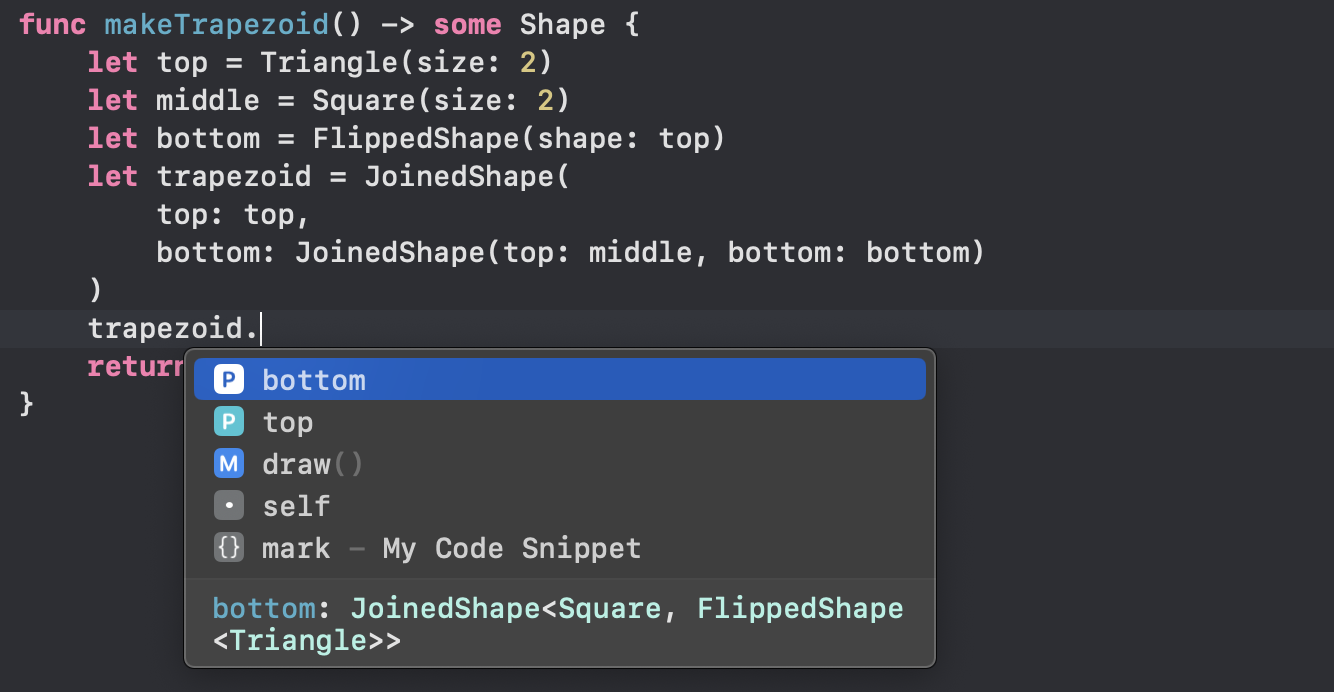
makeTrapezoid() 역시 함수 내부에서는 JoinedShape가 생성한 Structure 로부터 top과 bottom에 접근 가능하지만
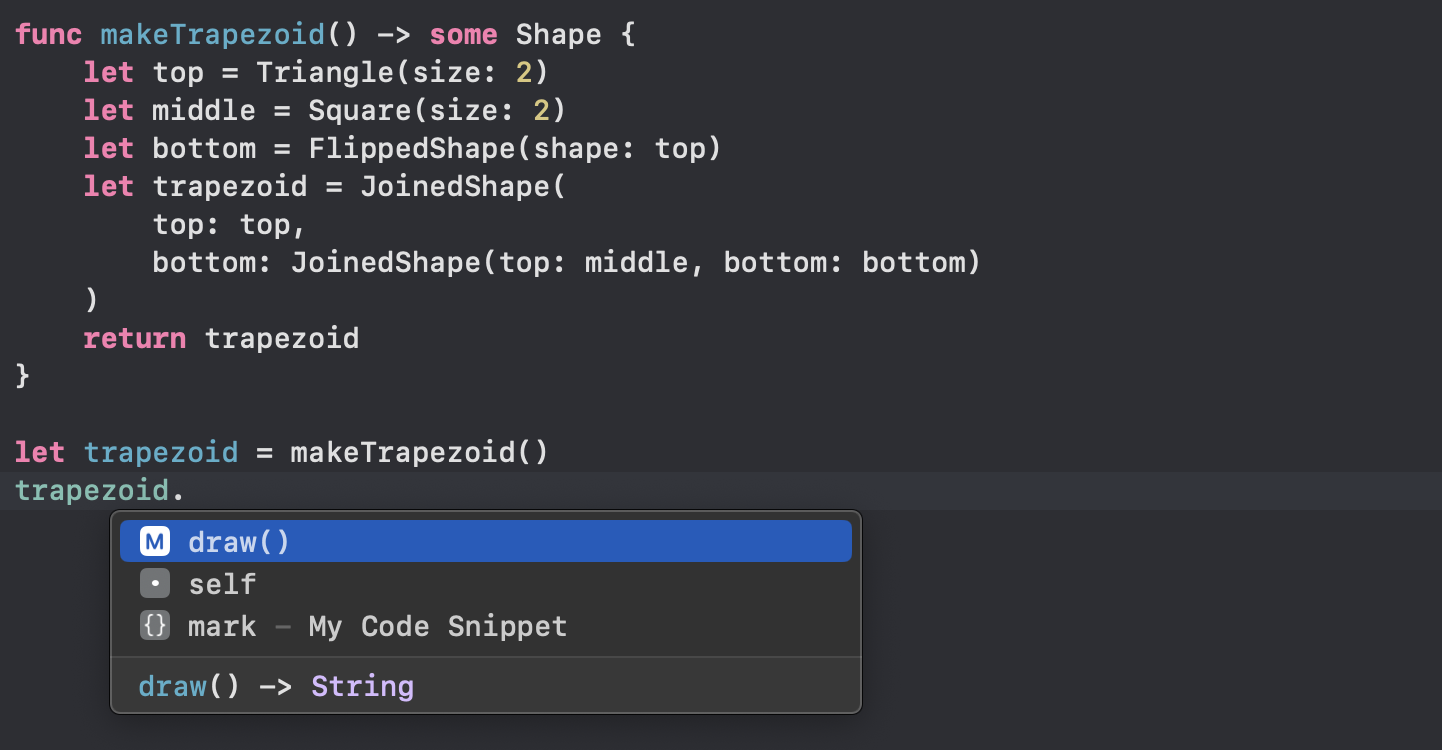
반환된 값에서는 접근할 수 없다. makeTrapezoid()는 Return Type 을
Opaque Type 으로 Wrapping해 Shape protocol 을 준수하는 객체의 다른 정보를 노출시키지 않고 모듈의 사용자가 알아야 하는
draw()만 노출시킨다.
Returning an Opaque Type
위에서 makeTrapezoid() 함수는 shape 의 명확한 Type 없이 some Shape를 반환했다. 즉, Shape protocol 을 준수하는
Structures 의 Exact Generic Type 대신
struct SomeStructure: Shape {
func draw() -> String { something }
}
형태로 Wrapping해 반환했다.
An 'opaque' type must specify only 'Any', 'AnyObject', protocols, and/or a base class를 다시 한 번 더
떠올려보자.
- Generic Types 가 해결하는 문제는 동일한 body 를 갖는 여러 cases 를 Type Inference 를 사용해 하나의 정의로 재사용함으로써 코드의 중복을 최소화하는 방향으로 코드를 유연하게 만들었다.
- Opaque Types 가 해결하는 문제는 Types 의 불필요한 정보 노출을 방지(hiding)하는 것이다. 이를 위해 특정
Type을 반환하더라도 위와 같이 그Type Object내에서 반환 하려는 단일Type Member만 반환하도록 코드를 작성해야한다. 이것은 추상적인 합의의 결과라 볼 수 있으며, 이 모듈을 개발하는 개발자와 Compiler 만Type Object를 알 수 있다. 이 모듈을 사용하는 클라이언트는 단지 매번 동일한Type Member를 얻는다는 것만 알고 있으면 되고, 매번 동일한 Identity 를 반환하니 클라이언트는 이 return type 을 더욱 신뢰하고 사용할 수 있게 된다.
Return Type 으로
Opaque Types를 사용하는 함수가 여러 위치에서 반환되는 경우, 가능한 경우의 모든 Return Values 의 Type 은 동일해야한다(all of the possible return values must have the same type).이것은 Generic Functions 의 경우 Return Type 에 Generic Types 를 사용할 수 있지만 그럼에도 불구하고 Return Type
some Type은 여전히 Single Type 이어야 함을 의미한다.
Hiding with Generics
Opaque Types some Shape를 return type 으로 갖는 flip(_:), join(_:) 함수를 추가로 구현해보자. 이번에는
Generics를 결합해도 Opaque Types 가 정상적으로 작동하는지 확인해본다.
func flip<T: Shape>(_ shape: T) -> some Shape {
FlippedShape(shape: shape)
}
func join<T: Shape, U: Shape>(_ top: T, _ bottom: U) -> some Shape {
JoinedShape(top: top, bottom: bottom)
}
let smallTriangle = Triangle(size: 3)
let opaqueJoinedTriangles = join(smallTriangle, flip(smallTriangle))
print(opaqueJoinedTriangles.draw())
*
**
***
***
**
*
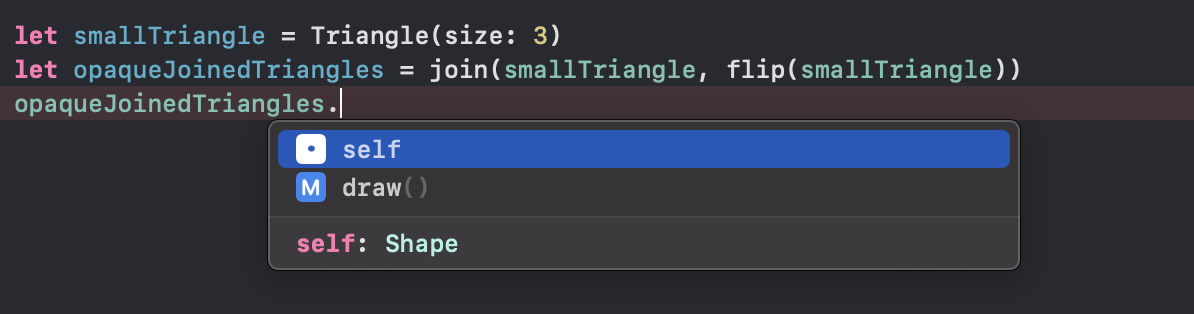
flip(_:)과join(_:)에 의해 반환된opaqueJoinedTriangles역시draw()외에는 접근할 수 없다.
Always Return a Single Type
위에서 Opaque Type 의 return type 은 Single Type이어야 한다고 했다. 따라서 이번에는 이 요구사항을 위반하는 잘못된 case 를 살펴본다.
위 flip(_:) 함수를 보면 굳이 정사각형을 정의하는 Square는 뒤집지 않아도 될 것 같다. 그래서 flip(_:) 함수 안에서 전달된
Shape 의 Type 이 Square 일 경우 그냥 반환하고, 그렇지 않을 경우에만 뒤집는 것으로 변경하면 더 좋을거라 판단되어 코드를 수정한다고
가정해보자.

Opaque Type 을 반환하겠다 해놓고
Single Type이 아닌 2가지 Types 로 return 을 하려고 하자 Compiler 가 Opaque Type 의 요구사항에 위반됨을 인지하고 에러를 출력한다.
- Function declares an opaque return type ‘some Shape’, but the return statements in its body do not have matching underlying types
이를 해결하기 위한 방법 중 하나는
struct Square: Shape {
var size: Int
func draw() -> String {
let line = String(repeating: "*", count: size)
let result = Array<String>(repeating: line, count: size)
return result.joined(separator: "\n")
}
}
Square: Shape 라는 특수한 경우를
struct FlippedShape<T: Shape>: Shape {
var shape: T
func draw() -> String {
let lines = shape.draw().split(separator: "\n")
return lines.reversed().joined(separator: "\n")
}
}
FlippedShape: Shape의 내부로 옮겨 invalidFlip(_:) 함수가 언제나
FlippedShape 의 some Shape 를 return하도록 하는 것이다.
struct FlippedShape<T: Shape>: Shape {
var shape: T
func draw() -> String {
if shape is Square {
return shape.draw()
}
let lines = shape.draw().split(separator: "\n")
return lines.reversed().joined(separator: "\n")
}
}
변경된 코드를 모아 비교해보면 다음과 같다.
flip(_:)&join(_:_:)
struct FlippedShape<T: Shape>: Shape {
var shape: T
func draw() -> String {
let lines = shape.draw().split(separator: "\n")
return lines.reversed().joined(separator: "\n")
}
}
func flip<T: Shape>(_ shape: T) -> some Shape {
FlippedShape(shape: shape)
}
let smallTriangle = Triangle(size: 2)
let smallSquare = Square(size: 2)
let trapezoid = join(smallTriangle, join(smallSquare, flip(smallTriangle)))
print(type(of: trapezoid)) // JoinedShape<Triangle, JoinedShape<Square, FlippedShape<Triangle>>>
print(trapezoid.draw())
*
**
**
**
**
*
fixedInvalidFlip(_:)
struct FlippedShape<T: Shape>: Shape {
var shape: T
func draw() -> String {
if shape is Square {
return shape.draw()
}
let lines = shape.draw().split(separator: "\n")
return lines.reversed().joined(separator: "\n")
}
}
func invalidFlip<T: Shape>(_ shape: T) -> some Shape {
if shape is Square {
return shape // Error: return types don't match
}
return FlippedShape(shape: shape) // Error: return types don't match
}
// 따라서 위 `invalidFlip(_:)`은 다음과 같이 바뀔 수 있다.
func fixedInvalidFlip<T: Shape>(_ shape: T) -> some Shape {
return FlippedShape(shape: shape) // Error: return types don't match
}
let smallTriangle = Triangle(size: 2)
let smallSquare = Square(size: 2)
let trapezoid = join(smallTriangle, join(smallSquare, fixedInvalidFlip(smallTriangle)))
print(type(of: trapezoid)) // JoinedShape<Triangle, JoinedShape<Square, FlippedShape<Triangle>>>
print(trapezoid.draw())
*
**
**
**
**
*
Opaque<T> Return Types with Generics
항상 Single Type을 반환해야 한다고 해서 Opaque Types를 return 하는 함수에
Generic Types 의 사용을 막지는 않는다.
다음은 Generic Types 를 사용하면서 Opaque Types의 요구사항을 만족하는 경우를 보자.
Always Return a Single Type 에서 invalidFlip(_:)함수가 불가능했던 이유는
func invalidFlip<T: Shape>(_ shape: T) -> some Shape {
if shape is Square {
return shape // Error: return types don't match
}
return FlippedShape(shape: shape) // Error: return types don't match
}
는 T를 받아 Square 또는 FlippedShape라는 2가지 Types 로 반환하려 했기 때문이다. 반면
func `repeat`<T: Shape>(_ shape: T, count: Int) -> some Collection {
Array<T>(repeating: shape, count: count)
}
repeat(shape:count:) 함수 역시 T에 의존하므로 받는 T에 따라 반환되는 T의 Type 은 변경되지만,
some Collection의 일부로써 Array<T>라는 Single Type 으로 Wrapping 된 Type 을 반환하기 때문에 Opaque Type 의
요구사항을 준수한다.
이는 flip(_:) & join(_:_:) 함수
func flip<T: Shape>(_ shape: T) -> some Shape {
FlippedShape(shape: shape)
}
func join<T: Shape, U: Shape>(_ top: T, _ bottom: U) -> some Shape {
JoinedShape(top: top, bottom: bottom)
}
의 some Shape가 각각
struct SomeStructure: Shape {
func draw() -> String { something }
}
라는 Single Type 으로 Wrapping되는 것과 같다고 볼 수 있다.
잘 작동하는지 확인해보자.
let doubleTriangle = `repeat`(smallTriangle, count: 2)
doubleTriangle.forEach { shape in
if let shape = shape as? Shape {
print(shape.draw())
}
}
*
**
***
*
**
***
let tripleSquare = `repeat`(smallSquare, count: 3)
tripleSquare.forEach { shape in
if let shape = shape as? Shape {
print(shape.draw())
}
}
***
***
***
***
***
***
***
***
***
Opaque Return Types 를 Generic 과 함께 사용하면 Always Return a Single Type 의 flip, join 함수 처럼 Return Type 을
Single Type으로 만들기 위해 하나의 Type 이 다른 Types 를 포함하도록 만들 필요 없이some Type을Generic을 사용해 반환하므로 각각의 코드를 명확히 분리시킬 수 있다.
Differences Between Opaque Types and Protocol Types
Opaque Types Preserve Type Identity
함수의 return type 이 Opaque Types 인 경우와 Protocol Types 인 경우는 유사해 보이지만 명확한 차이점과 서로가 해결하는 문제(사용함으로써 얻는 강점)이 명확히 다르다. 이를 정리해보자.
- Opaque Types : 모듈의 클라이언트가 Types 의 정보에 접근할 수 없다(hiding). Single Type Identity 를 유지한다. Opaque Type 은 하나의 특정 Type 을 참조하지만, 함수 호출자는 어떤 Type 인지 알 수 없다.
- Protocol Types : 모듈의 클라이언트가 Types 의 정보에 접근할 수 있다. Protocols 을 준수하는 모든 Types 가 가능하므로 Type Identity 가 유동적이다.
Strength of Opaque Types and Protocol Types
따라서 각 Types 가 강점은 다음과 같다.
- Opaque Types
some Type을 반환하도록 하기 위해 다음과 같이 Wrapping 되어 반한되는 모양을 보자.
struct SomeStructure: Shape {
func draw() -> String { something }
}
Types 의 정보를 은닉화(hiding)할 수 있을 뿐 아니라 특정 Protocols 를 준수하는 경우 해당 모듈이 어떤 Hierarchy 구조를 갖고
있든, 중간에 모듈 내부가 어떻게 변경되든 언제나 one specific type을 반환하므로 함수 호출자 입장에서 보면 이것은
return type 에 대한 강력한 보증을 약속(Opaque Type 으로 반환하기 위해 단일
Identity 를 유지하도록 코드를 작성해야하므로)하는 것이다.
- Protocol Types
특정 Protocols 를 준수하면 어떤 Types 든 모두 허용됨을 의미한다. 게다가 Types 의 정보에 접근 가능하므로 함수 호출자
입장에서 보면 이것은 높은 유연성을 제공하고 Original Types 에 접근이 가능하게 한다.
Protocol Return Type give more Flexibility
위에서 언급한 Protocol Types 의 강점인 코드를 유연하게 만드는 것에 대해 검증해본다. 우리는 위에서 invalidFlip 의 문제를 해결하기 위해 Square 의 특수한 경우를 FlippedShape 의 내부로 옮겼다.
func invalidFlip<T: Shape>(_ shape: T) -> some Shape {
if shape is Square {
return shape // Error: return types don't match
}
return FlippedShape(shape: shape) // Error: return types don't match
}
이번에는 Square 나 FlippedShape 의 수정 없이 return type 을 Protocol Types로 변경해보자.
func protocolFlip<T: Shape>(_ shape: T) -> Shape {
if shape is Square {
return shape
}
return FlippedShape(shape: shape)
}
let smallTriangle = Triangle(size: 2)
let smallSquare = Square(size: 2)
let trapezoid = join(smallTriangle, join(smallSquare, protocolFlip(smallTriangle)))
print(type(of: trapezoid)) // JoinedShape<Triangle, JoinedShape<Square, FlippedShape<Triangle>>>
print(trapezoid.draw())
*
**
**
**
**
*
Protocol Return Type 은 높은 유연성을 제공해
protocolFlip(_:)함수가Shape와FlippedShape라는 다른 Types 를 return 하더라도Shapeprotocols 을 준수한다면 이를 허용한다.
Protocol Return Type cannot use Operations that depend on Type Information
하지만 Protocol Return Type을 사용할 때 유의해야할 점이 있다. 코드를 유연하게 해줌으로써 많은 장점을 갖는 것은 맞지만
반대로 말하면, 위 protocolFlip(_:)의 return type 은 2개의 완전히 다른 Types를 갖는다.
따라서 Type 정보에 의존하는 많은 작업이 반환된 값에서 사용할 수 없음을 의미한다.
Triangle 과 FlippedShape 에 Equatable을 추가해보자.
extension Triangle: Equatable {}
extension FlippedShape: Equatable where T == Triangle {
static func == (lhs: FlippedShape<T>, rhs: FlippedShape<T>) -> Bool {
lhs.shape == rhs.shape
}
}
이제 Triangle 과 FlippedShape 은 == operator 를 사용할 수 있다.
1 ) Returning Opaque Types
let smallTriangle = Triangle(size: 3)
let anotherSmallTriangle = Triangle(size: 3)
print(smallTriangle == anotherSmallTriangle) // true
let flippedTriangle = FlippedShape(shape: smallTriangle)
let anotherFlippedTriangle = FlippedShape(shape: smallTriangle)
print(flippedTriangle == anotherFlippedTriangle) // true
2 ) Returning Protocol Types
let protocolFlippedTriangleA = protocolFlip(smallTriangle)
let protocolFlippedTriangleB = protocolFlip(smallTriangle)
print(type(of: flippedTriangle)) // FlippedShape<Triangle>
print(type(of: protocolFlippedTriangleA)) // FlippedShape<Triangle>
우선 Initializer 에 의해 생성된 flippedTriangle과 Protocol Return Type에 의해 반환된
protocolFlippedTriangleA은 둘 다 동일한 FlippedShape<Triangle> Type 임이 확인된다.
print(protocolFlippedTriangleA == protocolFlippedTriangleB) // error: Binary operator '==' cannot be applied to two 'any Shape' operands
하지만 Protocol Return Type은 == operator 를 사용할 수 없어 에러가 발생한다.
Downcasting Protocol Return Types
만약 위 경우 Protocols 를 이용한 유연성의 장점을 활용하면서, Types 의 정보를 활용하고자 하면 어떻게 해야할까?
잠시 다른 언어의 이야기를 살펴보자. 만약 Java 와 같은 언어를 해봤다면 어떤 함수의 return 값을 받아 변수에 할당할 때
ArrayList<String>, LinkedList<String>와 같이 명확한 Types 를 선언해 받지 않고, Interface 를 이용해
List<String>으로 받도록 코드를 작성한다.
List<String> result = someFunction() // return `ArrayList<String>` or `LinkedList<String>` or anything adopt to 'List' interface.
이는 이 포스팅을 시작할 때 설명했던 자세한 정보를 감추는 것은 '모듈'과 '모듈을 호출하는 코드' 사이의 '경계(boundaries)'에서 유용하다는
설명과 유사함을 보여준다.
이렇게 boundaries 에서 유연성을 확보하는 대신 result는 List 가 공통으로 가지고 있는 메서드는 사용할 수 있으나,
ArrayList 나 LinkedList etc...만 가지고 있는 전용 메서드는 사용할 수 없다. 만약, 전용 메서드를 사용하려면 Downcasting을
해야한다.
다시 Swift 로 돌아와보자. flippedTriangle와 protocolFlippedTriangleA은 동일한 Type 이지만
Protocol Return Type에 의해 반환된 protocolFlippedTriangleA 만 == operator 를 사용할 수 없었다.
한 번 이것을 Downcasting 해보자.
let downcastedFlippedTriangleA = protocolFlippedTriangleA as? FlippedShape<Triangle>
let downcastedFlippedTriangleB = protocolFlippedTriangleB as? FlippedShape<Triangle>
print(downcastedFlippedTriangleA == downcastedFlippedTriangleB) // true
작동된다‼️
Protocol Has an Associated Type Cannot Use as the Return Types
다음은 Generics 에서 Array 에 사용자가 생성한 Container 라는 Custom Protocol 에 대한 적합성을 준수하도록 한 코드의 일부다.
protocol IntContainer {
mutating func append(_ item: Int)
var count: Int { get }
subscript(i: Int) -> Int { get }
}
protocol StringContainer {
mutating func append(_ item: String)
var count: Int { get }
subscript(i: Int) -> String { get }
}
우리는 위와 같은 여러 Types 에 대한 버전의 Container 를 하나의 정의로 재사용하고자 Associated Types 를 사용해 다음과 같이 정의했었다.
protocol Container {
associatedtype Item
mutating func append(_ item: Item)
var count: Int { get }
subscript(i: Int) -> Item { get }
}
그리고 Array 는 이미 위와 같은 요구사항을 준수하기 위한 구현이 이미 존재하므로 다음과 같이 적합성을 추가할 수 있었다.
extension Array: Container { }
우선 Protocols 가 Protocol Return Type 으로 사용될 때의 경우를 살펴보기 위해 Container Protocol 의 요구사항을 모두 제거해보자.
protocol Container { }
extension Array: Container { }
func makeProtocolContainer<T, C: Container>(item: T) -> C {
[item] // error: Cannot convert return expression of type '[T]' to return type 'C'
}
item 이라는 무언가를 받아 Array()에 저장해 반환하는 함수다. 우리는 위에서 Array 가 Container Protocol 을 준수하도록
했으므로 이를 Generic Types 로 정의해 반환하고자 했다. 실제로 Container Protocol 은 아무런 요구사항이 없음에도 불구하고
Swift compiler 는 Generic Type T 를 Container Protocol 을 준수하는 Generic Type C 로 변환할 수 없다고 이야기한다.
T도 Type Inference 를 사용하는데, C도 Type Inference 가 필요한 상황이다. Swift 는 사전에 T 에 대한 충분한
정보도, C 에 대한 충분한 정보도, 게다가 T 와 C 의 관계가 가능한지에 대한 충분한 정보도 없는 상황이기 때문이다.
그렇다면 불확실성을 줄이기 위해 함수를 다음과 같이 변경해보자.
func makeProtocolContainer<T>(item: T) -> Container {
[item]
}
Array 는 Associated Types 를 사용해 무엇이든 저장할 수 있고, Array 는 Container Protocol 을 준수하므로 이제
makeProtocolContainer(item:)은 작동이 가능하다.
let emptyContainer = makeProtocolContainer(item: 10)
print(type(of: emptyContainer)) // Array<Int>
print(emptyContainer) // [10]
반면, Array
print(emptyContainer[0]) // error: value of type 'any Container' has no subscripts
Container 는 Subscript 를 요구사항으로 갖고 있지 않기 때문이다. 그렇다면 Container 에 Subscript 에 대한 요구사항을 추가해보자.
protocol Container {
associatedtype Item
subscript(i: Int) -> Item { get }
}
extension Array: Container { }
Array 는 모든 Types 를 저장할 수 있으므로, Container 역시 Array 가 저장한 모든 Types 에 대해 Subscript 가 작동하도록 하기 위해 Associated Type 을 이용해 위와 같이 적합성을 준수하도록 하면 다음과 같은 문제가 발생한다.
func makeProtocolContainer<T>(item: T) -> Container { // error: Use of protocol 'Container' as a type must be written 'any Container'
[item]
}
그리고 Swift compiler 는 Replace 'Container' with 'any Container' 라며 경고를 띄운다.
Associated Types 를 갖고 있는 Protocols 는 Return Types 로 사용될 수 없기 때문이다.
이는 앞에서 맞닥뜨린
func makeProtocolContainer<T, C: Container>(item: T) -> C {
[item] // error: Cannot convert return expression of type '[T]' to return type 'C'
}
와 유사한 케이스라 할 수 있다.
Opaque Type Resolve The Problem That Protocol Has an Associated Types
Container Protocol 은 다시 처음 정의하려던대로 바꾸고 Swift compiler 가 시키는대로 따라가보자.
protocol Container {
associatedtype Item
mutating func append(_ item: Item)
var count: Int { get }
subscript(i: Int) -> Item { get }
}
extension Array: Container { }
func makeProtocolContainer<T>(item: T) -> any Container {
[item]
}
let anyContainer = makeProtocolContainer(item: 11)
print(type(of: anyContainer)) // Array<Int>
print(anyContainer) // [11]
print(anyContainer.count) // 1
let eleven = anyContainer[0]
print(type(of: eleven)) // Int
print(eleven) // 11
정상적으로 작동한다. 위 경우는 Array 가 실제로 Any Types 에 대해 동작할 수 있지만 Any나 AnyObject는 명확히 필요한 상황이
아니면 앱의 코드를 Type-Safe하지 않게 만들기 때문에 사용을 지양해야한다.
이런 상황을 해결할 수 있게 해주는 것이 바로 Opaque Return Types다!
이번에는 다시 makeProtocolContainer(item:) 함수를 Opaque Types some Container를 return 하도록 바꿔보자.
func makeProtocolContainer<T>(item: T) -> some Container {
[item]
}
let opaqueContainer = makeProtocolContainer(item: 12)
print(type(of: opaqueContainer)) // Array<Int>
print(opaqueContainer) // [12]
print(opaqueContainer.count) // 1
let twelve = opaqueContainer[0]
print(type(of: twelve)) // Int
print(twelve) // 12
Opaque Return Types를 사용하면 Any 를 사용하지 않고
Associated Types 를 갖는 Protocol 을 return 할 때의 문제를
해결할 수 있다.
24. Automatic Reference Counting 👩💻
Automatic Reference Counting
Swift 는 Automatic Reference Counting (ARC)를 사용해 앱의 메모리 사용을 관리하고 추적한다. 대부분의 경우 Swift 에서 개발자는
메모리를 관리할 필요가 없다. 이에 대해 Apple 은 이렇게 말한다. just work.
ARC 는 Class Instance 가 더 이상 필요하지 않을 때 메모리 할당을 해제(free up)한다
(Deinitialization 이 호출됨을 의미).
그러나 일부 경우 ARC 는 메모리를 관리하기 위해 코드 관계에 대한 추가 정보를 요구한다. Swift 에서 ARC 를 사용하는 것은 Objective-C 에서 ARC 사용에 대한 Transitioning to ARC Release Notes 에서 설명한 접근 방식과 유사하다.
Reference counting은Class Instance에만 적용된다. Structures 와 Enumerations 는 Value Types이다.
How ARC Works
Class 의 new Instance가 생겨날 때마다, ARC 는 *Instance 의 정보를 저장하기 위해 메모리 청크를 할당
(allocates a chunk of memory)한다. 이 메모리는 Instance 의 Type 에 대한 정보와 Instance 와 연관된 Stored Properties
의 값에 대한 정보(pointer)를 갖는다.
반대로 더 이상 Class Instance 가 필요하지 않을 경우, ARC 는 Instance 에 사용되고 있던 메모리 할당(free up the memory)을 해제해
다른 프로세스가 사용할 수 있도록한다.
만약 ARC 가 아직 사용중인 Instance 의 메모리 할당을 해제하면, 더 이상 Instance 의 Properties, Methods 에 접근할 수 없어
앱에 crash 가 발생한다.
따라서 ARC 는 아직 사용중인 Instances 가 메모리 해제되지 않도록, 각 Class Instance 가 얼마나 많은 Properties, Constants,
Variables 를 참조(referring)하고 있는지 추적해 단 하나의 참조(reference)라도 유효하다면 Instance 의 할당을
해제(deallocate)하지 않는다.
이것을 가능하도록 하기 위해 ARC 는 Class Instance 를 Properties, Constants, Variables 에 할당할 때마다 이들 사이에 강한 참조
(strong reference)를 만든다. “strong” 이라는 단어가 사용된 이유는 해당 Instances 가 남아있는 한 ARC 는 메모리 할당 해제를
허용하지 않기 때문이다.
ARC in Action
ARC 의 동작을 확인하기 위해 Person 이라는 Class 를 하나 생성한다.
class Person {
let name: String
init(name: String) {
self.name = name
print("\(name) is being initialized")
}
deinit {
print("\(name) is being deinitialized")
}
}
다음으로 Person? Types 의 변수를 3개 생성한다. Optional Types 이므로 해당 변수 3개는 nil value 로 초기화 된다.
var reference1: Person?
var reference2: Person?
var reference3: Person?
new Person instance 를 하나 생성해 reference1 변수에 할당한다.
reference1 = Person(name: "John Appleseed")
John Appleseed is being initialized
이제 reference1 변수가 Person(name: "John Appleseed") instance 를 Strong References 로 갖는다. 따라서 ARC 는
이 Person(name: "John Appleseed")에 대한 Strong References 를 +1 시켜 1개를 기억해 이 Instance 가 메모리에
유지되고, deallocated 되지 않도록 한다.
reference2 = reference1
이제 reference2 변수 역시 Person(name: "John Appleseed") instance 를 Strong References 로 가져 이들 사이에도
Strong References 가 생성되었다. 따라서 ARC 는 Person(name: "John Appleseed")에 대한 Strong References 를
+1 시켜 2개를 기억한다.
그리고 여기서 중요한 것은
new Instance를 생성하는 것이 아닌Original Instance 의 Reference 를 공유하는 것이기 때문에 Initializer 는 호출되지 않는다.
reference3 = reference1
마찬가지로 이제 Person(name: "John Appleseed")에 대한 Strong References 는 3개가 생성되었다.
3개의 Strong References 중 Original Reference 를 포함해 2개를 끊어보자(break).
reference1 = nil
reference2 = nil
ARC 는
Person(name: "John Appleseed")에 대한 Strong References 를-2 시켜 1개를 기억한다. 따라서 아직 이Instance 가 메모리에 유지되고, deallocated 되지 않도록 한다.
마지막 남은 Strong References 역시 끊어보자.
reference3 = nil
John Appleseed is being deinitialized
ARC 는
Person(name: "John Appleseed")에 대한 Strong References 를-1 시켜 존재하지 않음을 확인(zero strong references)한다.
따라서 이제 Instance 는 deallocated 되어 Deinitializer 가 호출된다.
Strong Reference Cycles Between Class Instances
위에서 ARC 가 어떻게 동작하고, Instance 를 메모리에 유지하는지 확인했다.
이번에는 Strong References 가 절대로 zero strong references 에 도달하지 않는 코드의 예를 보려 한다. 이는 두 개의 Classes 가
서로에 대한 Strong References 를 갖는 경우 발생한다. 두 Instances 를 동시에 해제(deallocate)할 수 없어 각 Instances 는 서로를
유지시킨다.
해당 Case 를 확인하기 위해 Person 과 Apartment 라는 Classes 를 아래와 같이 생성한다.
class Person {
let name: String
init(name: String) { self.name = name }
var apartment: Apartment?
deinit { print("\(name) is being deinitialized") }
}
class Apartment {
let unit: String
init(unit: String) { self.unit = unit }
var tenant: Person?
deinit { print("Apartment \(unit) is being deinitialized") }
}
Personclass 는 초기값으로nil을 갖는Apartment?를 Properties 로 갖는다.Apartmentclass 는 초기값으로nil을 갖는Person?을 Properties 로 갖는다.
위와 마찬가지로 변수를 선언한다.
var john: Person?
var unit4A: Apartment?
john = Person(name: "John Appleseed")
unit4A = Apartment(unit: "4A")
변수 unit4A은 Apartment(unit: "4A") instance 를 Strong References 로 갖는다.
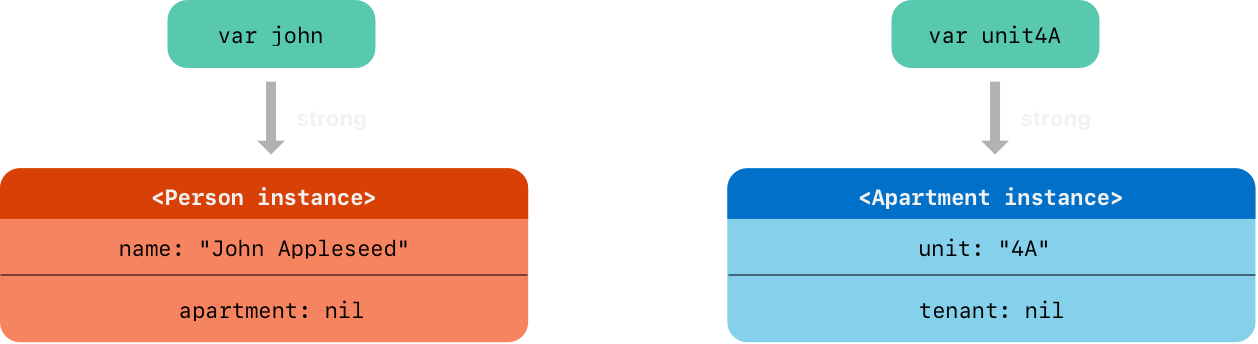
Person 은 Apartment 를 갖도록, Apartment 는 Person 을 갖도록 할 수 있다. 이 둘이 서로의 Instances 를 Strong References 로
갖도록 해보자.
john?.apartment = unit4A
unit4A?.tenant = john
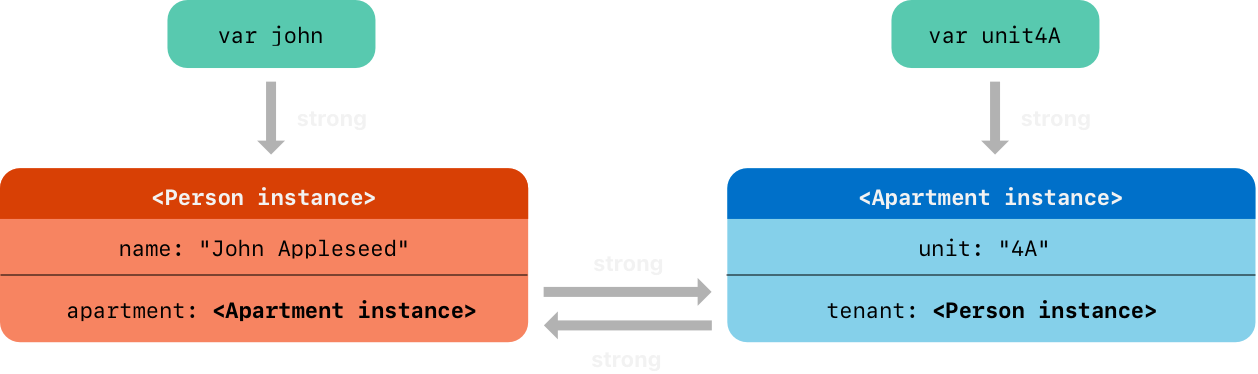
이제 Person(name: "John Appleseed")은 변수 john과 Apartment(unit: "4A") instance 의 변수 property tenant에
의해 참조되어 ARC 는 2개의 Strong References 가 존재함을 확인한다. 반대의 경우도 마찬가지로 Apartment(unit: "4A") instance
역시 ARC 는 2개의 Strong References 가 존재함을 확인한다.
변수 john과 unit4A가 갖는 Strong References 를 끊어보자.
john = nil
unit4A = nil
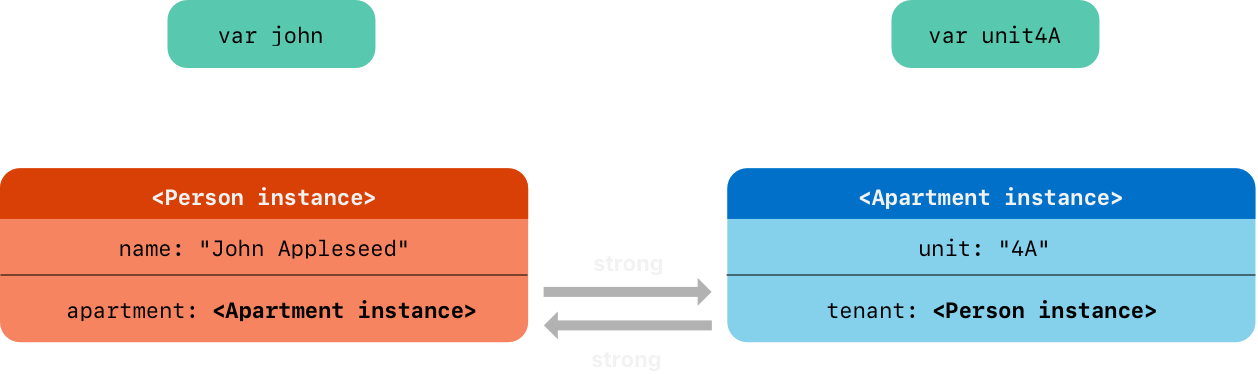
// Nothing
서로가 서로를 Strong References 로 참조하고 있기 때문에 두 Instances 는 절대로 Zero Strong References에 도달할 수 없다.
만약 이걸 끊어내려면 서로에 대한 Strong References 를 먼저 끊어야한다.
john?.apartment = nil
unit4A?.tenant = nil
john = nil
unit4A = nil
Apartment 4A is being deinitialized
John Appleseed is being deinitialized
하지만 이 방법은 위험한 방법이다. 개발자가 이를 놓치거나 로직 순서상 또는 예기치 못한 에러 등으로 인해 변수 john이나 unit4A가 갖는
Strong References 만 끊어질 경우 더이상 메모리를 해제할 수 없는 상태가 되므로 Memory Leak이 발생한다.
Resolving Strong Reference Cycles Between Class Instances 👩💻
How Resolve Strong Reference Cycles
Swift 는 위와 같은 Strong Reference Cycles 문제를 해결하기 위해 2가지 방법 Weak References와 Unowned References를
제공한다. 이를 사용해 참조하면 Reference Cycles 의 한 Instance 가 강한 유지 없이 다른 Instance 를 참조할 수 있다. 그러면
Reference Cycles 의 한쪽의 참조가 Strong References 가 아니게 되므로 Strong Reference Cycles 없이 서로를 참조할 수
있고, 필요 없어졌을 때 연결 고리를 끊어내고 메모리를 해제할 수 있게 된다.
- 참조하는 Instance 가
Short Lifetime을 갖는 경우Weak References를 사용한다.- 참조하는 Instance 가
Same Lifetime또는Long Lifetime을 갖는 경우Unowned References를 사용한다.
이를 이용하면 Strong References 없이 서로에 대한 Reference Cycles를 가질 수 있다.
Weak References
위 예제의 경우 Apartment 는 tenant 가 있을 수도, 없을 수도 있다고 하자. 그렇다면 Apartment 에 비해 tenant 에 할당되는 Person 의
Lifetime 이 Short Lifetime 을 가지므로 tenant 를 Weak References로 바꾸는 것이 적절하다.
Weak References 는 Instance 를 강하게 유지(strong hold)하지 않는 참조이므로 ARC 는 Instance 가 해제(deallocate)되는 것을
막지 않는다.
Property Observers 는
ARC 가 Weak Reference 에 nil 을 설정(set)할 때 호출되지 않는다.
아래 예제는 위와 거의 동일하지만, 이번에는 Apartment 의 tenant 를 Weak Reference로 선언했다.
class Person {
let name: String
init(name: String) { self.name = name }
var apartment: Apartment?
deinit { print("\(name) is being deinitialized") }
}
class Apartment {
let unit: String
init(unit: String) { self.unit = unit }
weak var tenant: Person?
deinit { print("Apartment \(unit) is being deinitialized") }
}
var john: Person?
var unit4A: Apartment?
john = Person(name: "John Appleseed")
unit4A = Apartment(unit: "4A")
변수 unit4A은 Apartment(unit: "4A") instance 를 Strong References 로 갖는다.
위 예제와 마찬가지로 이 둘이 서로의 Instances 를 참조하도록 Reference Cycles 를 만들어보자.
john?.apartment = unit4A
unit4A?.tenant = john
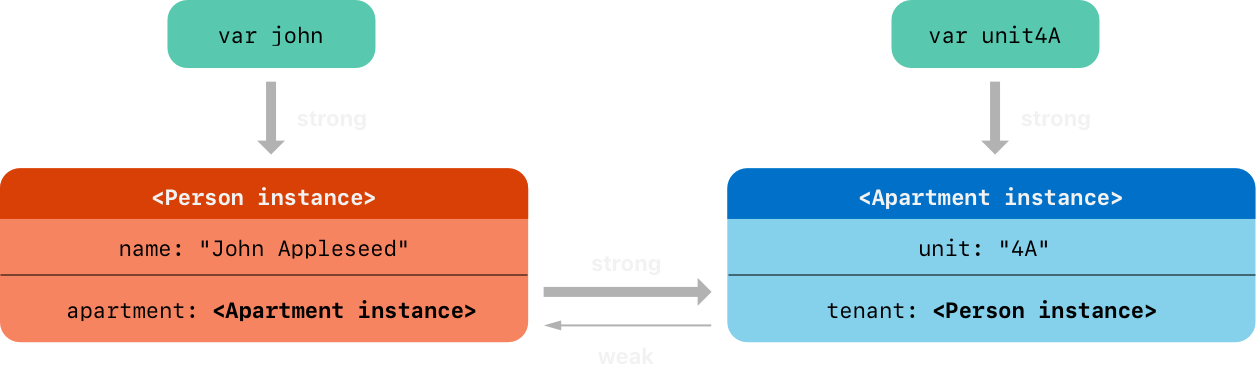
위와 마찬가지로 변수 john과 unit4A가 갖는 Strong References 를 끊어보자.
- Set
niltounit4Avariable
print(unit4A as Any) // Optional(__lldb_expr_13.Apartment)
unit4A = nil
print(unit4A as Any) // nil
DispatchQueue.main.asyncAfter(deadline: .now() + 1) {
print(john?.apartment as Any) // Optional(__lldb_expr_13.Apartment)
}
변수 unit4A의 Strong References 는 끊어졌지만 Person(name: "John Appleseed")이 Apartment(unit: "4A")
instance 를 Strong References 로 갖고 있기 때문에 해제(deallocate)되지 않는다.
- Set
niltojohnvariable
그렇다면 처음부터 다시 시작해서 이번에는 변수 john이 갖는 Strong References 를 끊어보자.
print(john as Any) // Optional(__lldb_expr_17.Person)
john = nil
print(john as Any) // nil
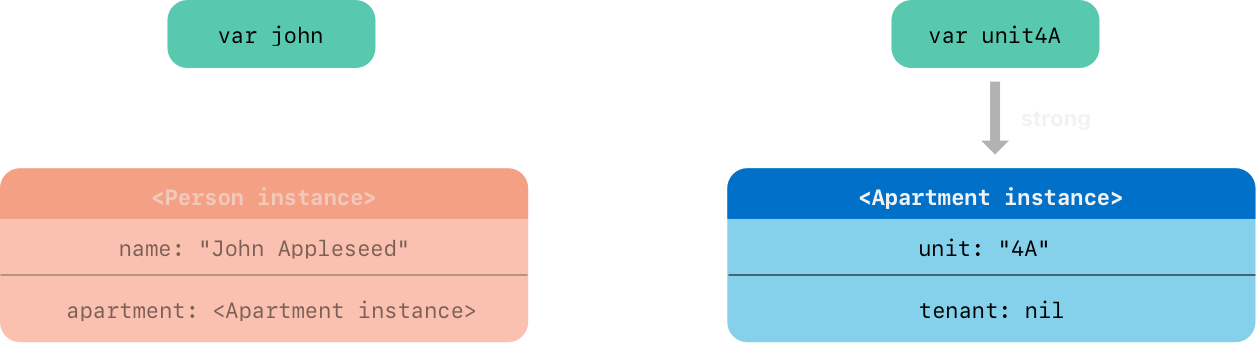
John Appleseed is being deinitialized
DispatchQueue.main.asyncAfter(deadline: .now() + 1) {
print(unit4A?.tenant as Any) // nil
}
변수 john의 Strong References 가 끊어지자 더이상 Strong References 가 남지 않은
Person(name: "John Appleseed")은 Deinitializers 를 호출 후 해제(deallocate)되었다.
Person(name: "John Appleseed")이 해제되어 이제 Apartment(unit: "4A")는 하나의 Strong References만 남게 되었다.
이제 Apartment(unit: "4A") 역시 해제가 가능하다.
unit4A = nil
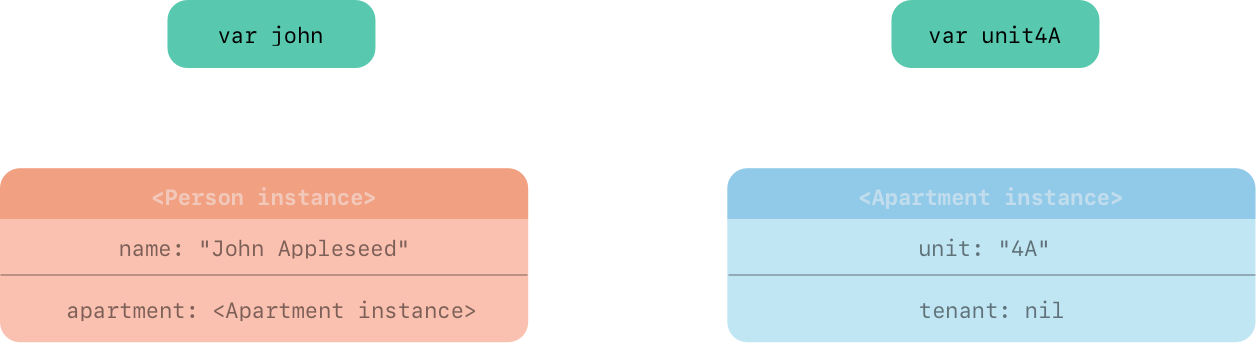
Apartment 4A is being deinitialized
Garbage Collection을 사용하는 시스템에서는 Garbage Collection 이trigger될 때만 Strong References 가 없는 객체가 deallocated 되기 때문에 Simple Caching Mechanism 을 구현하는데Weak Pointer가 사용되는 경우가 있다.
즉,Weak Pointer 는 Garbage Collection 이 trigger 되기 전까지 참조가 가능하다.하지만 Swift 의
ARC는 좀더 tight 하게 메모리를 관리한다. ARC 는마지막 Strong References 가 제거되는 즉시 deallocated 되어 Weak References 는 즉시 참조가 불가능하다.
Unowned References
Weak References 와 마찬가지로 Unowned References는 참조하는 Instance 를 강하게 유지(strong hold)하지 않는다. 그러나
Weak References 와 다르게 Unowned References 는 참조하는 Instance 의 수명이 같거나(Same Lifetime) 더 긴(Long Lifetime)
경우 사용한다. Weak References 와 마찬가지로 Properties 또는 Variables 선언 전에 unowned keyword 위치시켜 정의한다.
Weak References 와 달리 Unowned References 는 항상 값을 가질 것으로 예상된다. 결과적으로 Unowned References 는
Value 를 Optional 로 만들지 않고, ARC 는 Unowned References 의 값을 nil 로 설정하지 않는다.
References 가 항상 deallocated 되지 않은 Instance 를 참조한다고 확신하는 경우에만Unowned References를 사용해야한다.
즉, Strong References 가 아니어서 해제가 가능한데, Instance 가 deallocated 된 후 접근할 경우Runtime Error가 발생하기 때문이다.
다음 예제는 Customer와 CreditCard라는 두 Classes 를 모델로 한다. 이 예제는 앞에서의 Person 과 Apartment 모델과 조금 다른 관계를
갖는다. 이 데이터 모델에서 Customer 는 CreditCard 를 가지고 있거나 가지고 있지 않을 수 있지만, CreditCard 는 항상 Customer 와
연결되어있다.
앞의 모델과 비교해보자.
1 ) Person 과 Apartment 모델
class Person {
let name: String
init(name: String) { self.name = name }
var apartment: Apartment?
deinit { print("\(name) is being deinitialized") }
}
class Apartment {
let unit: String
init(unit: String) { self.unit = unit }
weak var tenant: Person?
deinit { print("Apartment \(unit) is being deinitialized") }
}
- Person : Apartment(=apartment) 없이 존재할 수 있다.
init(name:)&var apartment: Apartment? - Apartment : Person(=tenant) 없이 존재할 수 있다.
init(unit:)&var tenant: Person? - 그리고 Person 의 Lifetime 이 Apartment 의 Life Cycles 보다 짧다.
따라서 Lifetime 이 긴쪽인 Apartment 가 Short Lifetime 을 갖는 Person 을 참조할 때
week를 붙여week var tenant: Person?를 만들어 준다.
2 ) Customer 와 CreditCard 모델
class Customer {
let name: String
var card: CreditCard?
init(name: String) {
self.name = name
}
deinit { print("\(name) is being deinitialized") }
}
class CreditCard {
let number: UInt64
unowned let customer: Customer
init(number: UInt64, customer: Customer) {
self.number = number
self.customer = customer
}
deinit { print("Card #\(number) is being deinitialized") }
}
- Customer : CreditCard(=card) 없이 존재할 수 있다.
init(name:)&var card: CreditCard? - CreditCard : Customer(=customer) 없이 존재할 수 없다.
init(number:customer:)&let customer: Customer - 그리고 Customer 의 Lifetime 이 CreditCard 의 Lifetime 보다 길거나 같으며,
CreditCard 는 Customer 에 종속적이다.
따라서 Lifetime 이 짧거나 같으며 Customer 에 종속성을 갖는 CreditCard 가 Long Lifetime 을 갖는 Customer 를 참조할 때
unowned를 붙여unowned let customer: Customer를 만들어 준다.
CreditCard 는 Customer 를 항상 갖고 있어야 한다는 종속성이 있기 때문에 Strong Reference Cycles 를 피하기 위해 항상
Unowned References로 정의한다.
var john: Customer?
john = Customer(name: "John Appleseed")
이제 변수 john은 Customer(name: "John Appleseed") instance 를 Strong References 로 갖는다.
그리고 이제 Customer(name: "John Appleseed")이 존재하므로 Customer 에 종속성을 갖는 CreditCard instance 를 생성할 수 있다.
john!.card = CreditCard(number: 1234_5678_9012_3456, customer: john!)
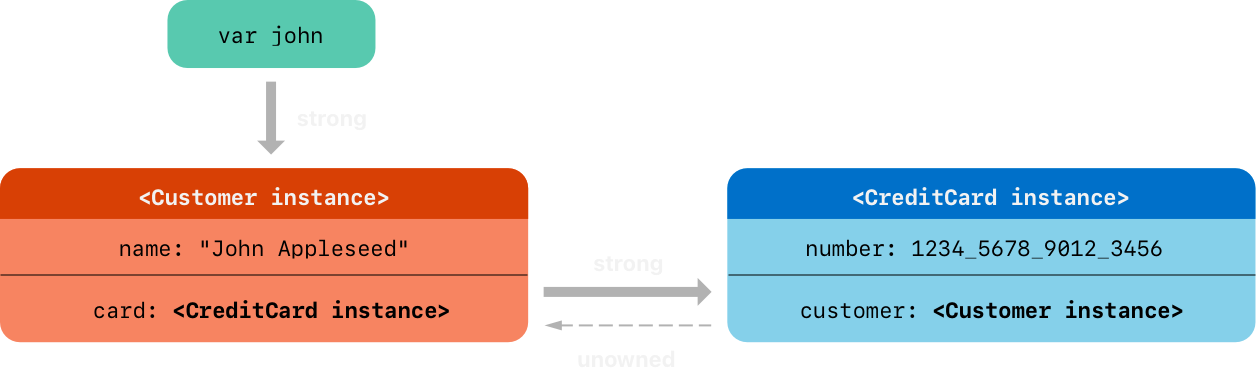
이제 변수 john이 갖는 Strong References 를 끊어보자.
john = nil
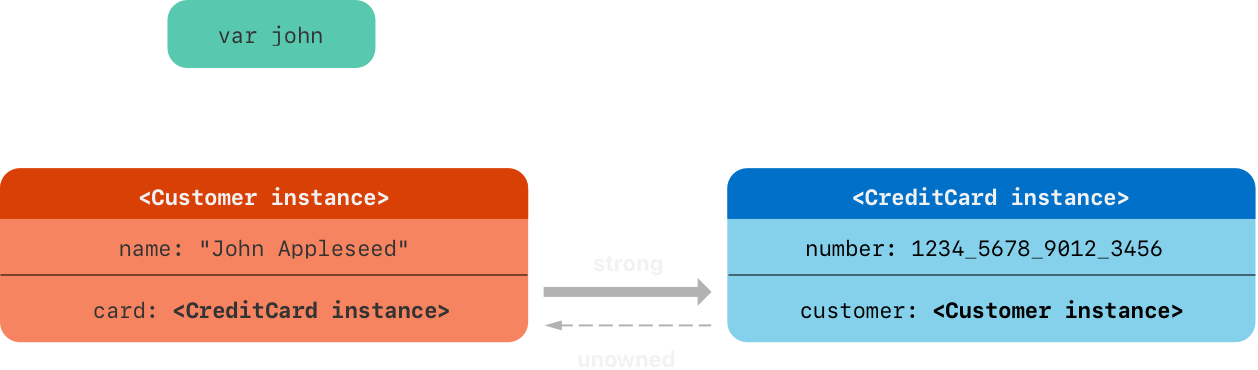
ARC 는 Customer(name: "John Appleseed")가 zero strong references 에 도달했음을 확인하고 Instance 를 deallocated 시키며,
Customer 에 종속성을 가지며 Customer 의 Properties 로써 존재하던 CreditCard 역시 deallocated 된다.
John Appleseed is being deinitialized
Card #1234567890123456 is being deinitialized
위 예제는 어떻게
Safe Unowned References를 사용하는지 보여준다.하지만 Swift 는 성능 상의 이유로
Runtime Safety Checks를 비활성화 할 수 있는Unsafe Unowned References역시 제공한다. 대신 Unstructured Concurrency 와 마찬가지로 완전한 책임(completely responsibility for correctness)이 사용자에게 주어진다.
Unsafe Unowned References 로 코드를 작성했고, 참조하던 Instance 가 deallocated 된 경우, Unsafe Unowned References 는 이를 알 수 없어 기존에 가지고 있던 메모리 주소(Pointer)를 이용해 안전하지 않은 접근을 하게 된다.
Unowned Optional References
위 예제에서는 Unowned References가 Non-Optional 이었다. 이번에는
Optional Types 인 Unowned Optional References에 대해 알아본다.
ARC Ownership Model에서Unowned Optional References와Weak References는 같은context에서 사용될 수 있다.
차이점은 Unowned Optional References 를 사용할 때Valid Object 를 참조하거나nil 로 설정되어있는지 확인해야한다.그리고 가장 중요한 것은 Unstructured Concurrency 와 마찬가지로 완전한 책임(completely responsibility for correctness)이 사용자에게 주어진다.
다음은 학교의 특정 과에 제공되는 강의를 추적하는 예제다.
class Department {
var name: String
var course: [Course]
init(name: String) {
self.name = name
self.course = []
}
deinit { print("Department '\(name)' is being deinitialized") }
}
class Course {
var name: String
unowned var department: Department
unowned var nextCourse: Course?
init(name: String, in department: Department) {
self.name = name
self.department = department
self.nextCourse = nil
}
deinit { print("Course '\(name)' is being deinitialized") }
}
Department는 과에서 제공하는 강의에 대해 강한 참조를 갖는다. 그리고 ARC Ownership Model 에서 Department 는 강의를 소유하고 있고,
Course는 department 와 nextCourse 라는 2개의 Unowned References를 갖는다.
그리고 Department 의 Lifetime 이 Course 의 Lifetime 보다 길거나 같으며, Course 의 department 는 Department 에
종속적이므로 Optional 이 아니다. 하지만 Course 의 nextCourse 는 존재할 수도, 않을 수도 있기 때문에 Optional이다.
var department: Department?
var intro: Course?
var intermediate: Course?
var advanced: Course?
department = Department(name: "Horticulture")
intro = Course(name: "Survey of Planets", in: department!)
intermediate = Course(name: "Growing Common Herbs", in: department!)
advanced = Course(name: "Caring for Tropical Plants", in: department!)
intro?.nextCourse = intermediate!
intermediate?.nextCourse = advanced!
department?.course = [intro!, intermediate!, advanced!]
위와 같이 Horticulture 과에 3개의 강의를 개설하고, 등록한 결과를 그림으로 표현하면 다음과 같다.
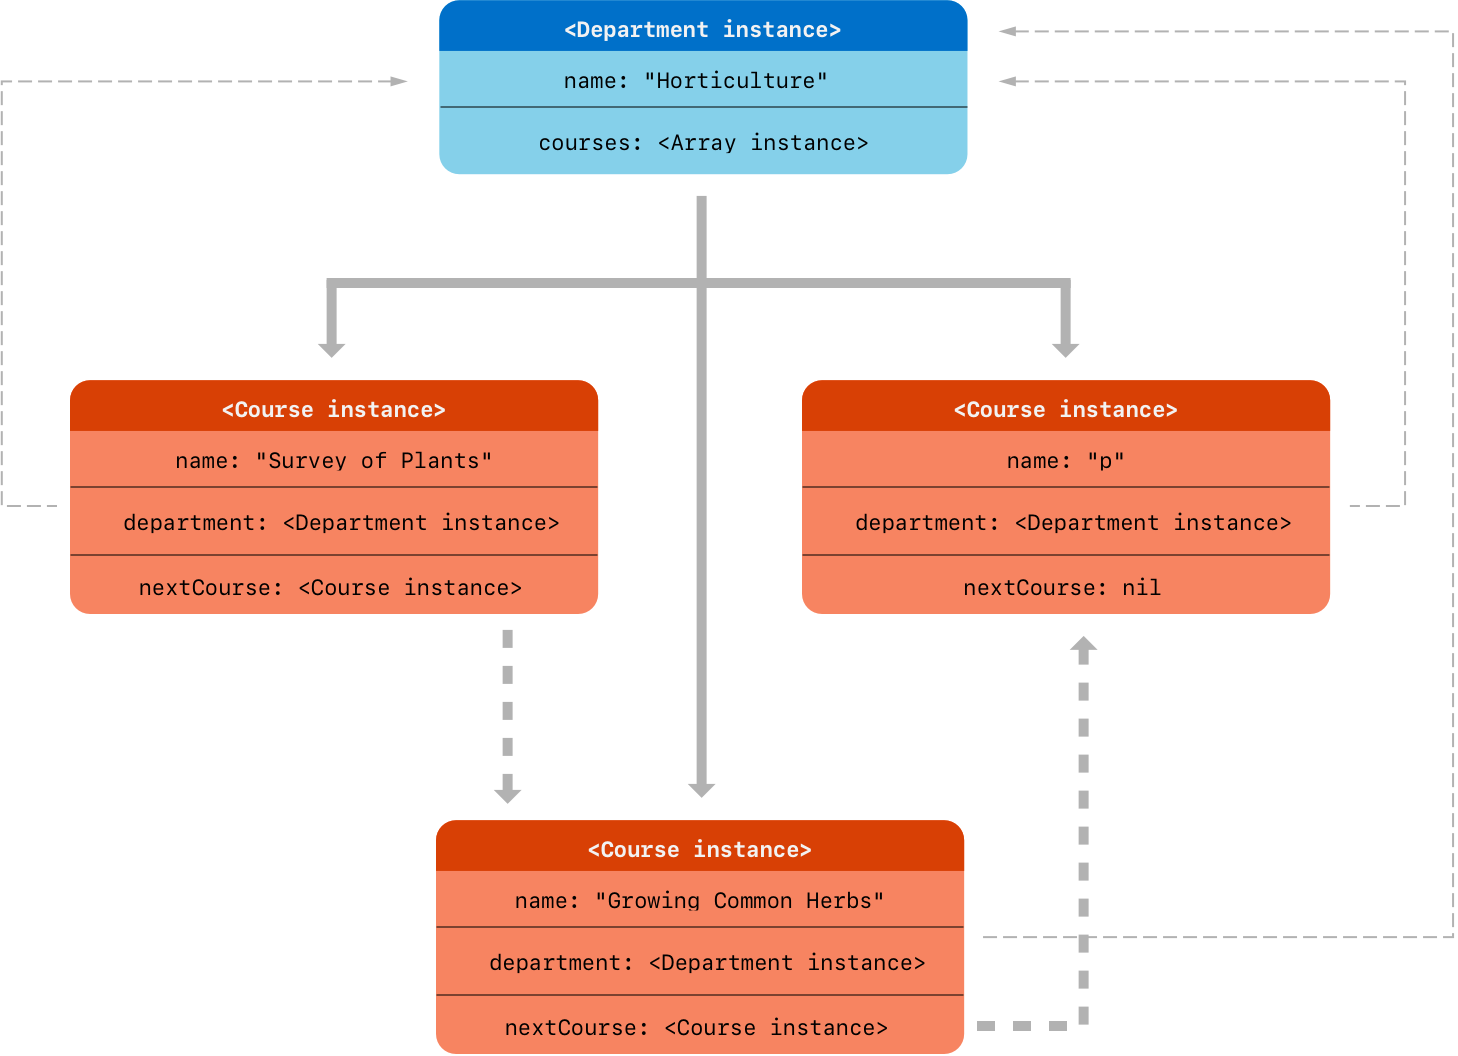
한번 각각의 변수들을 출력해보자. 우선 강의는 다음과 같이 확인된다.
let printCourse = { (variableName: String, course: Course) in
print("""
[\(variableName)]
Class : \(course)
Name : \(course.name)
Department : \(course.department)
Next Course : \(course.nextCourse as Any)
""")
}
printCourse("intro", intro!)
printCourse("intermediate", intermediate!)
printCourse("advanced", advanced!)
[intro]
Class : __lldb_expr_131.Course
Name : Survey of Planets
Department : __lldb_expr_131.Department
Next Course : Optional(__lldb_expr_131.Course)
[intermediate]
Class : __lldb_expr_131.Course
Name : Growing Common Herbs
Department : __lldb_expr_131.Department
Next Course : Optional(__lldb_expr_131.Course)
[advanced]
Class : __lldb_expr_131.Course
Name : Caring for Tropical Plants
Department : __lldb_expr_131.Department
Next Course : nil
과 정보도 출력해보자.
print("[department] : \(department!), \(String(describing: department!.name)), \(String(describing: department!.course))")
[department] : __lldb_expr_131.Department, Horticulture, [__lldb_expr_131.Course, __lldb_expr_131.Course, __lldb_expr_131.Course]
위 Unowned References 와 달리 사용자가 Classes 사이의 References 를 관리하고 deallocated 시키는 것에 대해 책임을 다하지 못했을 때 어떤 일이 발생하는지 확인해본다.
- Unsafe Unowned References - error case
department = nil
print(department as Any) // nil
DispatchQueue.main.asyncAfter(deadline: .now() + 1) {
printCourse("intro", intro!) // error
}
DispatchQueue.main.asyncAfter(deadline: .now() + 1) {
print("1")
print(intro!.name)
print(intro!.department) // error
print("2")
}
1
Survey of Planets
참조하던 Instance 가 deallocated 되었으나, Unsafe Unowned References 는 이를 알 수 없어 기존에 가지고 있던 메모리 주소(Pointer)를 이용해 안전하지 않은 접근을 했고, 값을 받아오지 못해 더이상 진행이 되지 않고 멈춰버렸다. 만약, 다른 프로세스에 의해 해당 메모리 주소에 값이 저장되었으나 예상한 것과 다른 값이 들어가 있고 그걸 가져올 경우는 Runtime Error 로 이어질 수도 있는 심각한 문제를 발생시킬 수 있다.
- Unsafe Unowned References - success case
위와 같은 발생하는 것을 막기 위해 Course 가 일부 deallocated 될 경우, 그 Course 를 참조하는 것들을 먼저 끊어야하며,
만약 Department 가 deallocated 될 경우, Department 에 종속성을 갖는 모든 Course 가 unowned var department property 에
접근하지 못하도록 하거나 모든 Course 를 함께 deallocated 해야한다.
do {
department = nil
advanced = nil
intermediate = nil
intro = nil
}
Department 'Horticulture' is being deinitialized
Course 'Survey of Planets' is being deinitialized
Course 'Growing Common Herbs' is being deinitialized
Course 'Caring for Tropical Plants' is being deinitialized
Optional Value기본 Types 는Swift Standard Library 의 Enumeration 인 Optional이다.
그러나 Optional 은 Value Types 에unowned를 marked 할 수 없다는 규칙에 대해 예외다.Class 를 Wrapping 한 Optional 은
Swift Standard Library 의 Enumeration 인 OptionalTypes 이므로 Container 가 Value Type 가 된다. 즉,Reference Counting을 사용하지 않으므로, Strong References 를 Optional 로 유지할 필요가 없다.
Unowned References and Type! Properties
위에서 Strong Reference Cycles 를 끊기 위한 2가지 방법(Week References, Unowned References)에 대해 다루었다.
1 ) 2개의 Properties 가 모두 nil 을 허용하는 케이스
Person 과 Apartment 예제는 2개의 Properties 가 모두 nil 을 허용하는 경우에 Strong Reference Cycles 이 발생할 가능성이
있는 상황을 보여준다. 이 시나리오는 Week References를 이용해 해결하는 것이 가장 좋다.
2 ) 1개의 Property 는 nil 을 허용하고, 1개의 Property 는 nil 을 허용하지 않는 케이스
Customer 와 CreditCard 예제는 1개의 Property 는 nil 을 허용하고, 1개의 Property 가 nil 을 허용하지 않는 경우에 Strong
Reference Cycles 이 발생할 가능성이 있는 상황을 보여준다. 이 시나리오는 Unowned References를 이용해 해결하는 것이 가장 좋다.
3 ) 2개의 Properties 가 모두 nil 을 허용하지 않는 케이스
마지막으로 2개의 Properties 가 모두 값이 항상 있고 초기화가 완료되면 nil 이 되어서는 안 되는 세 번째 시나리오가 있는 상황을 설명한다.
이 시나리오는 Unowned References 의 변형으로 Unowned References 와
Implicitly Unwrapped Optional Properties(Type!)를 이용해 해결한다.
이렇게 하면 Strong Reference Cycles 를 피하면서, 초기화가 완료되면 두 Properties 모두 Optional Unwrapping 없이 접근할 수 있다.
1 ) Unowned Optional References
Customer 와 CreditCard 모델 과 동일한 형태의 케이스를 먼저 확인하고, Implicitly Unwrapped Optional Properties 가 적용된 모델을 확인해 비교해본다.
class Country {
let name: String
var capitalCity: City?
init(name: String, capitalName: String) {
self.name = name
self.capitalCity = City(name: capitalName, country: self)
}
deinit { print("\(name) is being deinitialized") }
}
class City {
let name: String
unowned let country: Country
init(name: String, country: Country) {
self.name = name
self.country = country
}
deinit { print("Card #\(number) is being deinitialized") }
}
var country = Country(name: "Canada", capitalName: "Ottawa")
print("\(country.name)'s capital city is called \(country.capitalCity!.name)")
Canada's capital city is called Ottawa
var capitalCity: City?와init(name:, country:)를 사용한다.country.capitalCity!.name와 같이 country 의 capitalCity 에 접근하려면 Optional Unwrapping 이 필요하다.
2 ) Unowned References and Implicitly Unwrapped Optional Properties
class Country {
let name: String
var capitalCity: City!
init(name: String, capitalName: String) {
self.name = name
self.capitalCity = City(name: capitalName, country: self)
}
deinit { print("\(name) is being deinitialized") }
}
class City {
let name: String
unowned let country: Country
init(name: String, country: Country) {
self.name = name
self.country = country
}
deinit { print("Card #\(number) is being deinitialized") }
}
var country = Country(name: "Canada", capitalName: "Ottawa")
print("\(country.name)'s capital city is called \(country.capitalCity.name)")
Canada's capital city is called Ottawa
var capitalCity: City!와init(name:, country:)를 사용한다.country.capitalCity.name와 같이 Optional Unwrapping 없이 country 의 capitalCity 에 접근이 가능하다.
Country 의 Initializer 의 self.capitalCity = City(name: capitalName, country: self)를 살펴보자.
City 의 Initializer 는 Country 가 필요하다. 하지만 [Two-Phase Initialization] 에서 설명했듯이 'self' 참조는 'Phase 2'
에서만 가능하다.
따라서 ‘self’ 참조를 사용하면서, var capitalCity 가 Optional 을 허용하지 않도록 하기 위해 'City!'로 표시되는
Implicitly Unwrapped Optionals 를 사용해 nil 을 할당해 Phase 1 을 처리하고를 하고, Phase 2 에서 반드시 저장하는 방법을
사 용한다.
- Implicitly Unwrapped Optionals
let possibleString: String? = "An optional string." let forcedString: String = possibleString! // requires an exclamation point let assumedString: String! = "An implicitly unwrapped optional string." let implicitString: String = assumedString // no need for an exclamation point
마지막으로 deallocated 테스트를 해보자
var country: Country?
country = Country(name: "Canada", capitalName: "Ottawa")
country = nil
Country Canada is being deinitialized
City Ottawa is being deinitialized
deallocated 까지 정상적으로 처리된다.
Strong Reference Cycles for Closures
위에서 두 Class Instance Properties 사이에 생성되는 Strong Reference Cycles 와 이를 어떻게 해결하는지 각각의 시나리오에 대해
살펴보았다.
이번에는 Class Instance 와 Closures 사이에 생성되는 Strong Reference Cycles 에 대해 알아본다. 이것은 Class Instance
Property 에 Closure 를 할당하고, Closure 가 'self' 를 이용해 자신이 속한 context 의 Instance Properties/Methods 를
캡처할 때 생성된다.
class HTMLElement {
let name: String
let text: String?
lazy var asHTML: () -> String = {
if let text = self.text {
return "<\(self.name)>\(text)</\(self.name)>"
} else {
return "<\(self.name) />"
}
}
init(name: String, text: String? = nil) {
self.name = name
self.text = text
}
deinit { print("\(name) is being deinitialized") }
}
위 HTMLElement class 는 head와 text를 받아 HTML 을 만들어준다.
var heading: HTMLElement? = HTMLElement(name: "h1")
let html = heading!.asHTML()
print(html) // <h1 />
var headingWithText: HTMLElement? = HTMLElement(name: "p", text: "Hello~")
let anotherHtml = headingWithText!.asHTML()
print(anotherHtml) // <p>Hello~</p>
asHTMLproperty 는 String 값을 HTML Rendering 으로 출력할 때만 필요하므로lazyproperty 로 선언된다.
그리고lazy로 선언되었으므로 Property 가 호출되는 시점에는 이미 Initialization 을 마친 상태를 의미한다. 즉,self참조가 가능함을 의미한다.
이제 사용이 끝났으니 deallocated 시켜보자.
heading = nil
headingWithText = nil
print(heading as Any) // nil
print(headingWithText as Any) // nil
// Nothing
변수 heading과 headingWithText에 연결된 Strong Reference Cycles 는 제거되었지만 두 Classes 모두 deallocated
되지 않는다.
- 두 Classes 가 갖는 Properties 사이에 생성된 References 가 Strong Reference Cycles 를 생성하는 이유는
Classes 가 Reference Types이기때문이다.- 그리고
Closures 역시 Reference Types 이므로, Classes 와 Closures 사이에도 Strong Reference Cycles 가 생성된다.
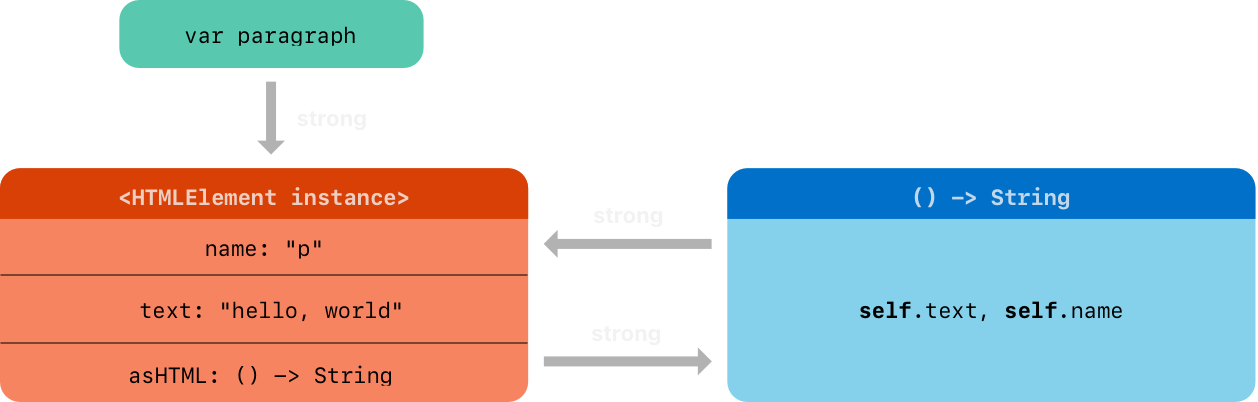
- Class Instances 는 context 내에 정의된 Properties 또는 Methods 의 Pointer 를 Strong References 로 참조한다.
(이 경우asHTML은 자신의 Closure() -> String을 강한 참조로 갖는다.) - Closures 는 자신이 속한 Context 내에 정의된 Properties 또는 Methods 의 Pointer 를 Strong References 로 참조한다.
(이 경우() -> String은 자신이 속한 Context 내에 정의된 name, text 에 접근하기 위해self를 강한 참조로 갖는다.)
Closures 는 여러 번 참조하지만 단 하나의
self를 Strong References 로 캡처한다.
Resolving Strong Reference Cycles for Closures
Defining a Capture List
Swift 는 이 문제를 해결하기 위해 Closure Capture List를 이용한 우아한 해결 방법을 제공한다. Capture List 는 Closures 가
하나 또는 그 이상의 Reference Types 를 캡처할 때 사용할 규칙을 정의한다. 두 Classes 의 경우와 마찬가지로 Week References
또는 Unowned References를 사용한다.
- Without Capture List
lazy var someClosure = {
(index: Int, stringToProcess: String) -> String in
// closure body goes here
}
lazy var someClosure = {
// closure body goes here
}
Closures 는 Parameter List 를 context 로부터 유추할 수 있어 생략이 가능하다.
- With Capture List
lazy var someClosure = {
[unowned self, weak delegate = self.delegate]
(index: Int, stringToProcess: String) -> String in
// closure body goes here
}
lazy var someClosure = {
[unowned self, weak delegate = self.delegate] in
// closure body goes here
}
Parameter List 를 context 로부터 유추하도록 생략하더라도 Capture List 를 사용할 때는
inkeyword 를 누락할 수 없다.
Weak and Unowned References
두 Classes 의 경우와 마찬가지로 Closures 가 캡처한 References 가 nil이 될 가능성이 있는지와 Lifetime 을 비교해 사용한다.
- Week References : 캡처한 self 가
nil이 될 가능성이 있는 경우(Short Lifetime) 사용한다. 즉, Week References 는 항상Optional이다. - Unowned References : 캡처한 self 가
nil이 될 가능성이 없고 항상 서로를 참조하는 경우(Same Lifetime) 사용한다. 즉, Unowned References 는Forced Unwrapping또는Non-Optional이다.
다음은 Strong Reference Cycles for Closures 에 Capture List 를 적용한 코드다.
class HTMLElement {
let name: String
let text: String?
lazy var asHTML: () -> String = {
[unowned self] in
if let text = text {
return "<\(name)>\(text)</\(name)>"
} else {
return "<\(name) />"
}
}
init(name: String, text: String? = nil) {
self.name = name
self.text = text
}
deinit { print("\(name) is being deinitialized") }
}
var headingWithText: HTMLElement? = HTMLElement(name: "p", text: "Hello~")
headingWithText = nil
p is being deinitialized
deallocated 까지 정상적으로 처리된다.
25. Memory Safety 👩💻
Memory Safety
기본적으로 Swift 는 코드에서 안전하지 않은 작동이 발생하는 것을 방지한다. 예를 들면, Initialization 이전에 Variables 에 접근하기, Deallocated 이후 메모리에 접근하기, Array 의 범위 체크(out-of-bounds)와 같은 것들이다.
또한 Swift 는 동일한 메모리 공간에 대한 Multiple Accesses 발생시, 해당 메모리를 수정중인 코드에게
Exclusive Access(독점적인 접근)을 하도록 해 Conflicts이 발생되지 않도록 한다.
Swift 는 메모리를 자동으로 관리하기 때문에 대부분의 경우에 메모리 접근에 대해 생각할 필요가 없다. 그러나, Conflicts이 발생할 가능성이
있는 경우에 대해 알아야 메모리 접근에 대한 Conflicting Access 를 피할 수 있으므로 이것을 이해하는 것은 중요하다. 만약 이를 피하지 못해
Conflicts 을 일으킬 수 있는 코드가 포함되어 있다면, Compile-time Error 또는 Runtime Error가 발생한다.
Memory Access
Understanding Conflicting Access to Memory
메모리에 접근하는 것은 변수에 값을 설정하거나 함수에 arguments 를 전달하는 것과 같은 작동을 할 때 발생한다. 다음 코드는 메모리 접근의
Read Access와 Write Access에 대한 예다.
// A write access to the memory where one is stored.
var one = 1
// A read access from the memory where one is stored.
print("We're number \(one)!")
코드의 서로 다른 부분이 메모리의 동일 위치에 동시에 접근하려는 경우 예측할 수 없거나 일관성 없는 작동이 발생할 수 있고, 이로 인해
Conflicting Access가 발생할 수 있다. Swift 에는 코드의 여러 라인에 걸쳐 있는 값을 수정하는 방법이 있어, 자체 수정 중에 값에 접근을
시도할 수 있다. 다음 코드는 이런 상황에 대한 예시를 보여준다.
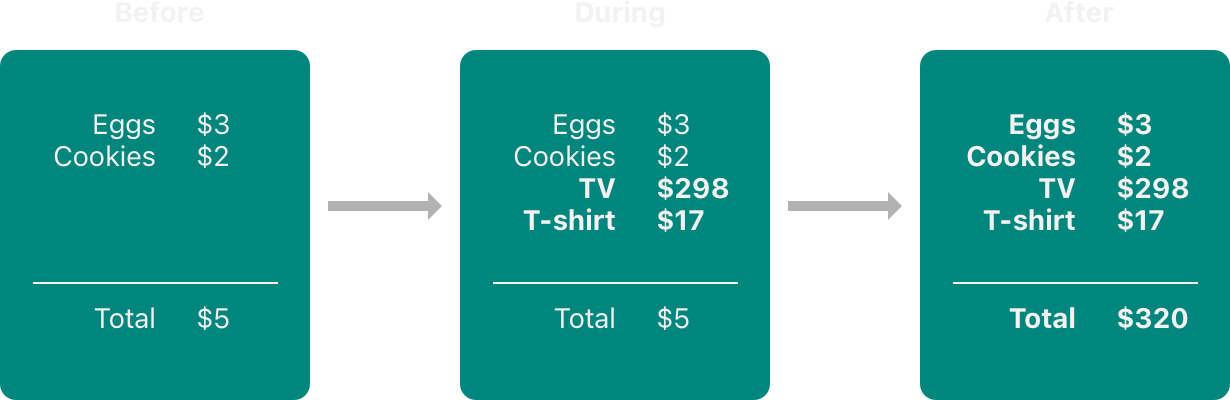
예산 업데이트는 2단계로 이루어진다.
- 1단계 : 아이템을 담는다.
- 2단계 : Total 을 업데이트 한다.
2단계까지 종료되어 예산 업데이트가 완료된 후에는 올바른 값을 얻을 수 있다. 하지만 1단계만 완료된 시점에 Total 에 접근할 경우, 임시적으로 올바르지 않은 값을 얻는다.
하지만 올바르지 않은 값을 얻는다는 것은 그림상 ‘During’ 조각 하나만 보았을 때 이야기일 뿐이다. 프로그래밍 관점에서 보면 이와 같은 문제를
해결하는 방법은 여러 가지가 존재하는데, 기존 Total 과 업데이트 된 Total 중 어떤 값을 원하는지에 따라 ‘$5’ 가 정답이 될 수도 있고,
‘$320’ 이 정답이 될 수도 있다. 따라서 Conflicting Access를 고치기 전에 작동이 수행하고자 하는 의도를 명확히 파악하는 것이 중요하다.
Concurrent Code 또는 Multithreaded Code 를 작성할 경우
Conflicting Access to Memory를 자주 접할 수 있다. 하지만 Conflicting Access 는Single Thread에서도 발생할 수 있다. 이 챕터에서 설명하는 Conflicts 가 이에 해당한다.
- Conflicting Access to Memory (Single Thread) : Conflicts 이 발생할 경우 Swift 는 이를 감지해 Compile-time Error 또는 Runtime Error 가 발생하도록 보장한다.
- Conflicting Access to Memory (Multithread) : Thread Sanitizer 를 사용해 Threads 사이에 발생하는 Conflicts 을 감지한다.
Characteristics of Memory Access
Conflicting Access 에서 고려해야 할 Memory Access 의 3가지 특성이 있다.
- Read Access 인가? Write Access 인가?
- Access 지속 시간
- Access 되는 메모리 위치
특히 다음 조건을 만족하는 2개의 Accesses 가 있다면 Conflicts 가 발생한다.
- 적어도 하나의 Write Access 또는 Nonatomic Access
- 메모리의 같은 위치에 접근
- 접근 기간(duration)이 중복
일반적으로 Read Access 와 Write Access 의 차이는 명확하다. Write Access 는 메모리의 위치를 변경하지만, Read Access 는 그렇지 않다. 메모리의 위치는 Variables, Constants, Properties 와 같은 접근 중인 항목을 나타낸다. 메모리 접근 기간은 순간적(instantaneous)이거나 장기적(long-term)이다.
연산이 C atomic operations 만 사용하는 경우 Atomic이고, 그렇지 않으면 Nonatomic이다. 이러한 함수 목록은 stdatomic.3 페이지를
참고한다.
Access 가 시작되고 종료되기 전까지 다른 코드를 실행할 수 없는 경우, 접근은 즉시(instantaneous) 이루어진다. 일반적으로 2개의
Instantaneous Access은 동시에 발생할 수 없다. 하지만 대부분의 메모리 접근은 즉각적으로 반응하며, 아래 코드 리스트의 모든 Read Access
와 Write Access 는 즉시 이루어진다(동시에 이루어지는 것을 말하는 것은 아니다. 둘이 순차적으로 즉각적인 반응을 보인다는 것이다).
func oneMore(than number: Int) -> Int {
return number + 1
}
var myNumber = 1
myNumber = oneMore(than: myNumber)
print(myNumber) // 2
그러나 다른 코드의 실행에 걸쳐 있는 Long-term Accesses 에 접근하는 방법은 여러 가지가 있다. Instantaneous Access와
Long-term Access의 차이점은 Long-term Access 는 시작되고 종료되기 전에 다른 코드가 실행될 수 있다는 것이다.
이것을 Overlap이라 한다.
- Instantaneous Access : Access 가 시작되고 종료되기 전까지 다른 코드가 실행될 수 없다.
- Long-term Access :
Overlap이 가능해 Access 가 시작되고 종료되기 전까지 다른 Instantaneous Access 또는 Long-term Access 가 실행될 수 있다.
Overlapping Accesses는 주로 함수나 메서드에서in-out또는mutating을 사용하는 코드에서 주로 나타난다.
Conflicting Access to In-Out Parameters
함수는 모든 In-Out Parameters 에 Long-term Write Access 를 갖고 있다. In-Out Parameters 에 대한 Write Access 는
나머지 모든 Non-In-Out Parameters 가 평가된 후에 시작되어 함수가 호출되는 동안 지속된다. In-Out Parameters 가 여러 개인 경우
Write Access 는 Parameters 의 순서와 동일하게 이루어진다.
- Read Access 와 Write Access 가 동시에 이루어지지 않는 경우
var someNumber = 7
func incrementByTen(_ number: inout Int) {
number += 10
}
incrementByTen(&someNumber)
print(someNumber) // 7
- Long-term Write Access 를 갖는 In-Out Parameters 와 함수 내부의 다른 Read Access 가 동시에 이루어진 경우(same duration)
var someNumber = 7
func incrementByTen(_ number: inout Int) {
print(someNumber) // error: simultaneous access
number += 10
}
incrementByTen(&someNumber) // error: Execution was interrupted, reason: signal SIGABRT.
print(someNumber)
다음과 같은 함수를 생각해보자.
var stepSize = 1
func increment(_ number: inout Int) {
number += stepSize
}
increment(&stepSize) // error: Execution was interrupted, reason: signal SIGABRT.
위에서 살펴본 것과 마찬가지로 Read Access 와 Write Access 가 동시에 이루어지므로 Conflicts 가 발생한다.

이 문제를 해결하는 방법 중 한 가지는 In-Out Parameters로 전달되는 원본 데이터가 재참조되지 않도록 명확하게 값을 복사해 전달하고,
함수가 종료된 후 원본 값을 업데이트 하는 것이다.
var stepSize = 1
// Make an explicit copy.
var copyOfStepSize = stepSize
func increment(_ number: inout Int) {
number += stepSize
}
increment(©OfStepSize)
// Update the original.
stepSize = copyOfStepSize
print(stepSize) // 2
그리고 In-Out Parameters를 전달할 때 추가로 주의해야 할 것은, 여러 개의 Parameters 에 동일한 변수를 전달하는 것이 가능한 일반
Parameters 와 달리 동일한 변수를 전달할 수 없다는 것이다.
- 일반 Parameters 는 동일한 변수를 2개의 Parameters 에 전달할 수 있다.
func balance(_ x: Int, _ y: Int) -> (Int, Int) {
let sum = x + y
return (sum / 2, sum - x)
}
var playerOneScore = 42
var playerTwoScore = 30
let (lhs1, rhs1): (Int, Int) = balance(playerOneScore, playerTwoScore)
let (lhs2, rhs2): (Int, Int) = balance(playerOneScore, playerOneScore)
print(lhs1, rhs1) // 36 30
print(lhs2, rhs2) // 42 42
In-Out Parameters는 동일한 변수를 전달할 수 없다.
func balance(_ x: inout Int, _ y: inout Int) {
let sum = x + y
x = sum / 2
y = sum - x
}
var playerOneScore = 42
var playerTwoScore = 30
balance(&playerOneScore, &playerTwoScore) // OK
balance(&playerOneScore, &playerOneScore) // error: conflicting accesses to playerOneScore
balance(&playerOneScore, &playerTwoScore)는 두 개의 Parameters 가 모두 Overlap 되지만, 메모리의 다른 위치에 접근하므로
Conflicts 가 발생하지 않는다.
반면, balance(&playerOneScore, &playerOneScore)는 두 개의 Parameters 가 동시에 메모리의 같은 위치에 Write Access 를
수행하므로 Conflicts 가 발생한다.
Conflicting Access to self in Methods 👩💻
Structures 의 mutating methods는 메서드를 호출하는 동안 self에 대한 Write Access 를 갖는다.
각 플레이어는 데미지를 입으면 체력이 줄어들고, 특수 능력을 사용하면 에너지가 줄어드는 게임이 있다고 생각해보자.
struct Player {
var name: String
var health: Int
var energy: Int
static let maxHealth = 10
mutating func restoreHealth() {
health = Player.maxHealth
}
}
restoreHealth() 메서드의 self 에 대한 Write Access 는 메서드의 호출시 시작되어 반환될 때까지 유지된다. 이 메서드는 내부에
Player instance 의 Properties 에 Overlapping Access(중복 접근)하는 다른 코드는 없다.
extension Player {
mutating func shareHealth(with teammate: inout Player) {
balance(&teammate.health, &health)
}
}
확장으로 추가한 shareHealth(with:) 메서드는 In-Out Parameters 로 다른 Player 의 Instance 를 가지고 있으며,
Overlapping Access 접근에 대한 가능성을 만든다.
var oscar = Player(name: "Oscar", health: 10, energy: 10)
var maria = Player(name: "Maria", health: 5, energy: 10)
oscar.shareHealth(with: &maria) // OK
print(oscar) // Player(name: "Oscar", health: 8, energy: 10)
print(maria) // Player(name: "Maria", health: 7, energy: 10)
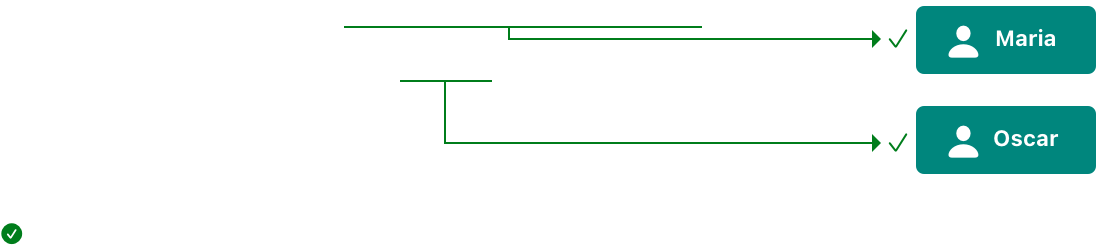
위 코드에서 oscar 의 mutating methods shareHealth(with:)가 갖는 Write Access 의 대상은 self,
즉, oscar 자기 자신이고, In-Out Parameters 로 전달되는 maria 가 갖는 Write Access 의 대상은 maria
이기 때문에 Conflicts 가 발생하지 않는다.
그러나 shareHealth(with:)의 In-Out Parameters 로 oscar 를 전달하면 mutating methods 의 self와
In-Out Parameters가 동일한 oscar 를 대상으로 Write Access 를 하기 때문에 동시에 같은 메모리를 참조하고
Overlap 되므로 Conflicts 가 발생한다.
oscar.shareHealth(with: &oscar) // error: inout arguments are not allowed to alias each other

Conflicting Access to Properties
Structures, Tuples, Enumerations 와 같은 Value Types는 Structure 의 Properties 또는
Tuple 의 Elements와 같은 개별 구성 값(individual constituent values)으로 구성된다.
이것은 Value Types 이기 때문에 값의 일부가 변경되변 전체가 변경된다.
즉, Properties 중 하나의 Read Access 또는 Write Access 접근을 하는 것은
self를 통한 접근이기 때문에 실제로 전체 값에 대한 Read Access 또는 Write Access 를
요구하는 것과 같다.
func balance(_ x: inout Int, _ y: inout Int) {
let sum = x + y
x = sum / 2
y = sum - x
}
var playerInformation = (health: 10, energy: 20)
balance(&playerInformation.health, &playerInformation.energy)
// error: conflicting access to properties of playerInformation
위 예제에서 balance(_:_:)를 호출하는 것은 playerInformation 에 Overlapping Write Accesses 를 하는 것이므로 Conflicts 가
발생한다.
만약, 다음과 같이 Tuple 을 이용해 하나의 In-Out Parameter 로 전달되면 Conflicts 가 발생하지 않는다.
func balance(_ player: inout (health: Int, energy: Int)) {
let sum = player.health + player.energy
player.health = sum / 2
player.energy = sum - player.health
}
var playerInformation = (health: 10, energy: 20)
balance(&playerInformation)
print(playerInformation) // (health: 15, energy: 15)
아래 코드도 마찬가지의 이유로 Conflicts 가 발생한다.
var holly = Player(name: "Holly", health: 10, energy: 20)
balance(&holly.health, &holly.energy) // Error
print(holly)
이 문제를 해결하는 방법 중 한 가지는 In-Out Parameters 로 전달되는 원본 데이터를
Global Variable 이 아닌 Local Variable 로 변경하는 것이다. 그러면 Swift compiler 는 Structure 의
Stored Properties 에 대한 Access 가 다른 코드의 부분과 상호작용하지 않으므로 안전하다는 것을 증명할 수 있게 되고,
2개의 In-Out Parameters 가 전달되지만 정상적으로 작동할 수 있다.
func someFunction() {
var holly = Player(name: "Holly", health: 10, energy: 20)
balance(&holly.health, &holly.energy)
print(holly)
}
someFunction()
Player(name: "Holly", health: 15, energy: 15)
위 코드에 대해 보충 설명을 하자면 다음과 같다.
Structure 의 Properties 에 대한 중복 접근(Overlapping Access) 제한은 메모리 안전성을 위해 항상 필요한 것은 아니다. 메모리 안전성은 보장되지만,
배타적 접근(exclusive access)은메모리 안전성(memory safety)보다 더 엄격한 요구사항이다.즉, 일부 코드는 메모리에 대한
Exclusive Access를 위반하더라도Memory Safety를 유지한다는 것을 의미한다. 이는 위와 같이 Swift compiler 가 메모리에 대한비배타적 접근(nonexclusive access)가 여전히 안전하다는 것을 증명할 수 있는Memory Safety를 허용한다.
Swift compiler 에 의해 메모리에 대한
Nonexclusive Access가Memory Safety를 가질 수 있는 조건은 다음과 같다.
- 오직 Instance 의
Stored Properties 에만 접근해야한다(not Computed Properties or Class Properties).- Structure 가
Local Variable의 값어야한다(not Global Variable).- Structure 는
어떤 Closures 에도 캡처되지 않거나orNonescaping Closures 에 의해서만 캡처되어야한다. (일반 Closures 또는 Escaping Closures 는 함수 context 외부와 상호작용을 하므로 완전히 격리 되지 않는다.)
26. Access Control 👩💻
Access Control
Access Control 은 다른 소스 파일과 모듈에서 코드에 접근하는 것을 제한한다. Access Control 을 이용해 코드를 은닉화(hiding) 하고 접근할 수 있는 기본 인터페이스를 지정할 수 있다.
접근 수준은 Classes, Structures, Enumerations 단위로 제한하거나 이에 속해 있는 Properties, Methods, Initializers, Subscripts 단위로 제한하는 것 역시 가능하다. 또한 Protocols 는 특정 context 단위로 제한될 수 있다.
이 챕터에서는 간결성을 위해 Properties, Types, Functions 등과 같이 Access Control 을 적용할 수 있는 것들을
Entities로 표현한다.
Modules and Source Files
Swift 의 Access Control 은 Modules와 Source Files의 개념을 기초로 한다.
- Modules : Single unit of code distribution. 즉, 코드가 빌드되고 제공되는 Framework 또는 App 과 같은 코드의 배포 단위로
importkeyword 를 사용해 다른 모듈을 가져와 사용한다. - Source Files : Modules 내의 Single Swift Source Code File 로 실제로 Framework 또는 App 내에 있는 Single File 을
의미하며, 일반적으로 서로 다른 Types 는 각각의 Source Files 에 정의하지만 Swift 에서는
Single Source Code File 에 여러 Types, Functions 등에 대한 정의를 포함할 수 있다.
Access Levels
Kind of Access Levels
Swift 는 코드 내에서 Entities 에 대해 5개의 다른 Access Levels 를 제공한다. 이 Access Levels 는
Modules > Source Files > Entities의 Hierarchy 구조와 관련된다.
- Open : Framework Level, App 또는 Framework 를 공개된 인터페이스로 지정할 때 사용한다.
(Public 과 유사하지만 Open 은 Classes 와 Class Members 에만 사용 가능하며, 다른 모듈에서 Open 으로 정의된 Classes 와 Class Members 를 Subclassing, Overriding 하는 것을 허용한다.) - Public : Framework Level, App 또는 Framework 를 공개된 인터페이스로 지정할 때 사용한다.
- Internal : Application Level, 생략시 적용되는 기본 접근 레벨로, 동일 모듈 내에서 자유로운 접근이 가능하지만 외부 모듈의 접근은 제한된다. 따라서 App 또는 Framework 의 내부 구조를 정의할 때 사용한다.
- File-private : Application Level, Source File 내부로 접근을 제한한다.
- Private : Application Level, Source File 안에서도 정의를 둘러싼 context 로 내부로 접근을 제한한다.
Guiding Principle of Access Levels
Public Variables는 Internal, File-private, Private Types 로 정의될 수 없다. Public Variables 는 어디서나 사용될 수 있지만 Access Levels 를 이보다 낮은 수준으로 변경할 경우 그렇지 못하기 때문이다.Functions는 Parameter 와 Return Types 보다 높은 수준의 Access Levels 를 가질 수 없다.
Default Access Levels
명시적으로 Access Levels 를 지정하지 않으면 Swift 는 default 로 Internal을 Access Levels 로 갖도록 한다. 따라서 대부분의 경우
Access Levels 를 명시할 필요가 없다.
Access Levels for Single-Target Apps
Single-Target App을 만들 때 앱의 코드는 앱 내에 포함되며 앱의 외부 모듈에서 사용하도록 만들 필요가 없다. Swift 에 의해 default 로
지정되는 Internal은 이에 적합하므로 Access Levels 를 명시할 필요가 없다. 단, 앱의 모듈 내부 다른 코드에게 구현의 세부 내용을 가리기 위해
File Private, Private을 이용해 Access Levels 를 제한하는 것이 가능하다.
Access Levels for Frameworks
Framework 를 개발할 때 다른 모듈에서의 접근이 가능하도록 Framework 의 공용 인터페이스를 open 또는 public으로 표시한다.
Framework 내의 헤부 구현은 Default Access Levels 인
internal을 사용할 수 있으며, Framework 내부에서도 다른 코드 부분에 가리고자 하는 데이터는fileprivate또는private을 명시할 수 있다. Framework 가 노출 시킬 API 에 해당하는 Entities 에만open,public을 명시하면 된다.
Access Levels for Unit Test Targets
Unit Test Targets 을 이용해 앱을 구현할 때 해당 코드는 테스트를 위해 Test 모듈 에서 사용할 수 있어야 한다. 하지만 일반적으로 open 또는
public으로 선언되지 않은 Entities 는 다른 모듈에서 사용할 수 없다.
단, Unit Test Targets 에 한해 모듈을 import 할 때 앞에 @testable attribute 명시하면 해당
모듈의 internal entities 에 접근이 가능하다.
Access Control Syntax
위에서 설명한 Access Levels 을 설정하기 위해 open, public, internal, fileprivate, private modifier 를 Entities 의 정의 앞에 명시하기 위한 Syntax 다.
public class SomePublicClass {}
internal class SomeInternalClass {}
fileprivate class SomeFilePrivateClass {}
private class SomePrivateClass {}
public var somePublicVariable = 0
internal let someInternalConstant = 0
fileprivate func someFilePrivateFunction() {}
private func somePrivateFunction() {}
그리고 위에서 internal 로 선언된 SomeInternalClass와 someInternalConstant는 별도로 명시하지 않고 default Access Levels 가
적용되도록 다음과 같이 선언할 수 있다.
class SomeInternalClass {} // implicitly internal
let someInternalConstant = 0 // implicitly internal
Custom Types
User Custom Types 를 정의할 때 Access Levels 정의하고 싶다면 Types 를 정의할 때 지정해야한다. Types 자체에 대한 Access Levels 는 해당 Types 가 갖는 Members(Properties, Methods, Initializers, Subscripts) 의 default Access Levels 에도 영향을 미친다.
- Types 를
fileprivate으로 정의하면, 그 Members 역시fileprivate이 된다. - 단, Types 를
public으로 정의하더라도 그 Members 는internal이다. 이는 실수로 모듈의 API 가 아닌 코드 부분이 노출되는 것을 예방하기 위함이다.
Access Levels
- (open, public) Types = internal Members
- (internal, fileprivate, private) Types = Members
public class SomePublicClass { // explicitly public class
public var somePublicProperty = 0 // explicitly public class member
var someInternalProperty = 0 // implicitly internal class member
fileprivate func someFilePrivateMethod() {} // explicitly file-private class member
private func somePrivateMethod() {} // explicitly private class member
}
class SomeInternalClass { // implicitly internal class
var someInternalProperty = 0 // implicitly internal class member
fileprivate func someFilePrivateMethod() {} // explicitly file-private class member
private func somePrivateMethod() {} // explicitly private class member
}
fileprivate class SomeFilePrivateClass { // explicitly file-private class
func someFilePrivateMethod() {} // implicitly file-private class member
private func somePrivateMethod() {} // explicitly private class member
}
private class SomePrivateClass { // explicitly private class
func somePrivateMethod() {} // implicitly private class member
}
Tuple Types
- Tuples 는 Classes, Structures, Enumerations, Functions 와 달리 독립적인 정의가 없다
- Tuples 의 Access Levels 는 구성된 Types 로부터 자동으로 정해지며, 명시적으로 지정할 수 없다.
- Tuples 의 Access Levels 는 구성된 Types 중 가장 낮은 수준의 Access Levels 로 자동으로 정해진다.
Access Levels
- Tuples ≤ min(Types1, Types2)
따라서 internal과 private으로 구성된 Tuples 의 Access Levels 는 private이 된다.
Function Types
- Functions 의 Access Levels 는 Parameter Types 와 Return Types 중 가장 낮은 수준의 Access Levels 로 계산되며, context 의 Access Levels 와 일치하지 않는다면 명시적으로 지정해야한다.
Access Levels
- Functions ≤ min(Parameters, Returns)
1 ) Context 의 Access Levels 와 일치하는 경우
struct SomeInternalStructure {
func someFunction() -> (SomeInternalClass, SomeInternalClass) {
(SomeInternalClass(), SomeInternalClass())
}
}
context 의 Access Levels 가
internal, Function Parameter Types 와 Return Types 의 Access Levels 가internal이므로 함수는 암시적으로internal로 정의된다.
private struct SomePrivateStructure {
func someFunction() -> (SomePrivateClass, SomePrivateClass) {
(SomePrivateClass(), SomePrivateClass())
}
}
context 의 Access Levels 가
private, Function Parameter Types 와 Return Types 의 Access Levels 가private이므로 함수는 암시적으로private으로 정의된다.
2 ) Context 의 Access levels 와 일치하지 않는 경우
struct SomeInternalStructure {
func someFunction() -> (SomeInternalClass, SomePrivateClass) {
(SomeInternalClass(), SomePrivateClass())
} // error: method must be declared fileprivate because its result uses a private type
}
context 의 Access Levels 는
internal인데, Function Parameter Types 와 Return Types 중 낮은 Access Levels 가private이므로 Access Levels 을 다음과 같이 명시적으로 fileprivate 또는 private 으로 지정해야한다.
struct SomeInternalStructure {
fileprivate func someFunctionFirst() -> (SomeInternalClass, SomePrivateClass) {
(SomeInternalClass(), SomePrivateClass())
}
private func someFunctionSecond() -> (SomeInternalClass, SomePrivateClass) {
(SomeInternalClass(), SomePrivateClass())
}
}
let some = SomeInternalStructure()
some.someFunctionFirst()
some.someFunctionSecond() // 'someFunctionSecond' is inaccessible due to 'private' protection level
가장 낮은 Access Levels 는 private 이지만 fileprivate 까지는 허용이 되는 것으로 보인다. 물론, 함수를 정의할 때 Function Parameter Types 와 Return Types 에 대해 private 보다 높은 fileprivate 이 허용된다는 것을 의미하는 것일 뿐 fileprivate 으로 선언하면 같은 파일에서 접근이 가능하므로 해당 Types 외부에서 볼 때는 private 과 다른 Access Levels 를 갖게 된다.
Enumeration Types
- Enumerations 의 Cases 역시 Enumerations 의 Access Levels 를 자동으로 받는다.
- Enumerations 의 Cases 는 Classes 나 Structures 의 Members 와 달리 Access Levels 를 지정할 수 없다.
- Enumerations 에 사용된 Associated Values, Raw Values 는 Enumerations 의 Access Levels 과 같거나 높은 수준의 Access Levels 를 가져야 한다.
Access Levels
- Cases 의 Access Levels 수정 불가
- Enumerations = Cases
- Enumerations ≤ Associated Values
- Enumerations ≤ Raw Values
Nested Types
- Nested Types 역시 context 의 Access Levels 를 자동으로 받는다.
- 단, Public Types 의 Nested Types 는
internal이다. (cf. Custom Types)
Access Levels
- (open, public) Context Types = internal Nested Types
- (internal, fileprivate, private) Context Types = Nested Types
Subclassing
- 동일 모듈일 경우 현재 context 가 접근 가능한 어떤 Class 든 Subclassing 해 Members 를 Overriding 할 수 있다.
- 다른 모듈의 경우 대상이 Open Class 라면 Subclassing 해 Members 를 Overriding 할 수 있다..
- Subclass 는 상위 Class 보다 높은 Access Levels 를 가질 수 없다.
Access Levels
- Subclass ≤ Superclass
- Overriding 을 이용해 Subclass Members 의 Access Levels 를 Superclass 보다 높게
설정이 가능</span>하다.
Overriding 을 이용해 해당 Class Member 를 보다 액세스 하기 쉽도록 만들 수 있다.
public class A {
fileprivate func someMethod() {}
}
internal class B: A {
override internal func someMethod() {}
}
public class A {
fileprivate func someMethod() {}
}
internal class B: A {
override internal func someMethod() {
super.someMethod()
}
}
- Subclassing 된
Subclass B는Superclass A보다 높지 않은 Access Levels 를 가져야 한다는 조건을 만족한다.- Subclassing 을 통해 Subclass B 는
fileprivate으로 정의된someMethod()의 Access Levels 를 Overriding 을 통해internal로 높여 보다 엑세스 하기 쉽게 만들었다.
Members
Constants, Variables, Properties, and Subscripts
- 선언되는 Constants, Variables, Properties 는 할당하려는 Types 보다 높은 수준의 Access Levels 를 가질 수 없다.
- 유사하게 Subscripts 는 Index Types 또는 Return Types 보다 높은 수준의 Access Levels 를 가질 수 없다.
Access Levels
- Constants, Variables, Properties ≤ Types to assignment
- Subscripts ≤ min(Index, Return)
var internalInstance = SomePrivateClass() // Variable must be declared private or fileprivate because its type 'SomePrivateClass' uses a private type
fileprivate var fileprivateInstance = SomePrivateClass()
private var privateInstance = SomePrivateClass()
Private Types를 할당하므로 선언되는 Variables 는private보다 높은 수준의 Access Levels 를 가질 수 없으므로 반드시private으로 선언되어야 한다.
Function Types 에서 본 것과 마찬가지로 private 이 예상되는 곳에 fileprivate 까지는 허용이 되는 것으로 보인다.
Getters and Setters
- Constants, Variables, Properties, Subscripts 에 대한
Getters와Setters는 속해 있는 대상의 Access Levels 를 자동으로 받는다. Setters의 Access Levels 를Getters의 Access Levels 보다 낮게 제한하기 위해fileprivate(set),private(set)또는inernal(set)을 작성해 더 낮은 접근 수준을 할당할 수 있다.
Stored Properties 에 대해 명시적으로 Getters 와 Setters 를 작성하지 않아도 Swift 는 내부적으로 Stored Properties 의
Backing Storage에 대한 접근을 제공하기 위해 암시적으로 Getters 와 Setters 를 제공한다.
Access Levels
- Getters, Setters of (Constants, Variables, Properties, Subscripts) ≤ Constants, Variables, Properties, Subscripts
- Getters = Constants, Variables, Properties, Subscripts
- Setters ≤ Setters
Function Types, Constants, Variables, Properties, and Subscripts 에서 암시적으로 private 이 요구되는 곳에 fileprivate 을 사용하는 것이 허용되었으나 Setter 의 경우 좀 더 엄격하게 이를 지킨다. 즉, private 에 fileprivate ‘Setters’ 는 허용되지 않는다.
1 ) Getters: internal, Setters: internal
class SomeClass {
var id: String = ""
}
위와 같이 정의된 SomeClass 는 내부적으로 다음과 같은 방식으로 작동한다.
class SomeClass {
private var _id: String = ""
var id: String {
get {
_id
}
set {
_id = newValue
}
}
}
let someClass = SomeClass()
someClass.id = "A"
print(someClass.id) // A
2 ) Getters: internal, Setters: private
따라서 우리는 Getters 는 internal 의 Access Levels 를 갖고, Setters 는 private 의 Access Levels 를 갖도록 하기 위해 다음과 같이 직접 구현할 수 있다.
class SomeClass {
private var _id: String = ""
var id: String {
get {
_id
}
}
func setId(_ id: String) {
self._id = id
}
}
Swift 는 위와 같이 작동되는 서로 다른 Access Levels 를 갖는 Properties 를 다음과 같이 정의할 수 있다.
class SomeClass {
internal private(set) var id: String = ""
func setId(_ id: String) {
self.id = id
}
}
그런데 SomeClass Types 의 Access Levels 가 internal 이다.
따라서 Properties 가 암시적으로 Types 의 Access Levels 를 받도록 생략하고 Setters 의 Access Levels 만 지정해
짧은 형태로 정의할 수 있다.
internal private(set) -> private(set)
class SomeClass {
private(set) var id: String = ""
func setId(_ id: String) {
self.id = id
}
}
let someClass = SomeClass()
someClass.id = "A" // error: cannot assign to property: 'id' is a get-only property
someClass.setId("A")
print(someClass.id) // A
결국 Stored Properties 는 Backing Storage 에 대한 접근을 Access Levels 에 따라 제공하기 위해 Computed Properties 와 유사한 형태의 구현을 암시적으로 제공하고 있다는 것을 알 수 있다.
즉, Access Levels 를 관리하기 위해 사용되는
Getters와Setters는 명시적으로 구현을 하든 암시적으로 구현이 되든 Stored Properties 와 Computed Properties 모두에 적용된다.
Initializers
- Custom Initializers 는 Types 보다 높은 수준의 Access Levels 를 가질 수 없다.
- 단, Required Initializers 는 Types 는 자신이 속한 Class 와 동일한 Access Level 을 가져야한다.
- Functions 와 마찬가지로 Parameters 보다 높은 수준의 Access Levels 를 가질 수 없다. (e.g. Guiding Principle of Access Levels, Function Types)
Access Levels
- Custom Initializers ≤ Types
- Required Initializers = Types
- Initializers ≤ Parameters
Default Initializers
Default Initializers 가 생성되는 조건을 만족할 경우 다음과 같은 Access Levels 를 갖는다.
Access Levels
- (internal, fileprivate, private) Default Initializers == Types
- (open, public) Default Initializers = internal
(open, public) Types 에 의해 생성되는 Default Initializers 는
internal이다. 따라서 외부 모듈에 arguments 가 없는 (open, public) Initializers 를 제공해야 하는 경우 명시적으로no-argument Initializer를 정의해야한다.
Default Memberwise Initializers for Structure
Access Levels
- Structures 의 모든 Stored Properties 가 private -> Default Memberwise Initializers 는 private
- Structures 의 모든 Stored Properties 가 fileprivate -> Default Memberwise Initializers 는 fileprivate
- 그 외 -> Default Memberwise Initializers 는 internal
Default Initializers 와 마찬가지로 외부 모듈에 Memberwise Initializers 를 제공해야 하는 경우 명시적으로
Public Memberwise Initializers를 정의해야한다.
Protocols
- Protocols 의 기본 Access Levels 는 internal 이다.
- Protocols 의 Types 에 명시적으로 Access Levels 를 제한해 특정 context 내에서만 채택(adoption)될 수 있도록 할 수 있다.
Access Levels
- Requirements = Protocols
- Requirements 의 Access Levels 를 Protocols 와 다르게 변경할 수 없다.
- 다른 Types 와 다르게 Protocols 가 (open, public) 일 때 Requirements 역시 동일한 (open, public) Access Levels 를 갖는다.
Protocol Inheritance
Access Levels
- Sub Protocols ≤ Super Protocols
Protocol Conformance
Access Levels
- Protocols ≤ Types
- Requirements = min(Types, Protocols)
protocol SomeProtocol {
var protocolProperty: Int { get }
}
protocol SomePrivateProtocol {
var privateProtocolProperty: Int { get }
}
struct SomeStructure: SomeProtocol, SomePrivateProtocol {
var protocolProperty: Int
var privateProtocolProperty: Int
}
var some = SomeStructure(protocolProperty: 10, privateProtocolProperty: 30)
print(some.protocolProperty) // 10
some.protocolProperty = 5
print(some.protocolProperty) // 5
print(some.privateProtocolProperty) // 30
some.privateProtocolProperty = 50
print(some.privateProtocolProperty) // 50
Setters 를 제외한 다른 경우와 마찬가지로 Protocols 가 private 이어도 실제 Requirements 는 fileprivate 까지는 허용이 되는 것으로 보인다.
Objective-C 와 마찬가지로 Protocols 의
Conformance는 Global 이다. 한 프로그램 내에서 서로 다른 방법으로 Protocol 을 준수하는 것은 불가능하다.
Extensions
Extensions
Classes, Structures, Enumerations 를 확장하면 기존 Types 의 Members 가 갖는 default Access Levels 를 동일하게 갖는다.
Extensions 에 Access Levels 를 정의하면, Extensions 에 의해 추가되는 기능에 대해 암시적으로 정의되는 Access Levels 를 변경할 수 있다.
Access Levels
- Extensions ≤ Types
- (open, public) Types 를 Extensions -> internal Members
- (internal, fileprivate, private) Types 를 Extensions -> (internal, fileprivate, private) Members
struct SomeStruct {
var number: Int
func double() -> Int { self.number * 2 }
}
private extension SomeStruct {
func triple() -> Int { self.number * 3 }
}
var some = SomeStruct(number: 5)
some.number // 5
some.double() // 10
some.triple() // 15
Extensions 를 private 으로 정의하면, Extensions 에 의해 추가되는 기능은 private 으로 정의된다(물론 위 다른 경우와 마찬가지로 fileprivate 은 허용이 되는 것으로 보인다).
Private Members in Extensions
Extensions 이 Classes, Structures, Enumerations 와 같은 파일에 존재할 경우,
Original 과 Extensions 는 처음부터 단일 Original Types 에 정의된 것처럼 작동한다.
struct Origin {
private let originNumber = 5
func printExtensionNumber() { print(doubleNumber) }
}
extension Origin {
private var doubleNumber: Int { originNumber * 2 }
func printAnotherExtensionNumber() { print(tripleNumber) }
}
extension Origin {
private var tripleNumber: Int { originNumber * 3 }
func printOriginNumber() { print(originNumber) }
}
var someStructure = Origin()
someStructure.printExtensionNumber() // 10
someStructure.printAnotherExtensionNumber() // 15
someStructure.printOriginNumber() // 5
Generics
Generic Types 또는 Generic Functions 의 Access Levels 는 자기 자신 또는 Type Parameters 의 Constraints 중 최솟값으로 정해진다.
Access Levels
Generic Types, Generic Functions = min(itself, Type Parameters)
Type Aliases
Type Aliases 역시 Swift 의 다른 Types 와 마찬가지로 고유한 Types 가 된다. 따라서 Type Aliases 를 사용해 기존 Types 의
Access Levels 를 Original 과 같거나 낮게 변경해 고유의 Types 를 만들 수 있다.
Access Levels
Type Aliases ≤ Types
struct SomeStruct {
var number: Int
func double() -> Int { self.number * 2 }
}
private typealias PrivateStruct = SomeStruct
public typealias PublicStruct = SomeStruct // Type alias cannot be declared public because its underlying
Original Types 가 internal 이기 때문에 public 으로 Access Levels 를 더 개방하는 것은 불가능하다.
var privateStruct = PrivateStruct(number: 5) // error: variable must be declared private or fileprivate because its type 'PrivateStruct' (aka 'SomeStruct') uses a private type
Private Types 이므로 Internal Variables 에 할당할 수 없다.
private var privateStruct = PrivateStruct(number: 5)
privateStruct.number // 5
privateStruct.double() // 10
이 Rule 은 Protocols 의 준수성(conformances)를 충족하도록 하는데 사용되는 Associated Types 에도 적용된다.
27. Advanced Operators 👩💻
Advanced Operators
Swift 는 C나 Objective-C와 유사한 Bitwise Operators를 포함해 여러 고급 연산자를 제공한다. Swift 는
C 의 Arithmetic Operators 와 달리 기본적으로 Overflow 되지 않는다.
Overflow 는 trapped되어 에러로 보고된다.
Swift 에서 Overflow 행동을 하도록 하려면 Overflow Addition Operator($+)와 같은 연산자를 사용해야한다
(모든 Overflow Operators는 &로 시작한다).
Custom Classes, Structures, Enumerations 를 정의할 때, Custom Types 에 대해 Standard Swift Operators 의 구현을 제공하는 것이 유용할 수 있다. Swift 는 Custom Types 에 대해 Custom Operators 를 손쉽게 제공할 수 있도록 하며, 각 Types 에 대한 행동이 정확히 무엇인지 결정할 수 있다.
Custom Operators 는 사전에 정의된 Operators 로 제한되지 않으며, Swift 는 자신만의 Infix, Prefix,
Assignment Operators를 정의함은 물론, 자신만의 우선순위를 자유롭게 정의할 수 있다. 이러한 Custom Operators
는 코드에서 Swift 가 기본적으로 제공하는 Predefined Operators 처럼 사용되며, Custom Operators 를 채택하도록
기존의 Types 를 확장할 수 있다.
Bitwise Operators
Bitwise Operators
Bitwise Operators 는 Data Structure 내에서 개별 Raw Bits를 조작할 수 있게 해준다. 이것은 Graphics
Programming 이나 디바이스 드라이버 생성 같은 Low-Level Programming 에서 주로 사용된다. 또한 외부 소스로부터
Custom Protocol 을 사용해 통신하는 데이터 Encoding/Decoding 작업에 사용하기도 한다. Swift 는 C 가
갖고 있는 모든 Bitwise Operators 를 지원한다.
func printToBinary(number: UInt8) {
print(toBinary(number))
func toBinary(_ number: UInt8) -> String {
let binary = String(number, radix: 2)
if binary.count < number.bitWidth {
return String(repeating: "0", count: 8 - binary.count) + binary
} else {
return binary
}
}
}
위 함수를 만들고 비트 연산 결과를 확인해보자.
Bitwise NOT Operator ~
Bitwise NOT Operator ~는 Prefix Operator로 공백 없이 값 바로 앞에 위치해 숫자의 모든 비트를 반전시킨다.
let initialBits: UInt8 = 0b00001111
let invertedBits = ~initialBits
printToBinary(number: invertedBits) // 11110000
UInt8 정수는 8비트를 가지며 0 ~ 255 사이의 숫자를 저장할 수 있으며, 2진수 00001111로 이루어진 8비트 데이터
(10진수로 15와 같음)에 ~ Operator 를 적용해 2진수 11110000(10진수로 240과 같음)이 되었다.
Bitwise AND Operator &
Bitwise AND Operator &는 두 값 사이에 위치해 연산된 값을 반환한다. 비트의 각 자릿수가 모두 1이면 1을, 그 외에는
0을 반환한다.
let firstSixBits: UInt8 = 0b11111100
let lastSixBits: UInt8 = 0b00111111
let middleFourBits = firstSixBits & lastSixBits
printToBinary(number: middleFourBits) // 00111100
2진수 11111100과 00111111에 & Operator 를 적용해 2진수 00111100이 되었다.
Bitwise OR Operator |
Bitwise OR Operator |는 두 값 사이에 위치해 연산된 값을 반환한다. 비트의 각 자릿수가 모두 0이면 0을, 그 외에는
1을 반환한다.
let someBits: UInt8 = 0b10110010
let moreBits: UInt8 = 0b01011110
let combinedBits = someBits | moreBits
printToBinary(number: combinedBits) // 11111110
2진수 10110010과 01011110에 | Operator 를 적용해 2진수 11111110이 되었다.
Bitwise XOR Operator ^
Bitwise XOR Operator(=Exclusive OR Operator) ^는 두 값 사이에 위치해 연산된 값을 반환한다. 비트의 각 자릿수가
서로 같으면 0을, 다르면 1을 반환한다.
let firstBits: UInt8 = 0b00010100
let otherBits: UInt8 = 0b00000101
let outputBits = firstBits ^ otherBits
printToBinary(number: outputBits) // 00010001
2진수 00010100과 00000101에 ^ Operator 를 적용해 2진수 00010001이 되었다.
Bitwise Left and Right Shift Operators << >>
Bitwise Left Shift Operator <<는 모든 비트를 왼쪽으로 이동시키며 정수를 2배로 곱하는 효과가 있고, Bitwise Right
Shift Operator >>는 모든 비트를 오른쪽으로 이동시키며 정수를 반으로 나누는 효과가 있다.
1 ) Shifting Behavior for Unsigned Integers
부호 없는 정수의 Bit-Shifting 행동은 다음과 같다.
- 기존의 비트를 요청된 숫자만큼 왼쪽 또는 오른쪽으로 이동시킨다.
- 정수의 저장 범위(UInt8 정수는 8비트를 가지며 0 ~ 255 사이의 숫자를 저장)를 넘는 비트는 제거된다.
- 비트 이동으로 빈 공간에
0이 삽입된다.

let shiftBits: UInt8 = 4
printToBinary(number: shiftBits) // 00000100
printToBinary(number: shiftBits << 1) // 00001000
printToBinary(number: shiftBits << 2) // 00010000
printToBinary(number: shiftBits << 5) // 10000000
printToBinary(number: shiftBits << 6) // 00000000
printToBinary(number: shiftBits >> 2) // 00000001
다음 예제는 16진수 Cascading Style Sheets 색상값을 각각 RGB 로 분리하는 연산을 수행한다.
let pink: UInt32 = 0xCC6699
let redComponent = (pink & 0xFF0000) >> 16 // redComponent is 0xCC, or 204
let greenComponent = (pink & 0x00FF00) >> 8 // greenComponent is 0x66, or 102
let blueComponent = pink & 0x0000FF // blueComponent is 0x99, or 153
16진수 Cascading Style Sheets 색상값을 저장하기 위해
UInt32상수를 사용했고 저장된 색상은 분홍색이다.
- 빨간색을 분리하기 위해 분홍색에 빨강색의 자릿값
0xFF0000을&연산한 다음 오른쪽으로 16비트를 이동시킨다.- 녹색을 분리하기 위해 분홍색에 녹색의 자릿값
0x00FF00을&연산한 다음 오른쪽으로 8비트를 이동시킨다.- 파란색을 분리하기 위해 파랑색의 자릿값
0x0000FF을&연산했고 자릿값 이동이 필요 없어 그대로 종료했다.
2 ) Shifting Behavior for Signed Integers
부호 있는 정수의 Bit-Shifting 행동은 이진으로 표현되는 방법 때문에 부호 없는 정수보다 더 복잡하다(다음 예제는 단순화를 위해 8비트의 부호 있는 정수를 사용하지만 동일한 원칙이 모든 부호 있는 정수에 적용된다).
부호 있는 정수는 첫 번째 비트를 부호로 사용한다. 이를 Sign Bit로 0은 양수를, 1은 음수를 표현한다. 그리고 나머지
비트는 Value Bits로 실제 값을 저장한다. 양수일 때는 부호 없는 정수와 동일한 방식을 사용한다.
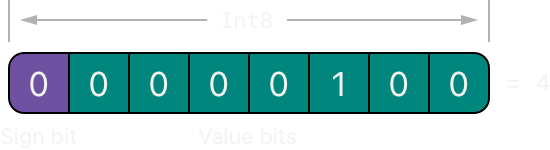
부호 있는 정수의 +4
하지만 음수의 경우 우리가 직관적으로 사용하는 부호 + 절대값 숫자의 형태를 띄지 않는다. +4, -4 이런 식의 표현은 사람에게
쉽고 익숙한 것이지 컴퓨터 친화적이지 않기 때문이다. 컴퓨터는 Binary 로 데이터를 다루기 때문에 2의 보수를 사용해 표현한다.

부호 있는 정수의 -4
2진수가 가질 수 있는 보수는 2의 보수와 1의 보수다.
- 2진수 양수
+4는00000100이다.+4의 1의 보수는11111111 - 00000100=111110110이다.+4의 2의 보수는 1의 보수에 1을 더해111110110 + 00000001=11111100이 된다.
부호 있는 정수의 -4는 Sign Bit 1과 Value Bits 1111100으로 이루어진다. 10진수에서 이 값은 124를 갖는다.
따라서, 부호 있는 정수의 음수 표현은 2의 보수를 사용해 음수를 표현하는 Sign Bit와 2의 보수로 표현되는 Value Bits
128 - 4를 표현 방식으로 사용하고 있음을 확인할 수 있다. 이를 Two's Complement Representation(2의 보수 표현)이라
부른다.
2의 보수 표현을 사용하면 컴퓨터 연산에 여러 장점을 가질 수 있다.
-1+-4와 같은 연산을 단순히 표준 이진 덧셈으로 다룰 수 있다.
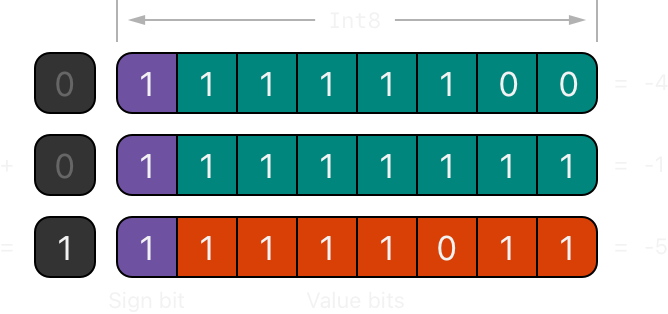
2의 보수로 표현된 -4와 -1을 표준 이진 덧셈 연산을 한 후 정수의 저장소 범위를 넘어 이동된 모든 비트를 삭제하면 손쉽게 -5의
2의 보수 표현을 얻는다.
- Bitwise Shift Operators 를 Unsigned Integers 와 유사하게 다룰 수 있다.

부호 있는 정수의 Bitwise Left Shift Operator 는 부호 없는 정수와 동일하게 행동하며 값을 2배로 늘린다.
부호 있는 정수의 Bitwise Right Shift Operator 는 부호 없는 정수와 유사하나, 비트 이동으로 빈 공간을 0으로 채우는 것이
아닌 Sign Bit 로 빈 자리를 채운다. 이것을 Arithmetic Shift라 한다.
Overflow Operators
Overflow Operators
Swift 는 정수 상수 또는 변수에 저장할 수 없는 값을 삽입하려고 하면, 유효하지 않은 값을 생성을 허용하지 않으며 에러를 발생시킨다. 이러한 행동은 너무 크거나 작은 값을 다룰 때 추가적인 Safety 를 제공한다.
예를 들어 Int16 정수는 2^16 = 65,536 개의 값을 0을 기준으로 저장하므로 -32,768 ~ 32,767 의 값을 저장할 수 있으므로
이 범위를 초과하는 숫자를 저장하려고 하면 에러를 발생시킨다.
var potentialOverflow = Int16.max // 32,767
potentialOverflow += 1 // error, Swift runtime failure: arithmetic overflow
따라서 경계값 조건을 코딩할 때 에러 처리를 제공해 유연성을 높일 수 있다. 하지만 에러를 발생시키는 대신 &를 붙여 Overflow
Operators를 사용할 수도 있다. Swift 는 3가지 Arithmetic Overflow Operators 를 제공한다.
- Overflow addition
&+ - Overflow subtraction
&- - Overflow multplication
&*
var potentialOverflow = Int16.max // 32,767
print(potentialOverflow &+ 1) // -32768
print(potentialOverflow &+ 2) // -32767
print(potentialOverflow &+ 3) // -32766
print(potentialOverflow &- 1) // 32766
print(potentialOverflow &* 2) // -2
Value Overflow
숫자는 Positive, Negative 양 방향으로 오버플로우 될 수 있다.
앞에서 정의한 printToBinary(number:) 함수를 다음과 같이 고치고 Overflow Operators 의 동작을 살펴보자.
func printToBinary<T: BinaryInteger>(number: T) {
print("Binary: \(toBinary(number)), Decimal: \(number)")
func toBinary(_ number: T) -> String {
let absoluteNumber = abs(Int(number))
let binary = String(absoluteNumber, radix: 2)
if binary.count < 8 {
return String(repeating: "0", count: 8 - binary.count) + binary
} else {
return binary
}
}
}
다음은 부호 없는 정수의 Positive 방향으로의 오버플로우 발생에 대한 예제다.
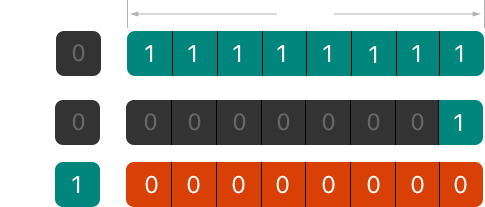
var unsignedOverflow = UInt8.max
printToBinary(number: unsignedOverflow)
// Binary: 11111111, Decimal: 255
unsignedOverflow = unsignedOverflow &+ 1
printToBinary(number: unsignedOverflow)
// Binary: 00000000, Decimal: 0
- 변수 unsignedOverflow 는
UInt8의 최댓값11111111을 초깃값으로 저장한다.- Overflow Addition Operator
&+를 사용해 값을 1 증가시킨다.- 정수의 저장 범위를 넘는 비트는 제거되고
00000000이 남게 된다.
이번에는 부호 없는 정수의 Negative 방향으로의 오버플로우 발생에 대한 예제를 알아보자.
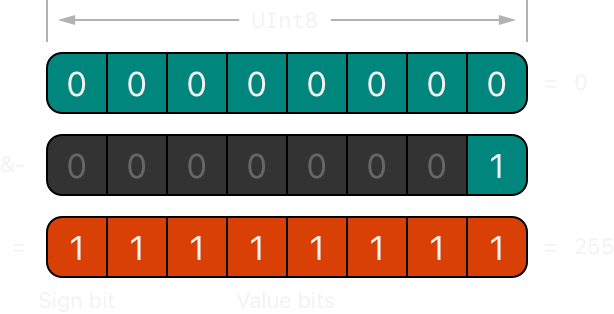
var anotherUnsignedOverflow = UInt8.min
printToBinary(number: anotherUnsignedOverflow)
// Binary: 00000000, Decimal: 0
anotherUnsignedOverflow = anotherUnsignedOverflow &- 1
printToBinary(number: anotherUnsignedOverflow)
// Binary: 11111111, Decimal: 255
오버플로우는 Signed Integers 에서도 발생한다. 부호 있는 정수의 모든 덧셈, 뺄셈은 비트 방식으로 수행된다.
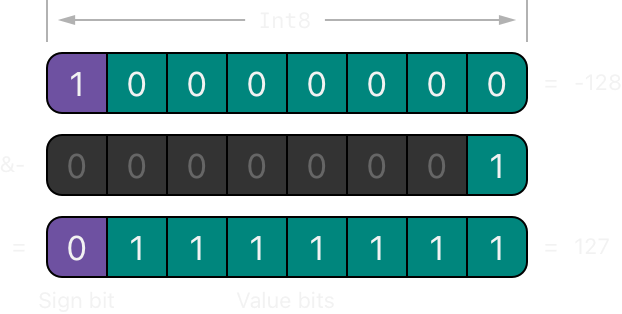
var signedOverflow = Int8.min
printToBinary(number: signedOverflow)
// Binary: 10000000, Decimal: -128
signedOverflow = signedOverflow &- 1
printToBinary(number: signedOverflow)
// Binary: 01111111, Decimal: 127
- 변수 signedOverflow 는
Int8의 최솟값10000000을 초깃값으로 저장한다.- Overflow Subtraction Operator
&-를 사용해 값을 1 감소시킨다.- 결과값은 부호 비트가 토글되어 양수가 되어
01111111을 저장한다.
Signed Intergers, Unsigned Integers 는 동일하게 최댓값을 넘어서면 최솟값으로, 최솟값을 넘어서면 최댓값으로 순환된다.
Precedence and Associativity
연산자 우선순위(precedence)는 다른 연산자보다 높은 우선순위를 갖도록 해 먼저 적용되게 한다. 연산자 연관성(associativity)은 동일한 우선순위를 갖는 연산자들이 왼쪽과 그룹화 될지, 오른쪽과 그룹화 될지를 정의한다.
Swift 는 C 처럼 Multiplication Operator *, Division Operator /, Remainder Operator % 같은
것들은 Addition Operator +, Subtraction Operator - 같은 것들보다 더 높은 우선순위를 갖는다. 동일한 우선순위
사이에서는 왼쪽으로 그룹화 된다. 즉, 수학적 사칙연산 우선순위를 그대로 따른다.
2 + 3 % 4 * 5
따라서 위 연산은 괄호를 사용해 우선순위를 명시적으로 표현하면 다음과 같다.
2 + ((3 % 4) * 5)
(3 % 4)는 3 이므로 다음 연산은 2 + (3 * 5)가 되고, 또 다시 (3 * 5)는 15 이므로 다음 연산은 2 + 15가 되어
연산 결과는 17 이 된다.
Swift 의
Operator Precedences와Operator Associativity Rules는 C 나 Objective-C 보다 더 간단하고 예측 가능하다. 이것은 C-based 언어와 완전히 일치하지 않음을 의미하므로, 기존 코드를 Swift 로 전환할 때 연산자 상호작용이 의도한대로 작동하는지 확인해야한다. Swift Standard Library 가 제공하는 Operators 는 Operator Declarations 에서 확인할 수 있다.
Operator Methods
Operator Methods
Classes 와 Structures 는 기존 연산자를 Overloading 시켜 자체 구현을 제공할 수 있다.
Arithmetic Addition Operator 는 두 타겟에 작동하므로 Binary Operator이며, 두 타겟 사이에 위치하므로
Infix Operator다. 아래 예제는 Custom Structure 에서 Overloading 을 통해 Arithmetic Addition
Operator +가 어떻게 구현되는지를 보여준다.
struct Vector2D {
var x = 0.0, y = 0.0
}
extension Vector2D {
static func + (lhs: Vector2D, rhs: Vector2D) -> Vector2D {
Vector2D(x: lhs.x + rhs.x, y: lhs.y + rhs.y)
}
}
Vector2D의 Type Method 로 정의된 연산자 +는 이름이 Arithmetic Addition Operator 와 일치하기 때문에
Overloading 된다. Arithmetic Addition Operator 가 Binary Operator 이며, Infix Operator 이므로
이 연산자 역시 동일한 형태로 작성되었다. 또한 덧셈 연산은 벡터의 필수 동작이 아니므로 Structures 정의 자체에 포함시키지 않고
Extensions 를 이용해 분리시켜 정의했다.
let vector = Vector2D(x: 3.0, y: 1.0)
let anotherVector = Vector2D(x: 2.0, y: 4.0)
let combinedVector = vector + anotherVector
print("Combined Vector is (\(combinedVector.x), \(combinedVector.y)).")
// Combined Vector is (5.0, 5.0).
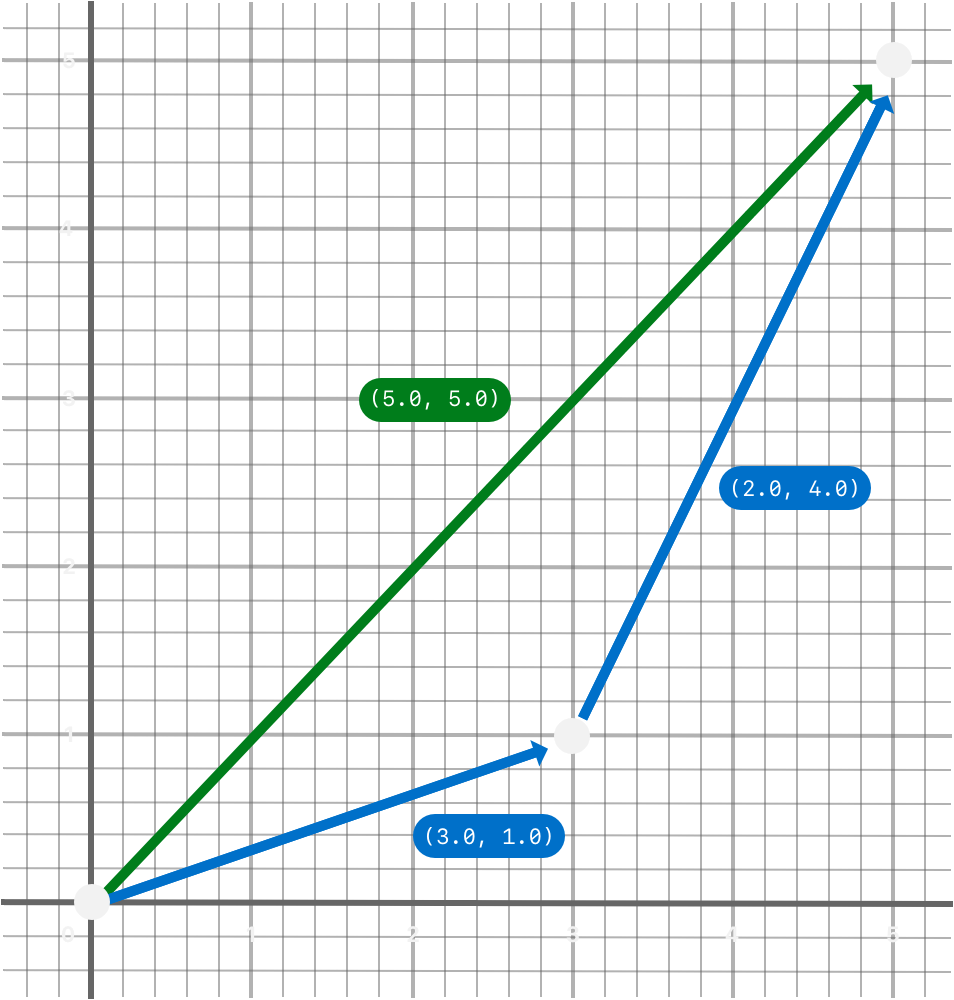
Prefix and Postfix Operators
위 예제는 Binary Infix Operator의 Custom Implementation 을 보여주었다. Classes 와 Structures 는
Standard Unary Operators 와 같은 것들도 구현할 수 있다.
Unary Operators
- Single Target 을 대상으로 작동한다.
- Operator 가 타겟 앞에 위치하는
Prefix Operators, 타겟 뒤에 위치하는Postfix Operators2가지로 나뉜다.Binary Operators
- Two Target 을 대상으로 작동한다.
- Operator 가 두 타겟 사이에 위치한다.
Unary Operators는 func keyword 앞에 prefix 또는 posfix modifier 를 작성해 정의한다. 다음 Operator 는
Unary Minus Operator 로 Prefix Operator 로 정의되었다.
extension Vector2D {
static prefix func - (vector: Vector2D) -> Vector2D {
Vector2D(x: -vector.x, y: -vector.y)
}
}
let positive = Vector2D(x: 3.0, y: 4.0)
let negative = -positive
print("Negative Vector is (\(negative.x), \(negative.y)).")
// Negative Vector is (-3.0, -4.0).
let alsoPosotive = -negative
print("Also Positive Vector is (\(alsoPosotive.x), \(alsoPosotive.y)).")
// Also Positive Vector is (3.0, 4.0).
Compound Assignment Operators
Compound Assignment Operators는 연산자와 Combine Assignment =를 결합해 만든다. 예를 들어 Addition
Assignment Operator +=는 단일 연산으로 덧셈과 할당을 결합한다.
Compound Assignment Operators의 left input parameter 는 Operator Method 로부터 값이 직접 수정되므로inout이 되어야 한다.
다음은 Vector2D 의 Addition Assignment Operator 의 구현이다. 여기서 Arithmetic Addition Operator 는 Operator Methods에서 정의된 것을 사용한다.
extension Vector2D {
static func += (lhs: inout Vector2D, rhs: Vector2D) {
lhs = lhs + rhs
}
}
var original = Vector2D(x: 1.0, y: 2.0)
let vectorToAdd = Vector2D(x: 3.0, y: 4.0)
original += vectorToAdd
print("Original Vector is (\(original.x), \(original.y)) now.")
// Original Vector is (4.0, 6.0) now.
Equivalence Operators
기본적으로 Custom Classes 와 Structures 는 Equivalence Operators ==와 !=를 구현을 갖지 않는다. 따라서
이를 구현할 때는 일반적으로 == 연산자를 구현하고, !=는 Swift Standard Library 의 기본 구현이 ==의 부정임을
이용한다.
위 Vector2D 에 Custom Equal to Operator ==를 구현하는 방법은 두 가지가 있다.
1 ) Infix Operator 를 직접 구현하기
extension Vector2D: Equatable {
static func == (lhs: Vector2D, rhs: Vector2D) -> Bool {
lhs.x == rhs.x && lhs.y == rhs.y
}
}
2 ) Protocol 채택으로 Swift 가 구현을 자동으로 합성하도록 하기
extension Vector2D: Equatable {}
우리는 Swift Protocols 의 Adopting a Protocol Using a Synthesized Implementation 에서 단순히 Protocol 을 채택하는 것 만으로 Protocols 가 제공하는 Default Implementations 를 Swift 가 자동으로 합성해 구현하도록 할 수 있음을 확인했다.
let alpha = Vector2D(x: 2.0, y: 3.0)
let beta = Vector2D(x: 2.0, y: 3.0)
if alpha == beta {
print("These two vectors are equivalent.")
}
These two vectors are equivalent.
Impossible Operators to Overload
Classes 와 Structures 를 구현할 때 모든 Operators 가 Overloading 가능한 것은 아니다. Default Assignment
Operator = 또는 Ternary Conditional Operator a ? b : c와 같이 Overloading 이 허용되지 않는
연산자가 존재한다. Overloading 이 불가능한 모든 연산자 목록은 다음 섹션의
Custom Operators 로 사용할 수 없는 연산자 에서 확인할 수 있다.
Custom Operators
Custom Operators
Swift 가 제공하는 Standard Operators 외에 Custom Operators 를 선언하고 구현할 수 있다. Custom Operators
는 operator keyword 를 사용하며 prefix, infix, postfix modifiers 를 가지며 Global Level로 정의된다.
다음 예제는 +++라는 새로운 Prefix Operator 를 정의한다.
prefix operator +++
이 +++ 연산자는 Swift 에 존재하는 Operators 가 아니므로 Protocols 를 채택하도록 해 구현을 합성하도록 할 수 없다. 이
새 Operators 를 사용해 정의하려는 작업을 사용자가 직접 구현해야하며, 그 구현은 사용자가 정의한 특정 context 내에 의미가
부여된다.
prefix operator +++
extension Vector2D {
static prefix func +++ (vector: inout Vector2D) -> Vector2D {
vector += vector
return vector
}
}
이제 Vector2D 는 기존재 존재하지 않는 사용자 정의 연산자 +++를 사용해 값을 2배로 만드는 연산을 수행할 수 있다.
var toBeDoubled = Vector2D(x: 1.0, y: 4.0)
let afterDoubling = +++toBeDoubled
print("After Doubling Vector is (\(afterDoubling.x), \(afterDoubling.y)).")
// After Doubling Vector is (2.0, 8.0).
1 ) Custom Operators 로 사용할 수 있는 연산자
- ASCII 문자
/,=,-,+,!,*,%,<,>,&,|,^,? - 다음 문법과 일치하는 연산자
Grammar of operators
operator → operator-head operator-characters?
operator → dot-operator-head dot-operator-characters
operator-head → / | = | - | + | ! | * | % | < | > | & | | | ^ | ~ | ?
operator-head → U+00A1–U+00A7
operator-head → U+00A9 or U+00AB
operator-head → U+00AC or U+00AE
operator-head → U+00B0–U+00B1
operator-head → U+00B6, U+00BB, U+00BF, U+00D7, or U+00F7
operator-head → U+2016–U+2017
operator-head → U+2020–U+2027
operator-head → U+2030–U+203E
operator-head → U+2041–U+2053
operator-head → U+2055–U+205E
operator-head → U+2190–U+23FF
operator-head → U+2500–U+2775
operator-head → U+2794–U+2BFF
operator-head → U+2E00–U+2E7F
operator-head → U+3001–U+3003
operator-head → U+3008–U+3020
operator-head → U+3030
operator-character → operator-head
operator-character → U+0300–U+036F
operator-character → U+1DC0–U+1DFF
operator-character → U+20D0–U+20FF
operator-character → U+FE00–U+FE0F
operator-character → U+FE20–U+FE2F
operator-character → U+E0100–U+E01EF
operator-characters → operator-character operator-characters?
dot-operator-head → .
dot-operator-character → . | operator-character
dot-operator-characters → dot-operator-character dot-operator-characters?
infix-operator → operator
prefix-operator → operator
postfix-operator → operator
2 ) Custom Operators 로 사용할 수 없는 연산자
다음 연산자들은 예약되어있으며, Overloading 하거나 Custom Operators 로 사용할 수 없다.
- Tokens 로 사용할 수 없는 연산자:
=,->,//,/*,*/,. - Prefix Operators 로 사용할 수 없는 연산자:
<,&,? - Infix Operators 로 사용할 수 없는 연산자:
? - Postfix Operators 로 사용할 수 없는 연산자:
>,!,?
Precedence for Custom Infix Operators
모든 Custom Infix Operators는 기본 Infix Operators 와 마찬가지로 특정 우선순위 그룹에 속하게 된다. 선언할 때
우선순위 그룹을 명시할 수 있으며, 명시되지 않은 연산자는 Default Precedence Group 에 속하게 되는데 이것은 Ternary
Conditional Operator 의 바로 위에 위치하게된다.
다음 예제는 New Custom Infix Operator +-를 선언 및 정의한다. 이 연산자는 산술연산을 하므로 Addition
Precednece 그룹에 속하도록 선언되었다.
infix operator +-: AdditionPrecedence
extension Vector2D {
static func +- (lhs: Vector2D, rhs: Vector2D) -> Vector2D {
Vector2D(x: lhs.x + rhs.x, y: lhs.y - rhs.y)
}
}
let firstVector = Vector2D(x: 1.0, y: 2.0)
let secondVector = Vector2D(x: 3.0, y: 4.0)
let plusMinusVector = firstVector +- secondVector
print("Plus Minus Vector is (\(plusMinusVector.x), \(plusMinusVector.y)).")
// Plus Minus Vector is (4.0, -2.0).
Prefix Operators또는Postfix Operators를 정의할 때는 우선순위를 지정하지 않는다. 만약 피연산자(operand)에 둘을 모두 적용할 경우Postfix Operators가 더 높은 우선순위를 가져 먼저 적용된다.
Result Builders
The Problem That Result Builders Solve
결과 빌더 (result builder) 는 리스트 (list) 나 트리 (tree) 와 같은 중첩된 데이터를 자연스럽고 선언적인 방식으로 생성하기 위한 구문을 추가하는 타입입니다. 결과 빌더를 사용하는 코드는 조건적이거나 반복되는 데이터의 조각을 처리하기 위해 if 와 for 와 같은 Swift 구문을 포함할 수 있습니다. 아래 코드는 별과 텍스트를 사용하여 한줄로 그리기 위해 몇가지 타입을 정의합니다.
Result Builder는 하나의 Type 으로, List 나 Tree 와 같은 Nested Data
를 자연스럽고 선언적으로 생성하기 위한 Syntax 를 정의한다.
다음 에제는 한 줄에 별과 문자를 그리기 위해 몇 가지 Types 를 정의한다.
protocol Drawable {
func draw() -> String
}
struct Line: Drawable {
var elements: [Drawable]
func draw() -> String {
elements.map { $0.draw() }.joined(separator: "")
}
}
struct Text: Drawable {
var content: String
init(_ content: String) {
self.content = content
}
func draw() -> String {
content
}
}
struct Space: Drawable {
func draw() -> String {
" "
}
}
struct Stars: Drawable {
var length: Int
func draw() -> String {
String(repeating: "*", count: length)
}
}
struct AllCaps: Drawable {
var content: Drawable
func draw() -> String {
content.draw().uppercased()
}
}
Drawableprotocol 은draw()메서드를 구현하도록 강제함으로써 선이나 모양과 같은 그릴 수 있는 항목에 대한 요구사항을 정의한다.Linestructure 는 다른 Drawable 을 자신의 property 에 배열로 저장함으로써 대부분의 그리는 것에 대해 최상위 컨테이너의 역할을 한다. Line structure 는 줄을 그리기 위해draw()를 호출하고 이 메서드는 컨테이너 내 다른 Drawable 이 자신의draw()를 호출해 그림을 그리도록 한 뒤joined(separator:)메서드를 이용해 문자열 결과를 단일 String 으로 만든다.Textstructure 는 문자열을 하나의 그리기로 wrapping 시키고,Spacestructure 는 하나의 공백을 그리고,Starsstructure 는 주어진 개수 만큼 별을 그린다.AllCapsstructure 는 다른 Drawable 을 대문자로 변경하는 역할을 한다.
이 Structures 를 사용해 다음과 같이 One Line String 을 그릴 수 있다.
let name: String? = "Hogwarts"
let manualDrawing = Line(elements: [
Stars(length: 3),
Text("Hello"),
Space(),
AllCaps(content: Text("\(name ?? "World")!")),
Stars(length: 2)
])
print(manualDrawing.draw()) // ***Hello HOGWARTS!**
코드는 잘 작동하지만 AllCaps 안에 또 다른 괄호를 포함하는 인스턴스 생성 구문이 들어가는 것은 코드를 읽기 어렵게 만든다.
Define Result Builders
Result Builder는 코드를 좀 더 Swift 스럽고 읽기 쉽게 만들어준다. Result Builder 는 타입 선언에 @resultBuilder
Attribute 를 작성해 정의한다. 다음 예제는 Declarative Syntax 를 사용해 drawing 작업을 묘사하는 DrawingBuilder
를 정의한다.
@resultBuilder
struct DrawingBuilder {
static func buildBlock(_ components: Drawable...) -> Drawable {
Line(elements: components)
}
static func buildEither(first: Drawable) -> Drawable {
first
}
static func buildEither(second: Drawable) -> Drawable {
second
}
}
DrawingBuilder structure 는 Result Builder Syntax 의 일부를 구현하는 3개의 메서드를 정의한다.
buildBlock(_:)메서드는 코드 블럭에Line을 그리기 위한 지원을 추가한다.buildEither(first:)메서드와buildEither(second:)메서드는if-else에 대한 지원을 추가한다.
Result Builders in Action
위에서 정의한 DrawingBuilder를 사용하기 위해 함수의 Parameter 에 @DrawingBuilder attribute 를 적용할 수
있으며, 이는 함수에 전달된 Closure 를 Result Builder 가 해당 Closure 에서 생성하는 값으로 변환한다.
func draw(@DrawingBuilder content: () -> Drawable) -> Drawable {
content()
}
func caps(@DrawingBuilder content: () -> Drawable) -> Drawable {
AllCaps(content: content())
}
func makeGreeting(for name: String? = nil) -> Drawable {
draw {
Stars(length: 3)
Text("Hello")
Space()
caps {
Text("\(name ?? "World")!")
}
Stars(length: 2)
}
}
draw(_:)와caps(_:)함수는 둘 다@DrawingBuilderattribute 가 적용된 Single Closure 를 arguemnt 로 받는다. 이것은 일반 함수에서 Parameter Type 이 Closure 일 때의 사용법과 동일하다. 우리는 이것을 이미 Autoclosure Type Parameters 에서 Autoclosure 를 사용하지 않은 일반 함수의 Parameter 가 Closure 일 때 사용해본 적이 있다.
var customersInLine = ["Chris", "Alex", "Ewa", "Barry", "Daniella"]
func serve(customer customerProvider: () -> String) {
print("Now serving \(customerProvider())!")
}
// serve(customer: { customersInLine.remove(at: 0) }) // Now serving Chris!
// with trailing closure
serve {
customersInLine.remove(at: 0)
}
Now serving Chris!
makeGreeting(for:)함수는 name 을 parameter 로 받아 개인화 인사말을 그리는 데 사용한다. 앞에서 Result Builders 는 List 나 Tree 와 같은 Nested Data 를 자연스럽고 선언적으로 생성하기 위한 Syntax 를 정의하는 Type 이라고 했다. 즉, 이것은 Swift 가 언어 레벨에서 지원하는 Monad 라 볼 수 있다. 이것은 pipe 와 reduce 의 특성들을 조금씩 섞어 놓은 것처럼 보이기도 한다. 한가지 확실한 것은 Result Builders 는 결국 Monad 로 데이터를 쉽게 다루기 위한Container역할을 한다는 것이다.
기존의
let manualDrawing = Line(elements: [
Stars(length: 3),
Text("Hello"),
Space(),
AllCaps(content: Text("\(name ?? "World")!")),
Stars(length: 2)
])
와 비교해보면 훨씬 선언적인 문법이 되었다. 잘 작동하는지 확인해보자.
let genericGreeting = makeGreeting()
print(genericGreeting.draw()) // ***Hello WORLD!**
함수를 사용해 선언적으로 변경했기 때문에 가독성이 좋아졌을 뿐 아니라 재사용성도 좋아졌다.
let personGreeting = makeGreeting(for: "Hogwarts")
print(personGreeting.draw()) // ***Hello Hogwarts!**
@DrawingBuilder를 attribute 로 사용한다는 것은 DrawingBuilder 가 정의한 Syntax 를 사용한다는 것이므로
Closure 에 실행시키길 원하는 코드를 모아 하나의 코드 블럭으로 Wrapping 시키고, 이것을 do 명령으로 evalution 하는
것과 같다고 볼 수 있다. 따라서 draw(content:) 함수에 Trailing Closures 를 사용해 여러 코드를 하나의 블럭으로 묶은
것 처럼 caps(content:) 함수 역시 동일하게 여러 코드를 하나의 블럭으로 묶을 수 있다.
let name: String? = "Hogwarts"
let capsDrawing = caps {
let partialDrawing: Drawable
if let name = name {
partialDrawing = DrawingBuilder.buildEither(first: Text("\(name)!"))
} else {
partialDrawing = DrawingBuilder.buildEither(second: Text("World!"))
}
return partialDrawing
}
print(capsDrawing) // AllCaps(content: __lldb_expr_156.Text(content: "Hogwarts!"))
print(capsDrawing.draw()) // HOGWARTS!
여기서 caps(content:)가 실행하고자 하는 코드 블럭을 보자. if-else 구문을 buildEither(first:)와
buildEither(second:) 메서드에 대한 호출로 변환한다. 즉, Monad 의 일종이므로 모든 데이터를 Drawable로 다루게
하는 것이다. 현재 코드에서 buildEither(first:)와 buildEither(second:)가 하는 일이 동일하기 때문에 위에서
Ternary Operator 를 사용해 처리했지만 서로 다른 로직을 추가해 고유의 동작을 하도록 선언할 수 있음을 의미한다.
이번에는 DrawingBuilder 에 buildArray(_:) 메서드를 추가해보자.
extension DrawingBuilder {
static func buildArray(_ components: [Drawable]) -> Drawable {
Line(elements: components)
}
}
이 메서드는 Drawable 데이터를 Collection 으로 만들어 for-loop를 사용 가능하게 만들어준다.
let manyStars = draw {
Text("Stars:")
for length in 1...3 {
Space()
Stars(length: length)
}
}
print(manyStars.draw()) // Stars: * ** ***
현재 Result Builders를 통해 정의할 수 있는 메서드는 buildBlock(_:)과 buildEither(first:),
buildEither(second:)를 포함해 10개가 존재한다.
@resultBuilder
struct ArrayBuilder {
typealias Component = [Int]
typealias Expression = Int
static func buildExpression(_ element: Expression) -> Component {
return [element]
}
static func buildOptional(_ component: Component?) -> Component {
guard let component = component else { return [] }
return component
}
static func buildEither(first component: Component) -> Component {
return component
}
static func buildEither(second component: Component) -> Component {
return component
}
static func buildArray(_ components: [Component]) -> Component {
return Array(components.joined())
}
static func buildBlock(_ components: Component...) -> Component {
return Array(components.joined())
}
// ...
}
Result Builders 문법의 전체 레퍼런스는 Swift Docs Language Reference - Attributes/Result Builder 를 참고한다.