Xcode, AppCode 에 SwiftLint 를 적용하자
코드 작성을 도와주는 친구와 같은 정적분석 도구
SonarLint 는 Swift 를 지원하지 않지만 우리에겐 SwiftLint 가 있다!! 👩💻
SwiftLint GitHub를 방문해보면 Xcode뿐 아니라 AppCode, Atom 그리고 Visual Studio Code를 지원함은 물론이고, 배포 자동화를 돕는 fastlane(fastlane docs)에서도 사용이 가능하다.
1. 설치하기 👩💻
설치 방법은 깃허브에서 직접 pkg를 내려 받아 설치하는 것과, CLI Package manager 를 사용하는 방법이 있다.
지원하는 Package manager 는 다음과 같다.
이 글에서는 Homebrew를 사용해 설치를 진행한다. 그 외 설치 방법은 SwiftLint를 참고한다.
1. Homebrew 로 SwiftLint 설치하기
brew install swiftlint
That’s all!! 정말로 이게 끝이다. 🤣🤣
2. IDE 적용하기 👩💻
1. Xcode
애플이 만든 공식 IDE 인 Xcode부터 알아보자.

⌘ + 1을 눌러 이동한 다음 위 스크린샷의 빨간 블럭을 참고해 이동한다.
1 ) 프로젝트 > TARGETS > Build Phases
2 ) ✚ 버튼을 누르고 New Run Script Phase를 선택한다.
3 ) 그 다음 SwiftLint의 Usage > Xcode 에 있는 스크립트를 추가한다.
export PATH="$PATH:/opt/homebrew/bin"
if which swiftlint > /dev/null; then
  swiftlint
else
  echo "warning: SwiftLint not installed, download from https://github.com/realm/SwiftLint"
fi
만약 Apple Silicon 을 사용하고 있다면 Homebrew 의 경로가 바뀌었기 때문에 Path 를 변경해주거나 Symbolic Link를 걸어줘야한다.
Path 를 변경해주는 방법은 다른 IDE 는 물론 대부분의 상황에서 기존의 Homebrew 경로를 기본으로 하기 때문에 매번 변경해줘야하고, 설정 초기화를 할 경우 다시 등록해줘야하는 문제가 있기 때문에 Link 를 걸어주는 방법으로 진행하는 것이 좋다.
ln -s /opt/homebrew/bin/swiftlint /usr/local/bin/swiftlint
4 ) Compile 전에 검사를 먼저 하고 싶다면 추가한 스크립트를 위로 올려준다. 위 스크린샷에서는 Dependencies 다음에 위치하도록 순서를 2번째로 변경했다.
AppCode 와 마찬가지로 Plugins
2. AppCode
Plugins에서SwintLint플러그인을 설치 후AppCode를 재시작한다.-
설정에서
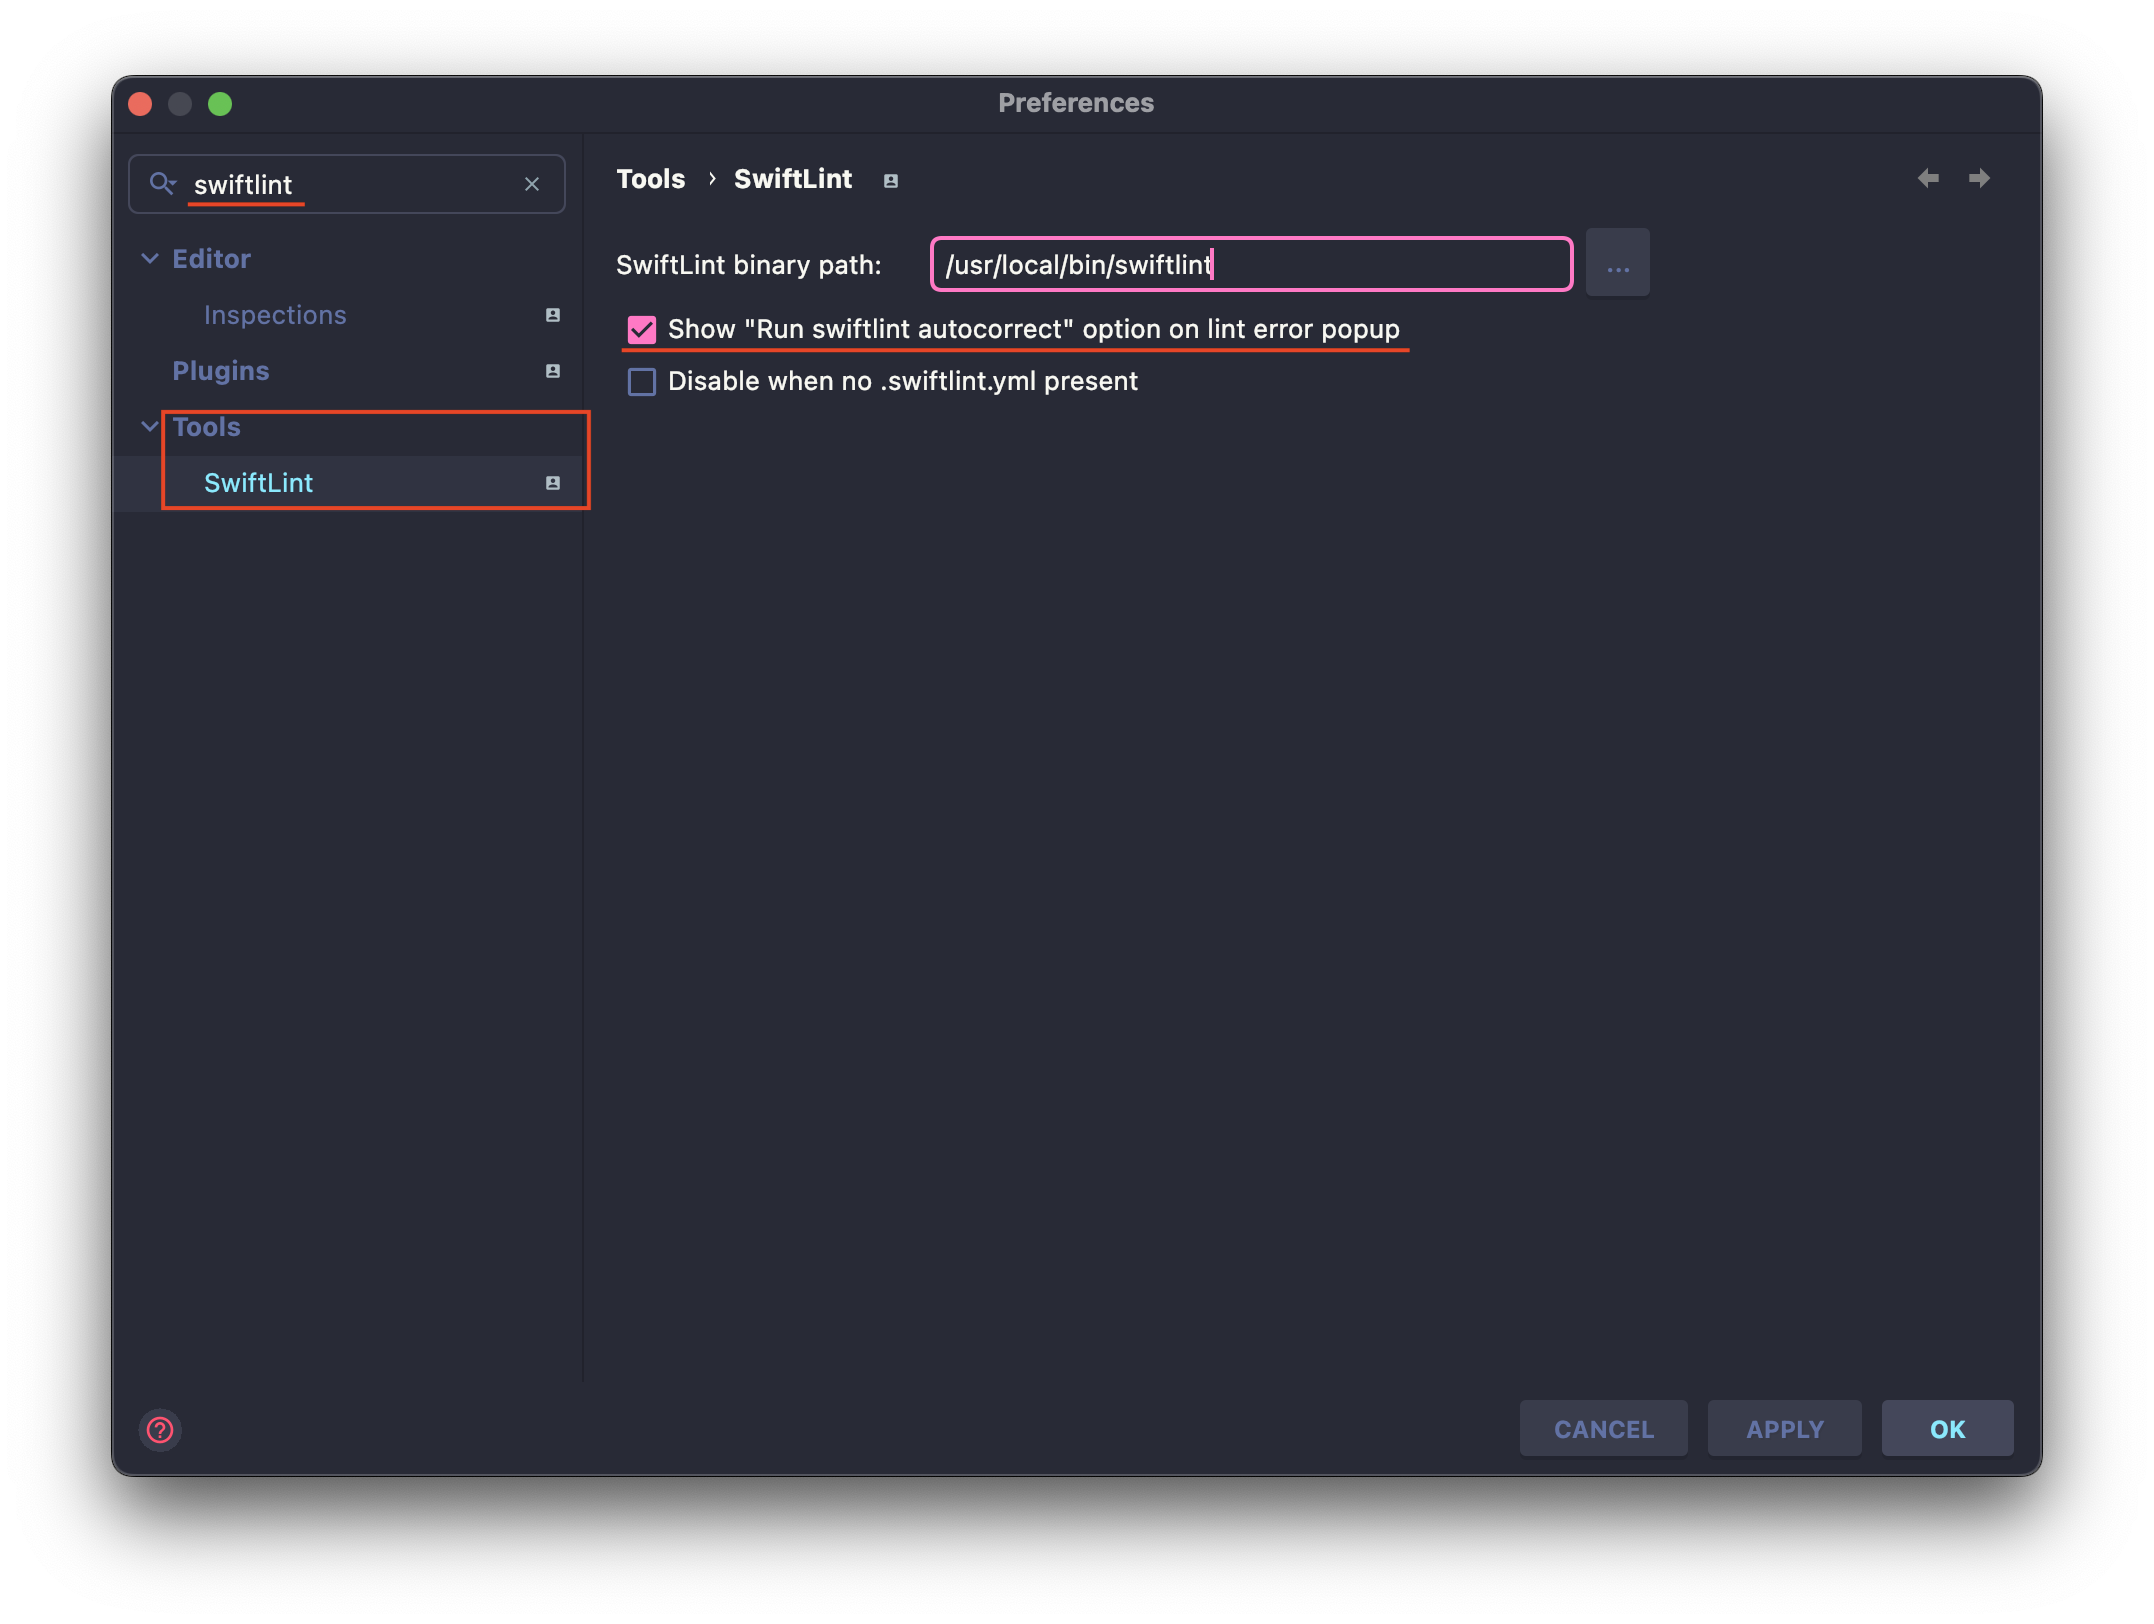
swiftlint를 검색해Tools-SwiftLint에 가서 경로를 확인한다. Apple Silicon 일 경우/opt/homebrew/bin/swiftlint로 경로를 바꿔주거나Symbolic Link를 설정해야한다.Symbolic Link는 Xcode 설정을 참고한다. 그리고Auto-Fix에SwiftLint suggestion을 통합하려면Show "Run swiftlint autocorrect" option on linkt error popup을 체크한다.
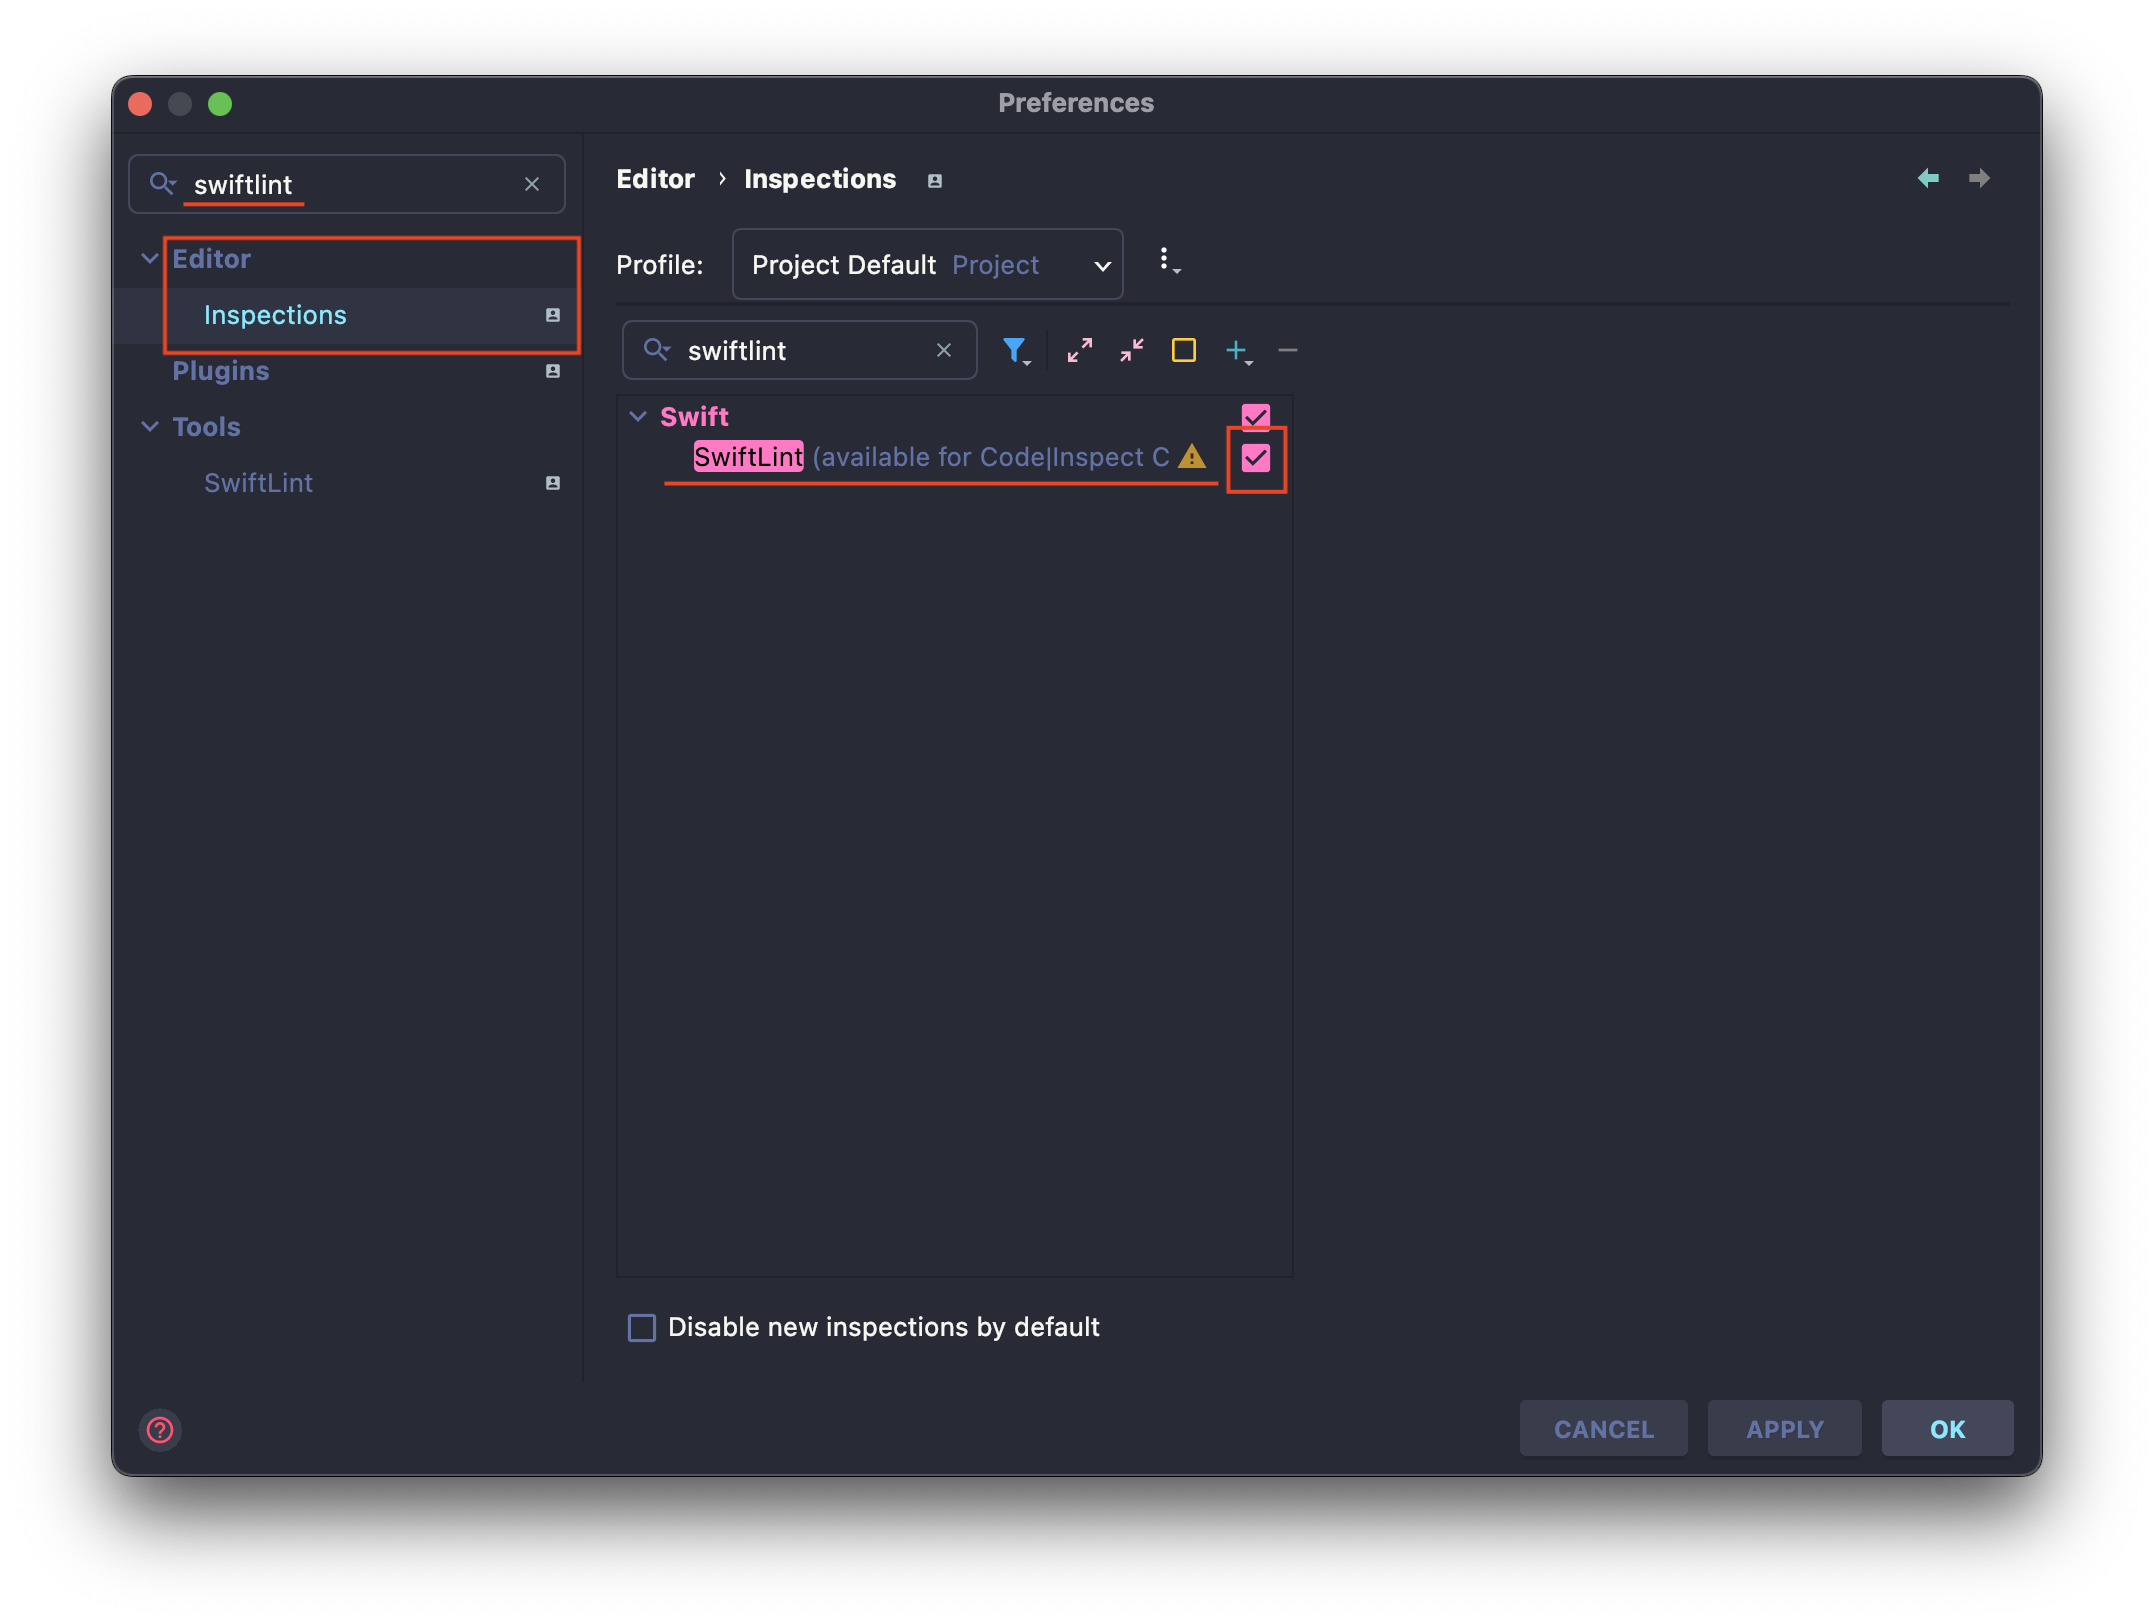
- Editor 에서도 이를 지원하도록 체크한다.
경로는 위 2번 설정에서 이어서 진행하면 된다.
Editor-Inspections에 가서 아래 표시된 부분을 체크해 활성시켜준다.
3. SwiftLint 제안 무시하기
가끔 무시하고 싶은 SwiftLint 규칙이 있을 것이다.
하지만 SwiftLint 규칙을 아예 변경하는 것이 아니라 특정 라인에서만 무시하고 싶다면 아래와 같이 SwiftLint가 제안한 라인 위에 해당 제안을 무시하라고 코멘트를 달아준다.
아래 샘플은 라인의 길이가 너무 기니 줄이라는 제안이고, 해당 라인에서 그 규칙을 무시하겠다는 코멘트다.
// swiftlint:disable: line_length
Question(question: "The total surface area of two human lungs is approximately 70 square metres.", answer: "True"),
3. Lint Rule Customizing 👩💻
1. Create .swiftlint.yml
Lint 규칙을 수정해보자.
프로젝트의 최상단에서 ⌘ + N을 눌러 새 파일을 추가하자.

파일명은
.swiftlint.yml
.을 파일명에 사용할거냐 하는데 무시하고 생성.
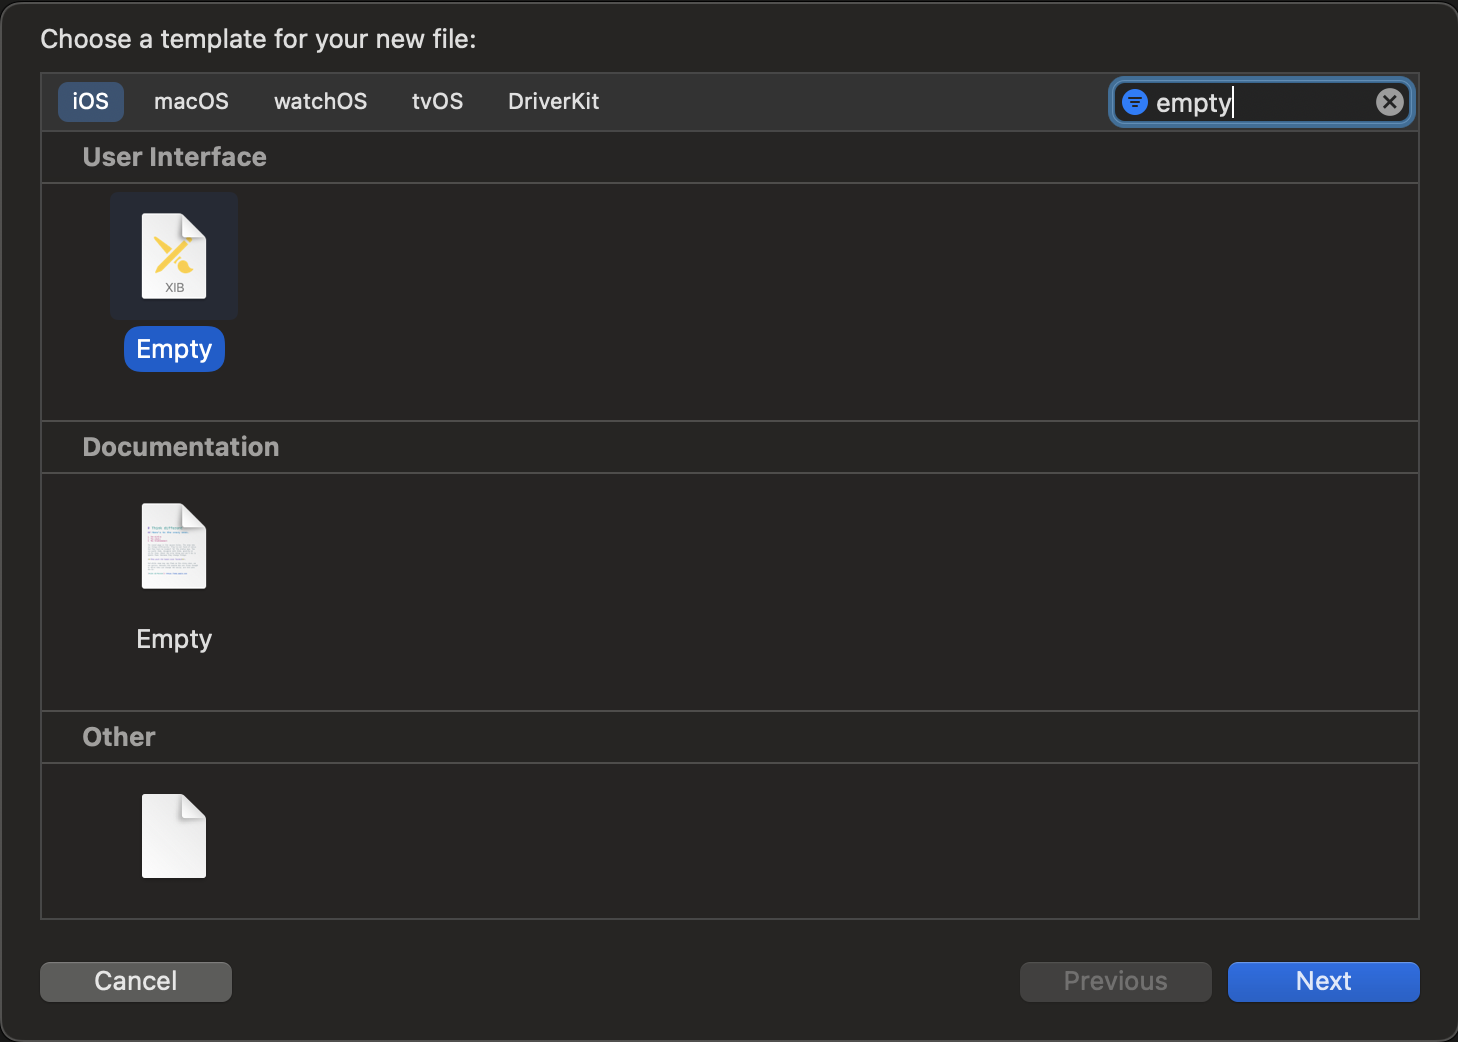
처음에 왜 그런지 .yml 쓴다고 해도 자꾸 .xib로 인식해서 아래와 같은 xml이 들어가 있는데 전부 삭제한다.
<?xml version="1.0" encoding="UTF-8" standalone="no"?>
<document type="com.apple.InterfaceBuilder3.CocoaTouch.XIB" version="3.0" toolsVersion="13142" targetRuntime="iOS.CocoaTouch" propertyAccessControl="none" useAutolayout="YES" useTraitCollections="YES" useSafeAreas="YES" colorMatched="YES">
    <dependencies>
        <plugIn identifier="com.apple.InterfaceBuilder.IBCocoaTouchPlugin" version="12042"/>
    </dependencies>
    <objects>
        <placeholder placeholderIdentifier="IBFilesOwner" id="-1" userLabel="File's Owner"/>
        <placeholder placeholderIdentifier="IBFirstResponder" id="-2" customClass="UIResponder"/>
    </objects>
</document>
2. Configuration Default Rules
disabled_rules: 기본 활성 rule 을 비활성화.opt_in_rules: 기본 활성 상태가 아닌 rule 을 활성화.only_rules: 활성화 할 규칙을 직접 선택(disabled_rules,opt_in_rules와 함께 사용 불가).analyzer_rules:analyze명령에서만 사용할 rule 로disabled_rules,opt_in_rules와 동일할 필요가 없다.
i.e.
# By default, SwiftLint uses a set of sensible default rules you can adjust:
disabled_rules: # rule identifiers turned on by default to exclude from running
  - colon
  - comma
  - control_statement
opt_in_rules: # some rules are turned off by default, so you need to opt-in
  - empty_count # Find all the available rules by running: `swiftlint rules`

# Alternatively, specify all rules explicitly by uncommenting this option:
# only_rules: # delete `disabled_rules` & `opt_in_rules` if using this
#   - empty_parameters
#   - vertical_whitespace

analyzer_rules: # Rules run by `swiftlint analyze`
  - explicit_self

included: # paths to include during linting. `--path` is ignored if present.
  - Source
excluded: # paths to ignore during linting. Takes precedence over `included`.
  - Carthage
  - Pods
  - Source/ExcludedFolder
  - Source/ExcludedFile.swift
  - Source/*/ExcludedFile.swift # Exclude files with a wildcard

# If true, SwiftLint will not fail if no lintable files are found.
allow_zero_lintable_files: false

# configurable rules can be customized from this configuration file
# binary rules can set their severity level
force_cast: warning # implicitly
force_try:
  severity: warning # explicitly
# rules that have both warning and error levels, can set just the warning level
# implicitly
line_length: 110
# they can set both implicitly with an array
type_body_length:
  - 300 # warning
  - 400 # error
# or they can set both explicitly
file_length:
  warning: 500
  error: 1200
# naming rules can set warnings/errors for min_length and max_length
# additionally they can set excluded names
type_name:
  min_length: 4 # only warning
  max_length: # warning and error
    warning: 40
    error: 50
  excluded: iPhone # excluded via string
  allowed_symbols: ["_"] # these are allowed in type names
identifier_name:
  min_length: # only min_length
    error: 4 # only error
  excluded: # excluded via string array
    - id
    - URL
    - GlobalAPIKey
reporter: "xcode" # reporter type (xcode, json, csv, checkstyle, codeclimate, junit, html, emoji, sonarqube, markdown, github-actions-logging)
3. Append User Custom Rules
Rule Directory 를 참고해 다음과 같이 생성한다.
i.e.
custom_rules:
  pirates_beat_ninjas: # rule identifier
    included:
      - ".*\\.swift" # regex that defines paths to include during linting. optional.
    excluded:
      - ".*Test\\.swift" # regex that defines paths to exclude during linting. optional
    name: "Pirates Beat Ninjas" # rule name. optional.
    regex: "([nN]inja)" # matching pattern
    capture_group: 0 # number of regex capture group to highlight the rule violation at. optional.
    match_kinds: # SyntaxKinds to match. optional.
      - comment
      - identifier
    message: "Pirates are better than ninjas." # violation message. optional.
    severity: error # violation severity. optional.
  no_hiding_in_strings:
    regex: "([nN]inja)"
    match_kinds: string
그리고 다음은 다른 블로그에서 찾은 일반적으로 많이 사용되는 규칙이라고 한다.
보통 excluded 에는 다음과 같은 것을 포함한다.
excluded: # 린트 과정에서 무시할 파일 경로. `included`보다 우선순위 높음
  - Pods
  - SignUp/AppDelegate.swift
  - SignUp/SceneDelegate.swift
SignUp 이야 각자 프로젝트에 맞게 설정하면 될거고, 일반적으로 많이 사용한다는 rule config 를 올린다.
# Git URL : https://github.com/realm/SwiftLint
# Reference : https://realm.github.io/SwiftLint/index.html
excluded:
  - Pods
analyzer_rules:
  - unused_declaration
  - unused_import
opt_in_rules:
  - anyobject_protocol
  - array_init
  - attributes
  - closure_end_indentation
  - closure_spacing
  - collection_alignment
  - contains_over_first_not_nil
  - empty_string
  - empty_xctest_method
  - explicit_init
  - extension_access_modifier
  - fallthrough
  - fatal_error_message
  - file_header
  - first_where
  - identical_operands
  - joined_default_parameter
  - let_var_whitespace
  - last_where
  - literal_expression_end_indentation
  - lower_acl_than_parent
  - nimble_operator
  - operator_usage_whitespace
  - overridden_super_call
  - override_in_extension
  - pattern_matching_keywords
  - private_action
  - private_outlet
  - prohibited_interface_builder
  - prohibited_super_call
  - quick_discouraged_call
  - quick_discouraged_focused_test
  - quick_discouraged_pending_test
  - redundant_nil_coalescing
  - single_test_class
  - sorted_first_last
  - static_operator
  - unavailable_function
  - unneeded_parentheses_in_closure_argument
  - untyped_error_in_catch
  - vertical_parameter_alignment_on_call
  - xct_specific_matcher
  - yoda_condition
disabled_rules:
# 추가한 rules
  - todo
  - orphaned_doc_comment
  - empty_xctest_method
  - redundant_type_annotation
  - number_separator
  - empty_count
#---------------------------
  - object_literal
  - file_name
  - trailing_whitespace
  - sorted_imports
  - file_header
  - vertical_whitespace_opening_braces
  - vertical_whitespace_closing_braces

# Customized Configurable Rules
line_length: 140
force_cast: error
nesting:
  type_level:
    warning: 3
  statement_level:
    warning: 5
identifier_name:
  excluded:
    - id
# number_separator:
#   minimum_length: 5
# file_name:
#   excluded:
#     - main.swift
#     - LinuxMain.swift
#     - TestHelpers.swift
#     - shim.swift
#     - AutomaticRuleTests.generated.swift

# Defining Custom Rules
custom_rules:
  rule_id:
    included: Source/SwiftLintFramework/Rules/.+/\w+\.swift
    name: Rule ID
    message: Rule IDs must be all lowercase, snake case and not end with `rule`
    regex: identifier:\s*("\w+_rule"|"\S*[^a-z_]\S*")
    severity: error
  rule_test_function:
    included: Tests/SwiftLintFrameworkTests/RulesTests.swift
    name: Rule Test Function
    message: Rule Test Function mustn't end with `rule`
    regex: func\s*test\w+(r|R)ule\(\)
    severity: error
근데 개인적으로 고해상도 모니터 쓴다면 line_length: 140 이 부분은 180 ~ 200 정도로 늘리는 게 더 난 것 같다.
Reference
- “realm/SwiftLint.” GitHub. Jun. 30, 2022, https://github.com/realm/SwiftLint.
- “baelex/SwiftLintAppCode.” GitHub. Jun. 6, 2022, https://github.com/bealex/SwiftLintAppCode.
- “Rule Directory”, SwiftLintFramework Reference, accessed Jul. 1, 2022, https://realm.github.io/SwiftLint/rule-directory.html.
- jake-kim. “SwiftLint 적용 방법.” 김종권의 iOS 앱 개발 알아가기. last modified Aug. 8, 2021, SwiftLint 적용 방법.